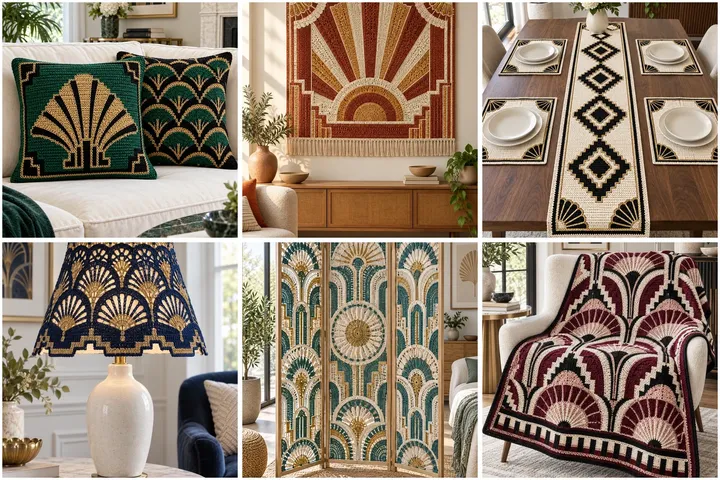
These thirteen original Hunerli Parmaklar projects translate Art Deco fans, sunbursts, arches and stepped geometry into practical crochet décor. Instructions use US terms. Make a washed gauge swatch before fitted covers, work color changes neatly and block every geometric panel to a measured paper template. For lampshades use a cool low-heat LED bulb only, maintain open ventilation and keep yarn away from the bulb and socket. Secure heavy wall pieces with appropriate hardware, keep curtain ties and hanging cords short, and place small pieces out of reach of babies, children and pets.
Emerald and Gold Fan Pillows
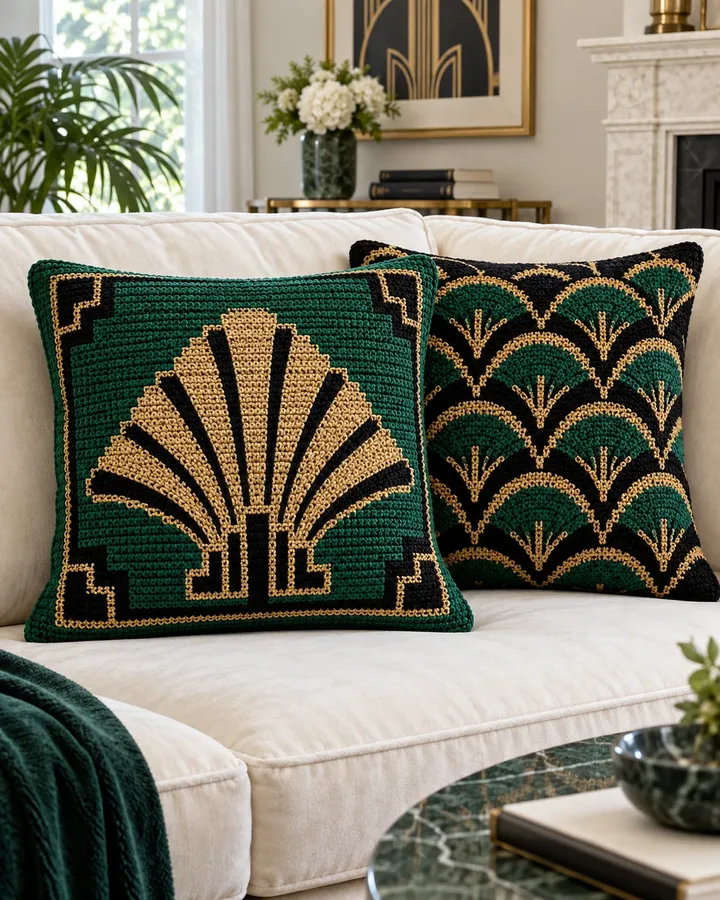
Emerald, black and antique-gold fans create two coordinated cushion covers with a glamorous boutique finish.
- LEVEL
- Intermediate
- TRY IT WITH
- Worsted cotton blend in emerald 650 yd, black 300 yd and gold 180 yd; 4 mm hook; two 18 in inserts
- FINISHING NOTE
- Two removable 18 × 18 in covers.
Short Pattern
Abbreviations: ch chain · sc single crochet · hdc half double crochet · dc double crochet · surface sl st surface slip stitch
- Crochet one 18 in emerald front panel, charting the central gold fan from the bottom upward with black stepped corners.
- Make the second front in black and repeat smaller emerald fans across staggered rows, adding gold surface outlines after blocking.
- Crochet plain backs as two overlapping rectangles per pillow so the inserts can be removed without buttons or zippers.
- Block both fronts square, join front and back around all edges with a firm sc seam and add one narrow contrast border.
- Insert washable cushion forms, smooth the corners and tack any long surface-stitch spans invisibly from the reverse.
Assembly: Keep decorative surface lines flat and yarn-only so the pillows remain comfortable and washable.
Terracotta Sunburst Wall Panel
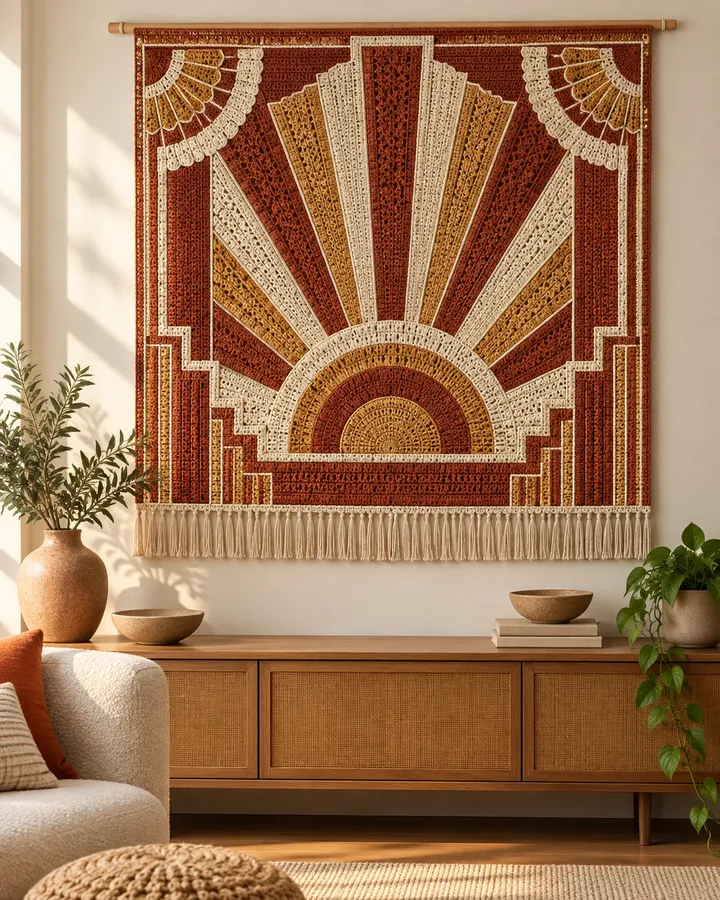
Terracotta, rust, cream and muted gold radiate from a large rising sun framed by stepped borders.
- LEVEL
- Advanced
- TRY IT WITH
- DK cotton in terracotta 750 yd, rust 320 yd, cream 380 yd and gold 190 yd; 3.5 mm hook; smooth wood dowel
- FINISHING NOTE
- About 32 × 38 in excluding fringe.
Short Pattern
Abbreviations: ch chain · sc single crochet · hdc half double crochet · dc double crochet · tapestry crochet colorwork
- Draw the complete rectangle and central sun on graph paper, placing every ray and stepped corner on whole stitch units.
- Work the panel from the lower border upward in tapestry sc, using separate bobbins for wide color sections to reduce carried bulk.
- Add cream-and-gold surface lines along selected rays and crochet matching fan corner appliqués for the upper border.
- Wet-block the panel square, measuring both diagonals, then add a dense top sleeve sized to the smooth dowel.
- Finish with one short even fringe row, steam it straight and mount the dowel with wall hardware rated for the full weight.
Assembly: Keep the hanging cord short and high, and mount the panel away from heaters, fireplaces and open flame.
Black and Cream Geometric Table Set
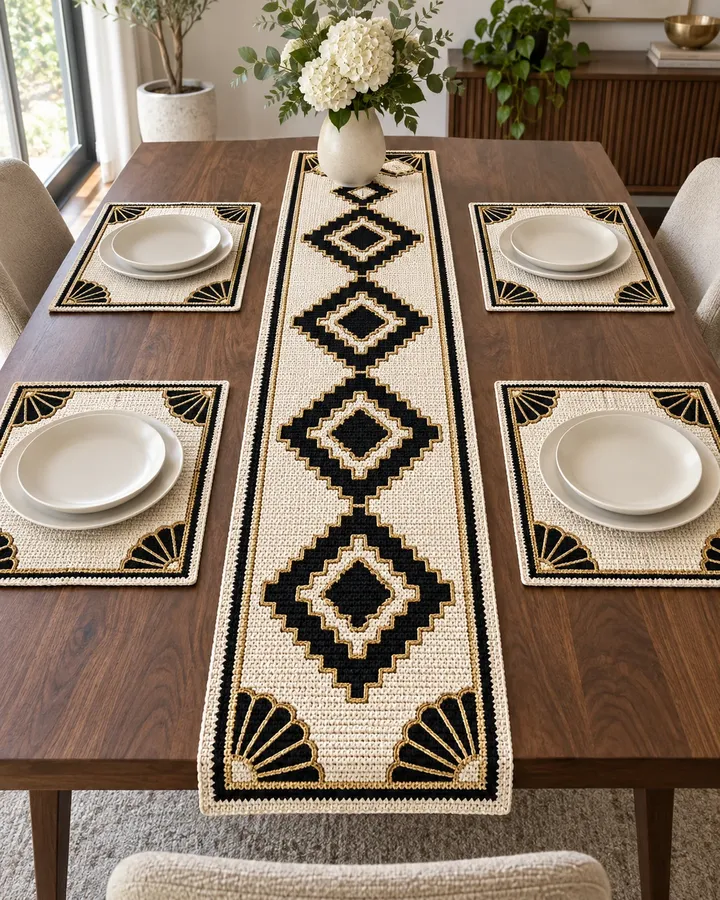
A long ivory runner and four matching placemats combine black stepped diamonds with fine gold outlines.
- LEVEL
- Intermediate
- TRY IT WITH
- Mercerized DK cotton in ivory 900 yd, black 520 yd and gold 160 yd; 3.5 mm hook
- FINISHING NOTE
- Runner about 16 × 60 in; mats about 13 × 18 in.
Short Pattern
Abbreviations: ch chain · sc single crochet · tapestry crochet colorwork · surface sl st surface slip stitch
- Chart one stepped black diamond repeat and crochet a full placemat as the gauge sample, adding fan motifs at all four corners.
- Adjust hook size until the fabric lies flat, then make three more identical mats with the same row and stitch counts.
- Crochet the runner lengthwise in ivory, centering repeated diamonds and leaving matching blank margins at both ends.
- Add gold surface outlines only after all pieces are washed and blocked, working from the same side throughout.
- Finish every edge with black sc and a final ivory slip-stitch round, then block the complete set to rectangular templates.
Assembly: Use heat-safe trivets beneath hot dishes; decorative crochet mats do not protect a table from cookware heat.
Navy and Gold Deco Lampshade
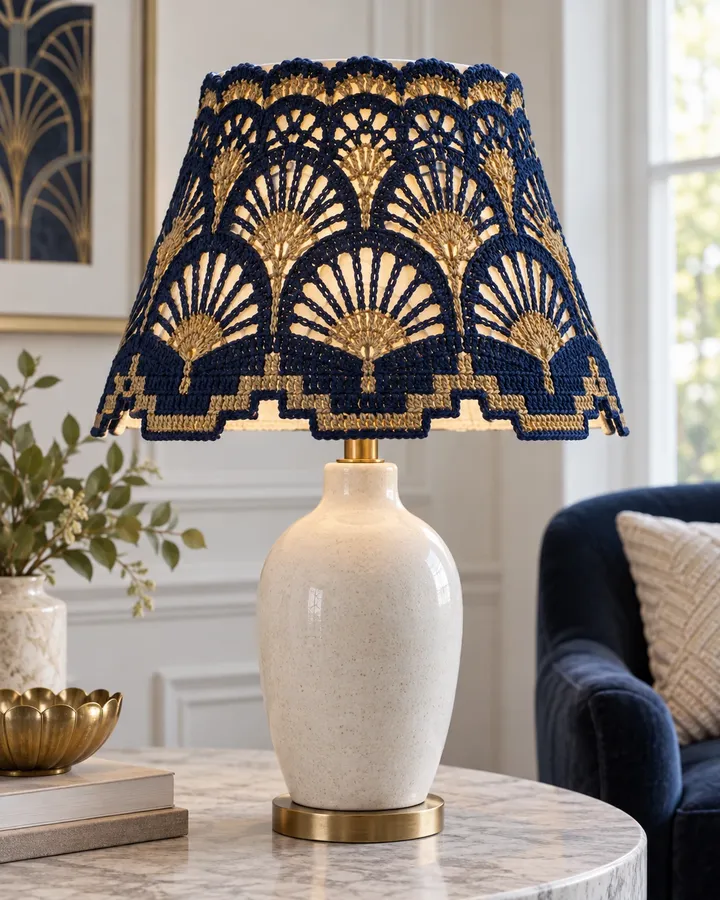
Open navy fan lace and antique-gold rays create a removable shade cover with generous ventilation.
- LEVEL
- Advanced
- TRY IT WITH
- Mercerized sport cotton in navy 320 yd and antique gold 100 yd; 3 mm hook; existing cool-LED lampshade frame
- FINISHING NOTE
- Custom fit to a straight-sided shade.
Short Pattern
Abbreviations: ch chain · sc single crochet · dc double crochet · tr treble crochet · picot ch 3, sl st
- Measure the shade circumference at top and bottom plus its vertical height, then make and wash one fan-lace repeat.
- Calculate a whole number of repeats and crochet the navy cover flat, shaping only if the frame is tapered.
- Add gold surface rays and a stepped lower border, keeping the upper and lower ventilation openings completely unobstructed.
- Join the short edges, fit the cover over the existing nonflammable shade and secure it only to the outer shade frame.
- Install a cool low-heat LED bulb, run the lamp for 30 minutes under supervision and confirm all yarn remains cool.
Assembly: Never let yarn touch the bulb or socket; do not use incandescent, halogen, high-heat bulbs, candles or damaged electrical fittings.
Jewel-Tone Geometric Pouf
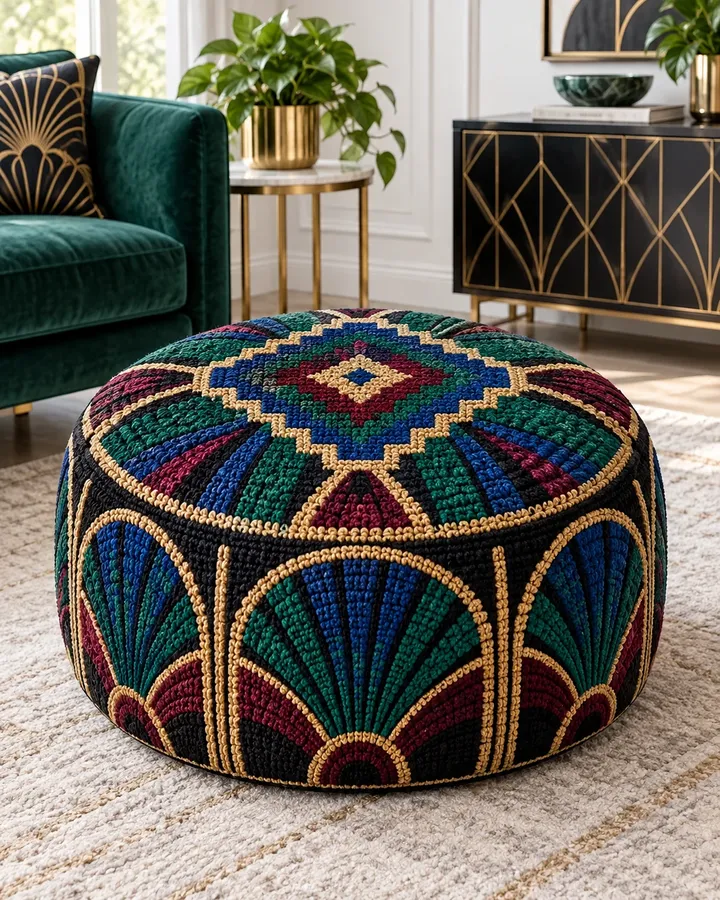
Emerald, sapphire, burgundy and gold form a firm round pouf with a stepped-diamond top and fan sides.
- LEVEL
- Advanced
- TRY IT WITH
- Super-bulky washable yarn in jewel tones, 1,800 yd total; 7 mm hook; washable inner pouf or firm textile filling
- FINISHING NOTE
- About 24 in diameter × 14 in high.
Short Pattern
Abbreviations: MR magic ring · sc single crochet · inc increase · BLO back loop only · tapestry crochet colorwork
- Crochet the circular top from the center outward, placing even increases while building the stepped jewel-tone diamond chart.
- Start the side in BLO, remove all increases and work vertical fan panels to the required height.
- Make a plain reinforced base with a wide overlapping opening so the inner pouf can be removed for washing.
- Block the empty cover, insert a firm commercial inner pouf or a fully enclosed washable textile insert and smooth the sides.
- Close the overlap, check that the base sits flat and add hidden stitches at high-stress joins if the pouf is used as a footrest.
Assembly: Use as a footrest or floor cushion only unless the filling and construction are specifically rated to support seated weight.
Teal and Gold Room Divider
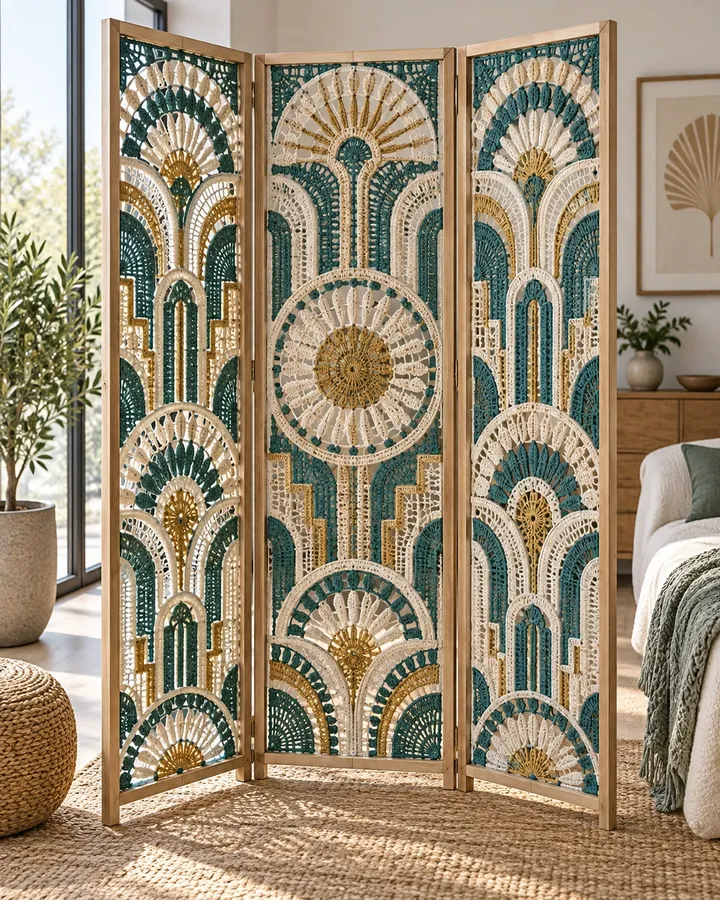
Three airy panels of teal fans, cream arches and gold medallions create a dramatic textile screen.
- LEVEL
- Advanced
- TRY IT WITH
- DK cotton in teal 1,100 yd, cream 700 yd and gold 300 yd; 3.5 mm hook; three stable wood frames
- FINISHING NOTE
- Each panel about 20 × 66 in.
Short Pattern
Abbreviations: ch chain · sc single crochet · dc double crochet · tr treble crochet · picot ch 3, sl st
- Measure the inside of each finished frame and draft one full-size paper rectangle with marked fan and medallion positions.
- Crochet the center panel first from joined lace motifs, then adjust the outer mesh rounds until it fits the template without strain.
- Make two mirrored side panels, repeating the arches and using cream and gold at identical row positions.
- Wet-block each panel to exact dimensions and lace it to the inner frame through evenly spaced yarn loops.
- Connect the frames with stable hardware appropriate to the wood and add discreet feet or anti-tip support for the intended floor.
Assembly: Anchor the divider if children or pets could pull it; crochet panels are decorative and do not make an unstable frame safe.
Burgundy and Cream Deco Throw
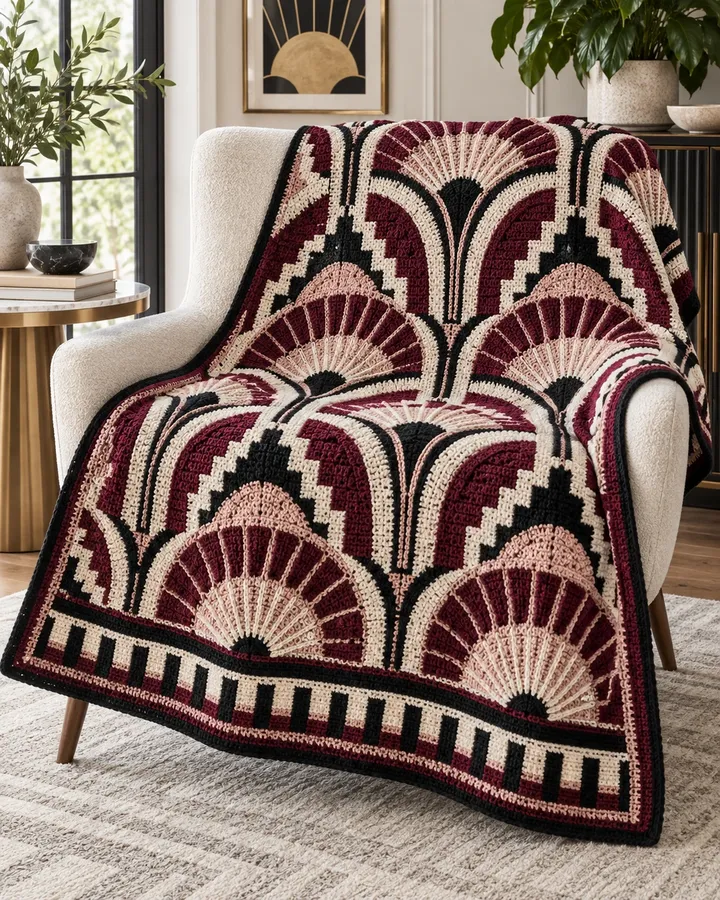
Large burgundy arches, blush fans and black stepped borders turn a warm blanket into a graphic statement.
- LEVEL
- Intermediate
- TRY IT WITH
- Worsted washable yarn in burgundy 1,300 yd, cream 1,000 yd, blush 550 yd and black 350 yd; 5 mm hook
- FINISHING NOTE
- About 52 × 66 in.
Short Pattern
Abbreviations: ch chain · sc single crochet · hdc half double crochet · dc double crochet · tapestry crochet colorwork
- Crochet one complete arch repeat as a washed gauge swatch and calculate the nearest whole-repeat blanket width.
- Work the throw from the lower edge in tapestry colorwork, using yarn bobbins so the reverse remains tidy and lightweight.
- Repeat the fan-and-arch sequence to the planned length, checking the side stitch count after every color section.
- Add black stepped borders to the short ends and narrow cream edging along both long sides.
- Wet-block in sections on a large mat, aligning repeats and allowing the blanket to dry completely before folding.
Assembly: Weave color tails in several directions and avoid long floats that could catch fingers, jewelry or pet claws.
Black and Gold Storage Baskets
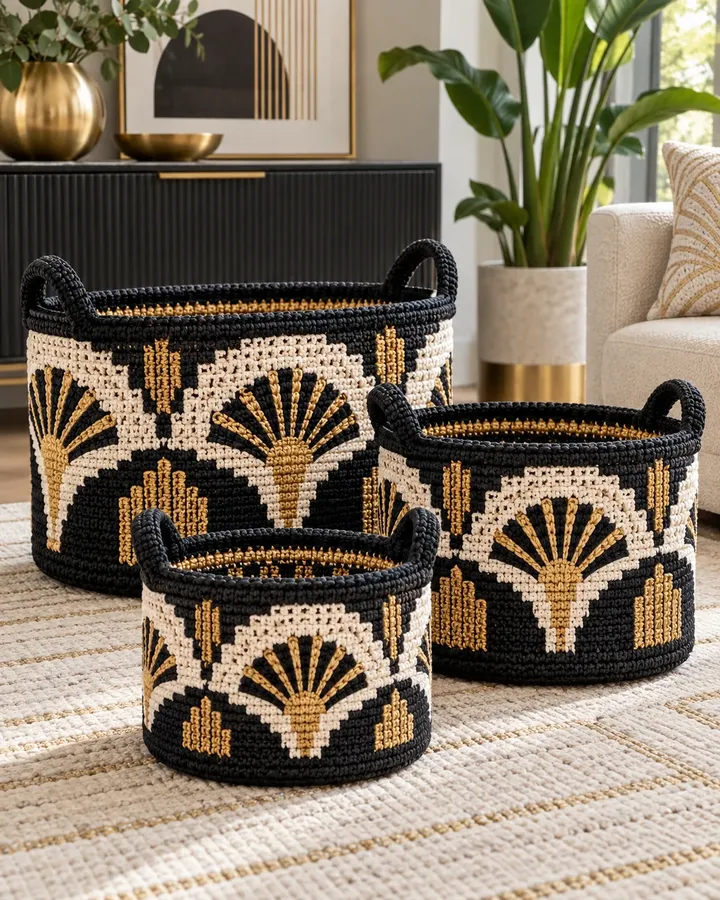
Three structured nesting baskets use black-and-cream bodies and gold fan motifs for practical shelf storage.
- LEVEL
- Intermediate
- TRY IT WITH
- Bulky cotton cord in black 600 yd, cream 350 yd and gold 180 yd; 6 mm hook
- FINISHING NOTE
- Small 8 in, medium 11 in and large 14 in wide.
Short Pattern
Abbreviations: ch chain · sc single crochet · inc increase · BLO back loop only · tapestry crochet colorwork
- Crochet three oval bases with firm even increases, using a smaller hook if the fabric bends easily.
- Turn upward in BLO and work straight black or cream walls, checking the opening remains the same size as the base.
- Chart fan motifs across the fronts, carrying gold only through the motif area and cutting it cleanly between sections.
- Add a doubled upper rim and form yarn-only handles from several rows of reinforced sc integrated into the wall.
- Steam lightly, shape over boxes while damp and nest only after every basket is fully dry.
Assembly: Use for light textiles and craft supplies, not children, pets, heavy objects or anything hot.
Mint and Blush Vase Covers
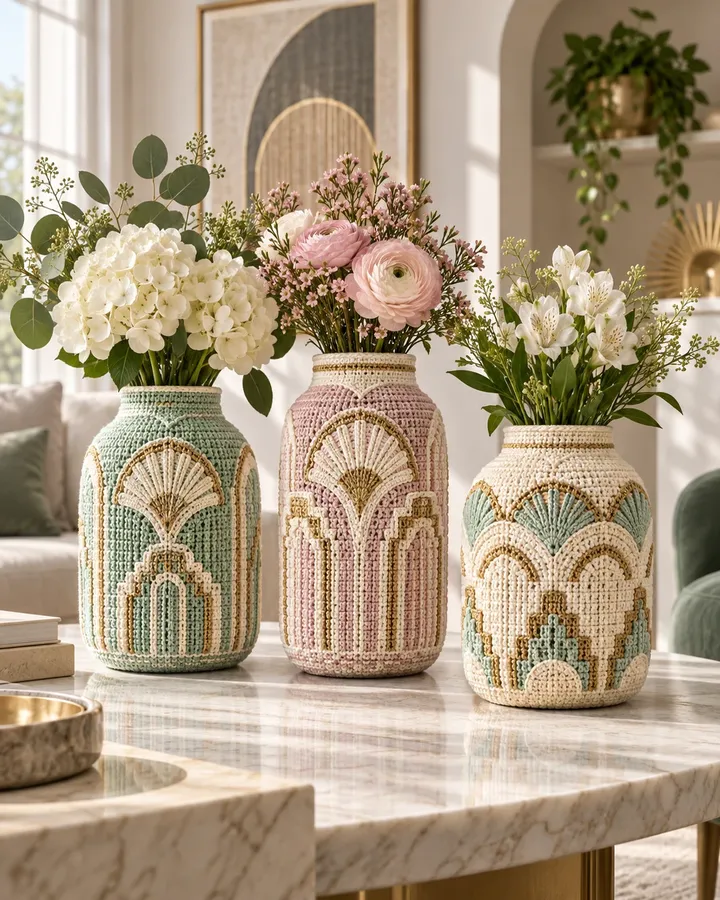
Three removable sleeves bring mint, blush, cream and soft-gold arches to plain watertight vessels.
- LEVEL
- Advanced beginner
- TRY IT WITH
- DK cotton in mint, blush, cream and soft gold, 420 yd total; 3.5 mm hook; watertight inner vessels
- FINISHING NOTE
- Custom fit three straight-sided vessels.
Short Pattern
Abbreviations: ch chain · sc single crochet · BLO back loop only · surface sl st surface slip stitch
- Measure each vessel circumference and height, then make a washed sc swatch to calculate a snug but removable sleeve.
- Crochet a flat base to the vessel footprint, turn upward in BLO and work the body in mint, blush or cream.
- Add contrasting fan panels with tapestry stitches and use soft-gold surface lines to emphasize the arches.
- Finish below the rim so the sleeve cannot wick water from the opening, then add a narrow stretch edge.
- Fit the cover only after the vessel is dry and remove it before adding water, washing or rearranging flowers.
Assembly: The crochet sleeve is decorative and not watertight; always use an intact inner vase and keep yarn dry.
Deco Fan Coaster and Tray Set
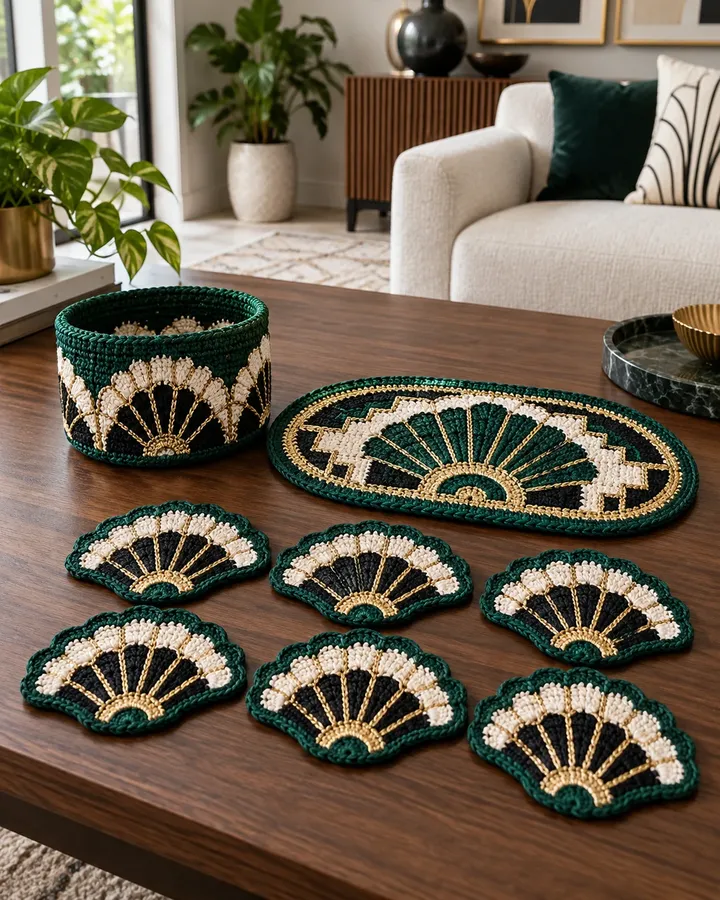
Six emerald fan coasters, an oval tray liner and a small basket create a complete coffee-table collection.
- LEVEL
- Advanced beginner
- TRY IT WITH
- Mercerized DK cotton in emerald 230 yd, cream 190 yd, black 100 yd and gold 70 yd; 3 mm hook
- FINISHING NOTE
- Coasters about 5 in wide; liner about 12 × 18 in.
Short Pattern
Abbreviations: ch chain · sc single crochet · hdc half double crochet · dc double crochet · surface sl st surface slip stitch
- Crochet one fan coaster from a narrow base into graduated emerald shells, adding cream and black stepped rows.
- Finish with gold surface outlines, block to a 5 in template and repeat five times with identical stitch counts.
- Work the oval liner around a foundation chain, increasing evenly at both ends and placing two large fans in the center.
- Crochet a shallow oval storage basket sized to the stacked coasters, reinforcing its base with a second panel.
- Wash, block and test the dry set beneath cool drinkware, adding a washable absorbent layer beneath the liner if needed.
Assembly: Coasters are for cool or warm cups only; use rated trivets beneath very hot vessels and cookware.
Sapphire Sunburst Clock Frame
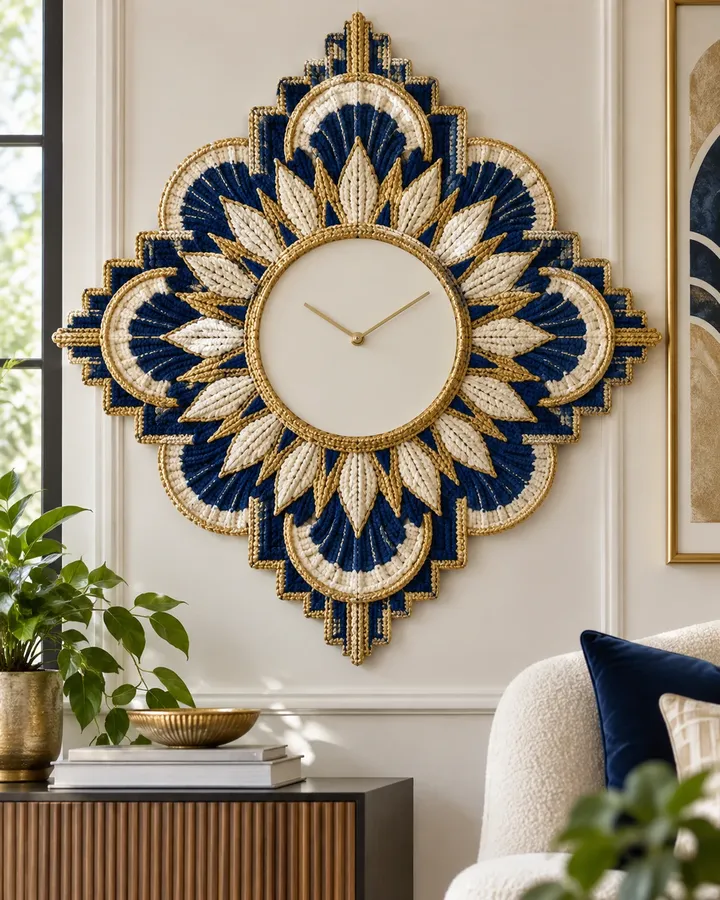
Sapphire, cream and gold rays surround a plain clock face in a bold geometric wall medallion.
- LEVEL
- Advanced
- TRY IT WITH
- Sport cotton in sapphire 420 yd, cream 210 yd and gold 120 yd; 3 mm hook; lightweight plain clock
- FINISHING NOTE
- Overall frame about 28 in diameter.
Short Pattern
Abbreviations: MR magic ring · ch chain · sc single crochet · dc double crochet · tr treble crochet
- Measure the clock casing and crochet a dense inner ring that fits around it without covering the face, hands or controls.
- Build twelve cream-and-sapphire rays separately, graduating stitch heights and matching every ray to one paper template.
- Join rays evenly around the inner ring, add gold surface accents and connect their outer points with a stabilizing crochet round.
- Block the decorative frame flat and attach it to a lightweight backing that remains independent of the clock mechanism.
- Mount the clock and frame with wall hardware rated for their combined weight, keeping battery access unobstructed.
Assembly: Do not hang the weight from crochet alone; use secure hardware through the clock or backing according to the manufacturer.
Blush and Teal Planter Covers
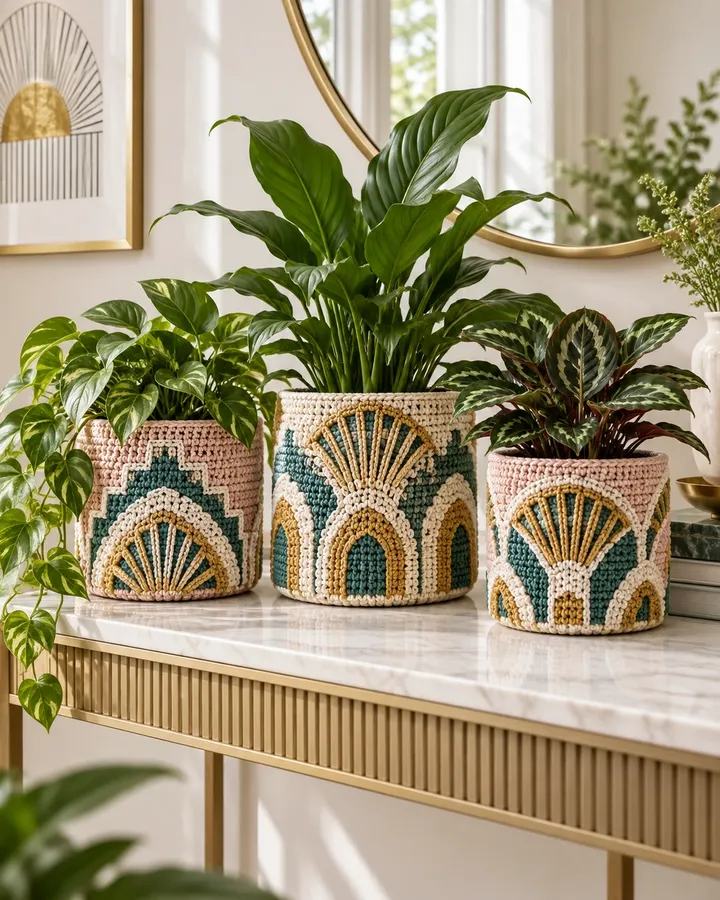
Blush, teal and cream pot sleeves carry gold fans and arches across three coordinated sizes.
- LEVEL
- Advanced beginner
- TRY IT WITH
- Bulky cotton in blush, teal and cream, 650 yd total plus gold 90 yd; 5 mm hook; waterproof plant pots
- FINISHING NOTE
- Custom fit three pots.
Short Pattern
Abbreviations: ch chain · sc single crochet · inc increase · BLO back loop only · tapestry crochet colorwork
- Measure the clean outer pots at base, widest point and height, leaving drainage saucers completely accessible.
- Crochet flat circular bases, turn upward in BLO and adjust with gradual increases if a pot flares toward the top.
- Place contrasting fan motifs across the front halves and keep the back halves plain for easier fitting.
- Add a firm upper edge that stops below the pot rim, then weave all color tails deeply into the reverse.
- Remove covers before watering, wipe the pots and saucers dry and replace the sleeves only when no moisture remains.
Assembly: Crochet covers are not waterproof; standing water can damage yarn, furniture and plants.
Ivory and Navy Curtain Set
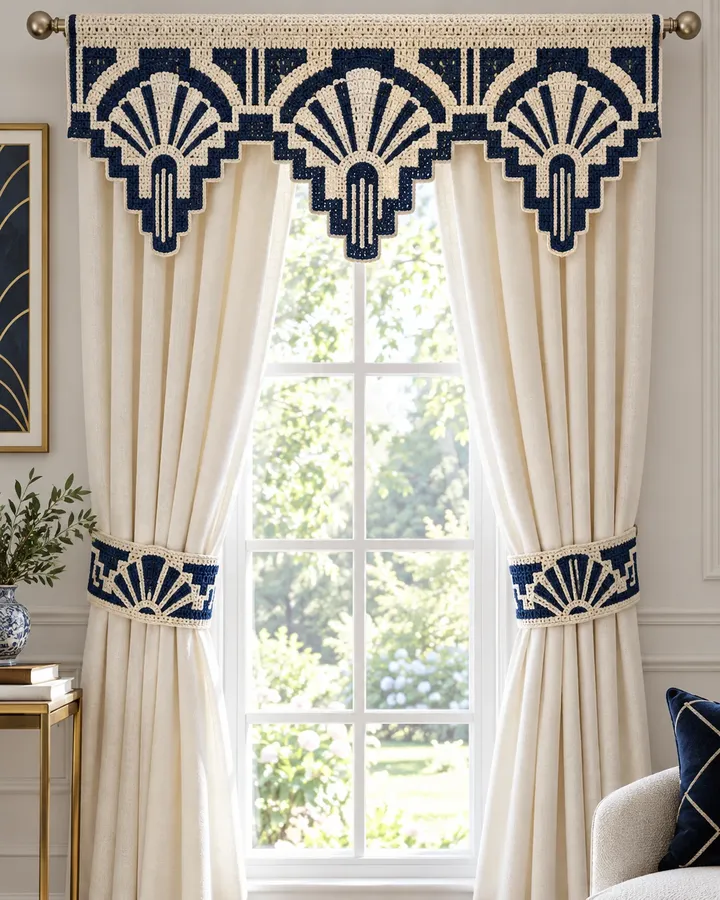
A stepped fan valance and broad matching tiebacks frame cream curtains with crisp Art Deco geometry.
- LEVEL
- Advanced
- TRY IT WITH
- Sport cotton in ivory 700 yd, navy 420 yd and gold 80 yd; 3 mm hook; existing secure curtain rod
- FINISHING NOTE
- Valance custom window width; tiebacks about 4 × 18 in.
Short Pattern
Abbreviations: ch chain · sc single crochet · dc double crochet · tr treble crochet · picot ch 3, sl st
- Measure the rod and visible window width, then chart an odd number of navy fan points with a larger center repeat.
- Crochet the valance from the rod sleeve downward, building cream arches and stepped navy points in joined rows.
- Add narrow gold surface lines, block the valance straight and confirm the rod sleeve slides freely without stretching.
- Make two broad tiebacks with one centered fan each and reinforce the closure loops through several full rows.
- Install the valance on a secure rod and fasten tiebacks to fixed wall hooks rather than wrapping long cords around the curtains.
Assembly: Keep tiebacks and loops short and out of children’s reach; long curtain cords can create a strangulation hazard.
Make thoughtfully and check as you go.
Yarn, hook size and personal tension can change the finished scale. Count every round, stuff gradually and use embroidered features instead of safety eyes when making toys for children under three.