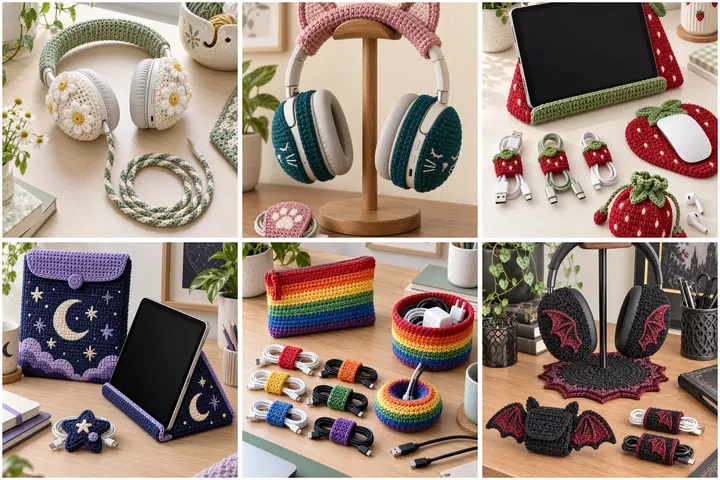
These twelve original Hunerli Parmaklar projects add soft color and organization to everyday technology without permanently altering a device. Instructions use US terms. Measure the exact device before beginning, use tightly spun low-lint cotton and keep every cover removable. Never cover ports, buttons, hinges, speakers, microphones, sensors, vents or ear cushions. Remove crochet accessories before charging if they sit near a connector or battery area, keep yarn away from hot electronics, and never use a phone or tablet stand that feels unstable. These decorative accessories may contain cords and small pieces; keep them away from babies, young children and pets.
Daisy Wired Headphone Cover
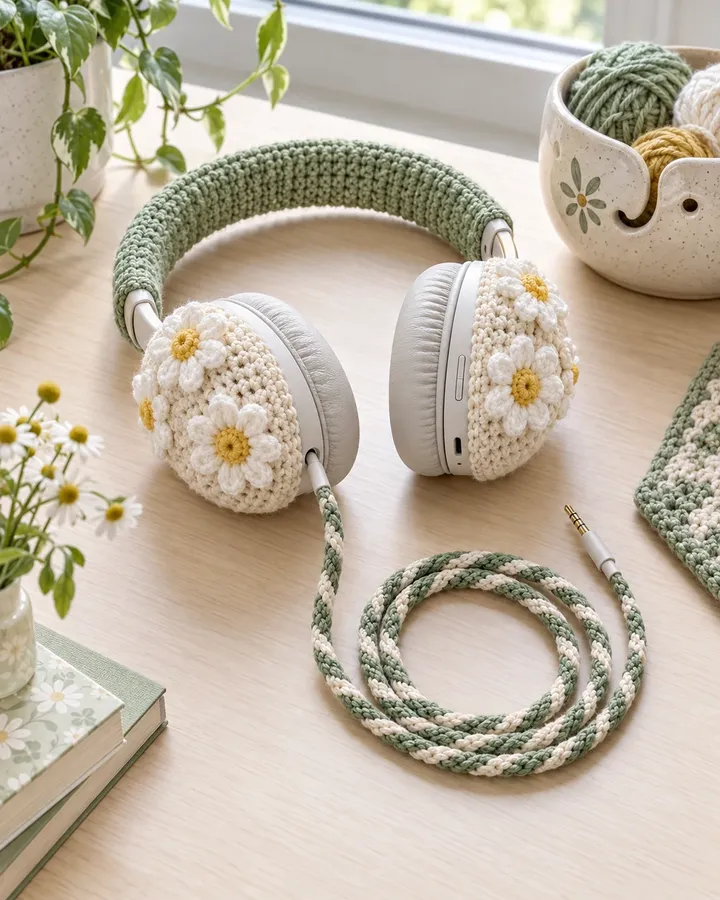
Cream daisy earcup covers, a sage headband sleeve and a braided cable cover give wired headphones a fresh cottage look.
- LEVEL
- Intermediate
- TRY IT WITH
- Sport cotton in cream 160 yd, sage 130 yd and yellow 25 yd; 3 mm hook; tapestry needle
- FINISHING NOTE
- Sized to the headphones; cable sleeve about 30 in.
Short Pattern
Abbreviations: MR magic ring · ch chain · sc single crochet · hdc half double crochet · sl st slip stitch
- Measure the outer earcup diameter and crochet two flat cream circles, increasing evenly until each sits just inside the controls and ports.
- Add a short stretchable sc side wall and finish with a snug ribbed edge; test that the cover grips the shell without touching the cushion.
- Make six small daisies from yellow centers and cream hdc petals, then sew them flat to the circles before fitting the covers.
- Crochet a sage rectangle to the headband length, seam it into a removable tube and leave both adjustment sliders exposed.
- For the cord, crochet two slim chains around—not through—the cable and join them as a loose sleeve, stopping well before the plug and strain relief.
Assembly: Remove all pieces for cleaning and inspect the cable frequently; the sleeve must slide freely and never bend either connector.
Cat Ear Headphone Covers
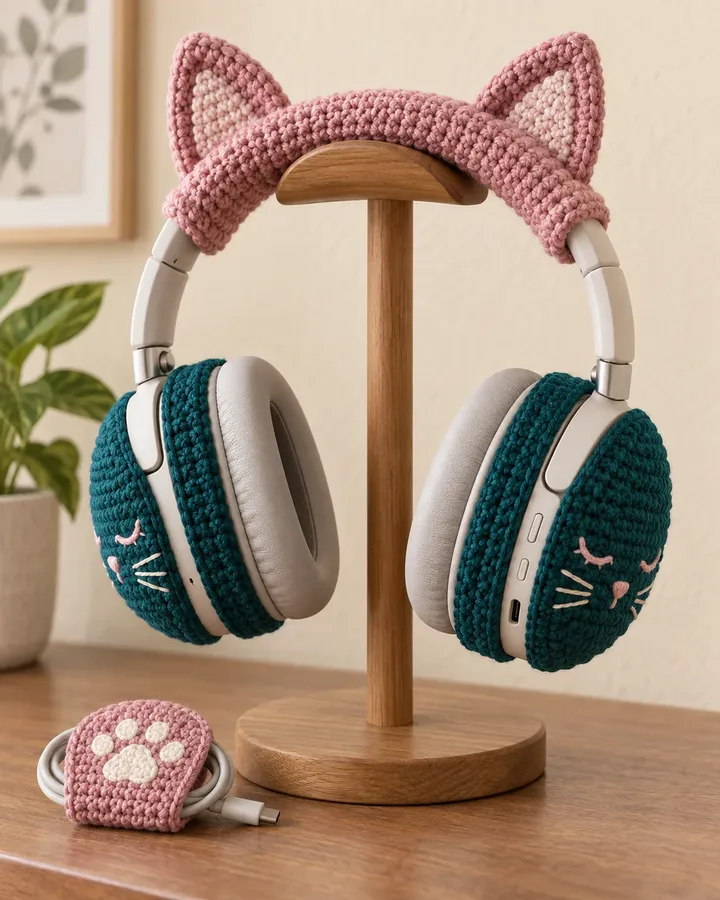
Teal sleepy-cat earcup covers and a dusty-pink cat-ear headband sleeve make a playful coordinated set.
- LEVEL
- Intermediate
- TRY IT WITH
- DK cotton in teal 170 yd, dusty pink 130 yd and cream scraps; 3.5 mm hook
- FINISHING NOTE
- Custom fit to over-ear headphones.
Short Pattern
Abbreviations: MR magic ring · sc single crochet · inc increase · dec decrease · BLO back loop only
- Crochet two teal earcup disks to the measured diameter and add shallow BLO sides that stop before every button and opening.
- Embroider closed eyes, nose and whiskers on the disks with yarn, knotting and burying all tails on the reverse.
- Make a padded pink headband sleeve as a ribbed rectangle with a button-free overlap or removable seam.
- Crochet four triangular ear panels, join them in pairs and stitch the finished ears only to the sleeve—not to the headphones.
- Fit each component separately, fold and extend the headphones through their full range, and adjust any edge that pulls near a hinge.
Assembly: Use no beads, wire or glue; remove the decorative ears if they affect balance or the headband adjustment.
Strawberry Tech Desk Set
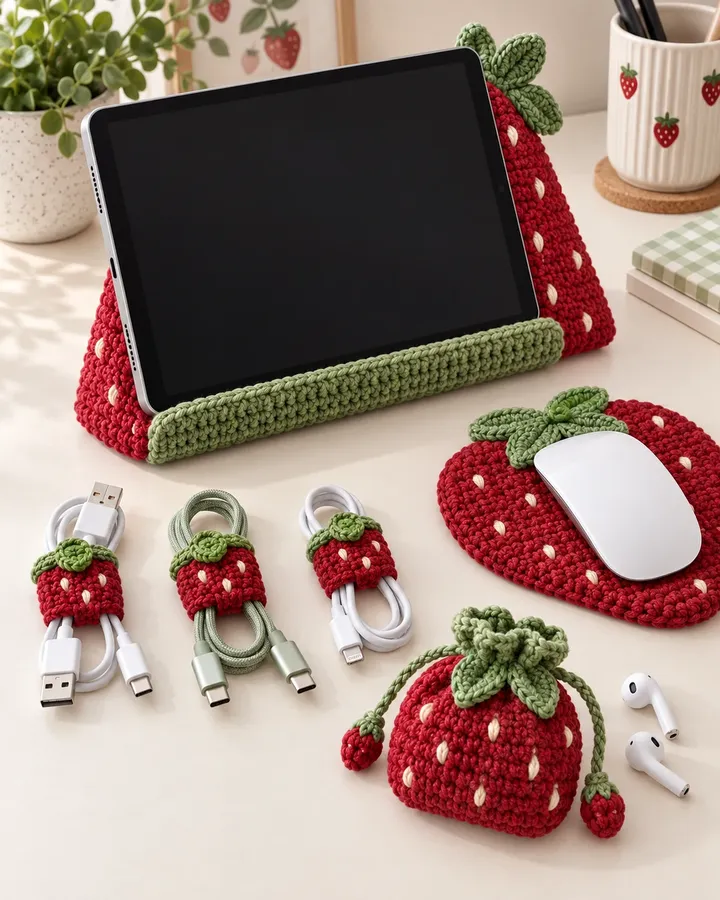
A strawberry tablet stand, cable wraps, mouse wrist rest and earbud pouch turn a plain desk into a berry-themed workspace.
- LEVEL
- Intermediate
- TRY IT WITH
- Worsted cotton in red 360 yd, sage 170 yd and cream 35 yd; 4 mm hook; firm washable filling; enclosed plastic canvas
- FINISHING NOTE
- Stand about 10 in wide; wrist rest about 8 × 6 in.
Short Pattern
Abbreviations: ch chain · sc single crochet · BLO back loop only · inc increase · dec decrease
- Build the triangular stand from three dense red panels around fully enclosed plastic canvas, leaving an open channel across the front edge.
- Crochet a sage stop bar and sew it through the stand base, checking that the tablet sits above rather than on its charging port.
- Make the wrist rest as two strawberry-shaped panels with very light firm filling and a flat sage leaf section kept away from the mouse sensor.
- Crochet three small rectangular cable wraps with leaf-shaped tabs, closing each with a yarn loop rather than a hard button.
- Finish a red drawstring earbud pouch, embroider cream seeds on every piece and test the stand on a non-slip surface.
Assembly: Never place the tablet in the yarn stand while charging or warm; the front stop must not cover speakers, ports or controls.
Sunflower Headphone Travel Pouch
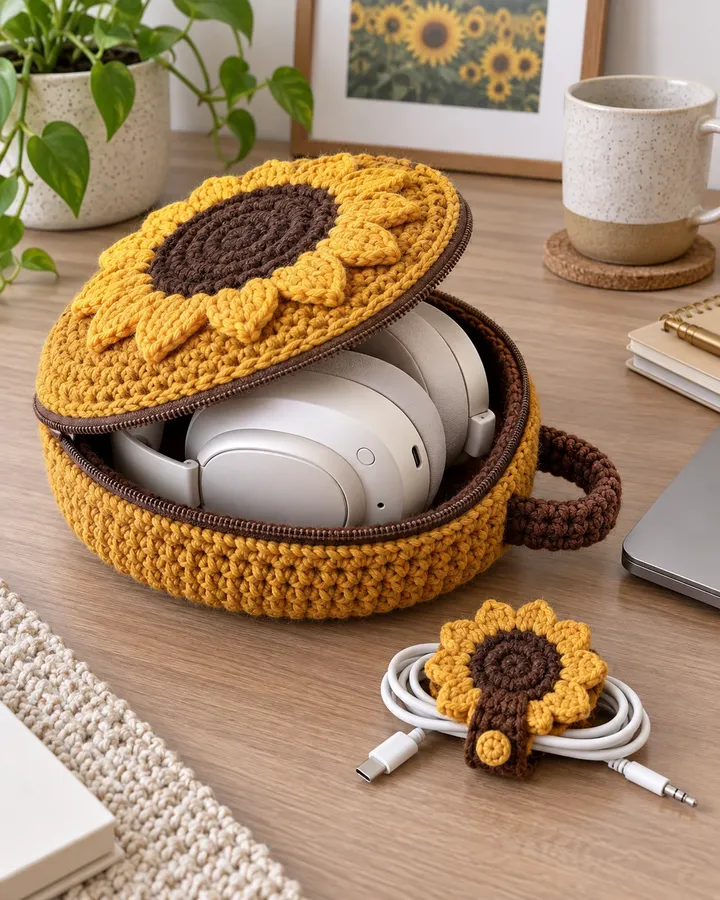
A padded mustard pouch with a dimensional sunflower protects folded headphones, while a matching keeper controls the cable.
- LEVEL
- Intermediate
- TRY IT WITH
- DK cotton in mustard 280 yd, brown 110 yd and tan 120 yd; 3.5 mm hook; cotton lining fabric; soft batting
- FINISHING NOTE
- Measure folded headphones and add 1 in ease.
Short Pattern
Abbreviations: MR magic ring · ch chain · sc single crochet · hdc half double crochet · BLO back loop only
- Trace the folded headphones on paper, add 1 in ease and crochet two dense oval panels to the template.
- Make a long side gusset, joining it around three quarters of both panels and leaving a wide opening that will not scrape the hinges.
- Sew a removable washable fabric lining with thin batting, then hand-stitch it inside without catching the exterior stitches.
- Crochet a brown center and two staggered mustard petal rounds; attach the sunflower across the top panel at several hidden points.
- Add a soft yarn-loop closure, compact carry handle and a separate flat sunflower cable keeper sized to the coiled cord.
Assembly: Store headphones powered off and cool; never place charging electronics or a battery pack inside the closed padded pouch.
Frog Earbud Pouch and Leaf Cable Wraps
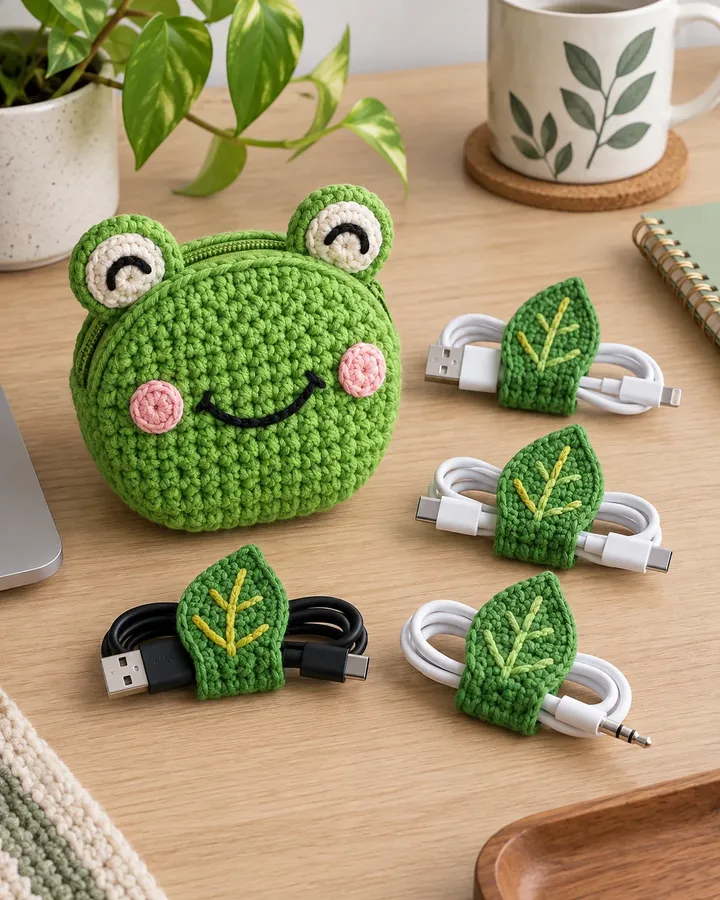
A bright frog pouch and four leaf-shaped wraps organize earbuds and charging cables without covering their connectors.
- LEVEL
- Advanced beginner
- TRY IT WITH
- Sport cotton in bright green 170 yd, leaf green 90 yd and pink and cream scraps; 3 mm hook
- FINISHING NOTE
- Pouch about 4.5 × 4.5 in.
Short Pattern
Abbreviations: MR magic ring · sc single crochet · hdc half double crochet · inc increase · sl st slip stitch
- Crochet two firm green circles and extend the back circle with two rounded eye bumps while keeping the front edge flat.
- Embroider the eyes, smile and cheeks, then join the circles around three sides and leave a generous top opening.
- Add a folded crochet flap with a yarn loop; avoid hard snaps or buttons that could scratch the earbuds.
- For each keeper, crochet an oval leaf around a center chain, embroider a vein and add a short flexible closing loop at one tip.
- Coil cables loosely, wrap the leaves around the middle only and confirm each plug and strain-relief section remains uncovered.
Assembly: Do not store earbuds while damp, hot or charging, and never pull a cable tight enough to form a sharp bend.
Celestial Tablet Sleeve and Stand
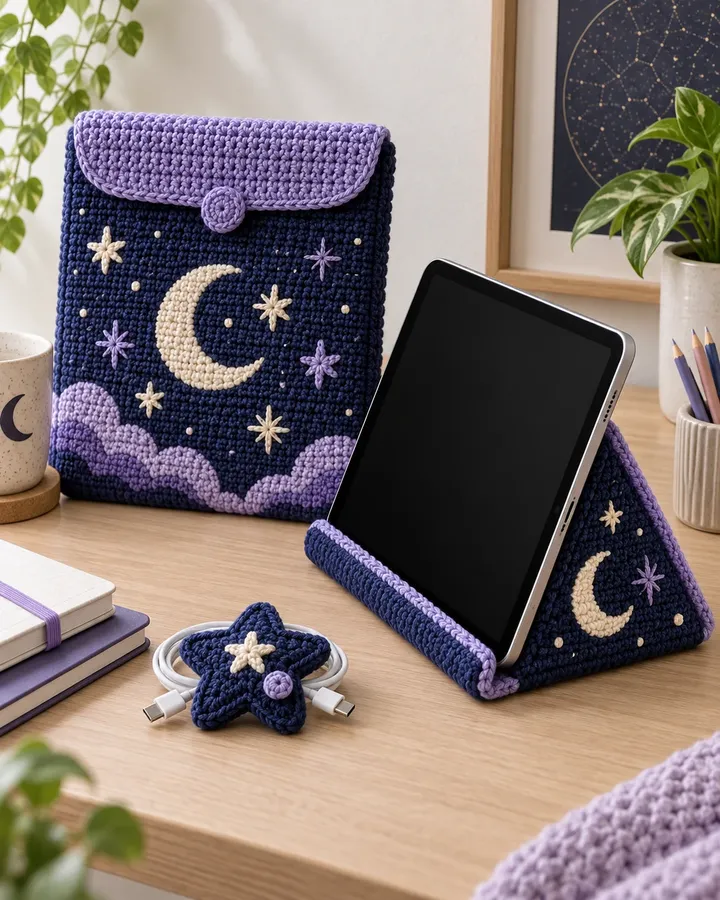
A padded navy sleeve and lavender moon-and-star stand create a dreamy but practical tablet set.
- LEVEL
- Intermediate
- TRY IT WITH
- DK cotton in navy 320 yd, lavender 180 yd, cream 60 yd and gold 25 yd; 3.5 mm hook; lining; enclosed plastic canvas
- FINISHING NOTE
- Custom fit with 0.5 in ease.
Short Pattern
Abbreviations: ch chain · sc single crochet · BLO back loop only · surface sl st surface slip stitch
- Measure the tablet and crochet two navy sleeve panels with half an inch of ease, plus a narrow bottom-and-side gusset.
- Embroider moon and stars before joining, then add a smooth fabric lining and a wide button-free overlapping flap.
- Build the stand from three lavender rectangles around fully enclosed plastic canvas, joining them into a stable triangular profile.
- Crochet a low front ledge and sew it through the base, leaving the full lower edge of the tablet accessible.
- Make one star-shaped cable keeper and test the empty stand for slipping before placing the powered-off tablet in it.
Assembly: Use the stand only on a level non-slip surface and remove the tablet before connecting a charger or if the device becomes warm.
Pastel Flower Keyboard Wrist Set
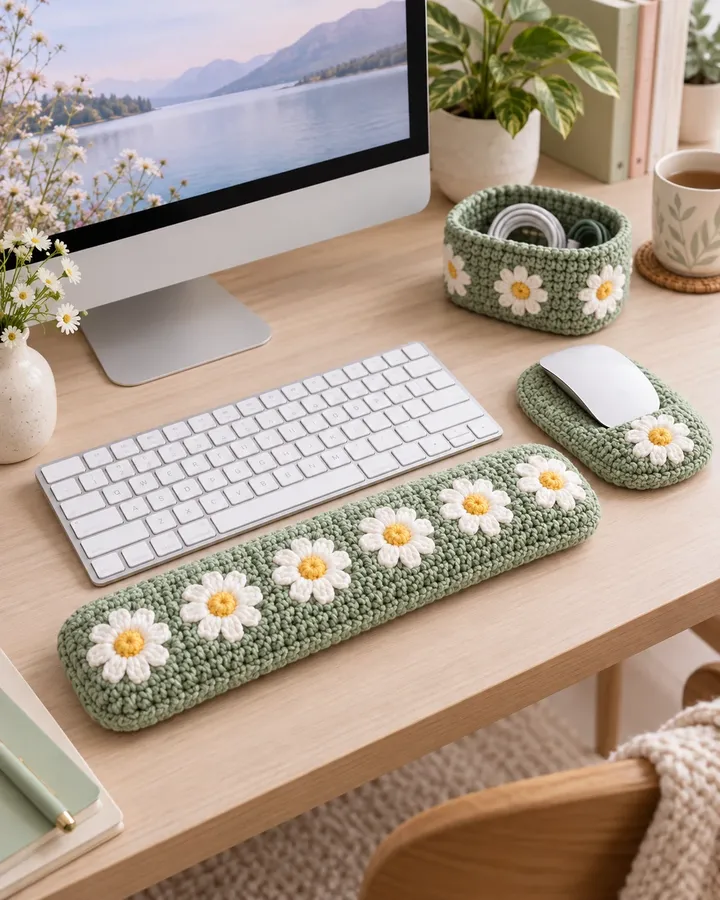
A sage daisy wrist rest, matching mouse cushion and small cable basket soften a light, organized workstation.
- LEVEL
- Advanced beginner
- TRY IT WITH
- DK cotton in sage 340 yd, cream 120 yd and yellow 25 yd; 3.5 mm hook; washable firm filling
- FINISHING NOTE
- Wrist rest about keyboard width and 3 in deep.
Short Pattern
Abbreviations: ch chain · sc single crochet · hdc half double crochet · dec decrease · sl st slip stitch
- Measure the keyboard width and crochet a dense sage tube, lightly filling it so the finished rest supports without lifting the wrists sharply.
- Close both ends flat and sew small cream daisies along the front face, keeping the upper contact surface mostly smooth.
- Make the mouse cushion as a shorter low oval with the same light filling and no raised motifs beneath the wrist.
- Crochet a wide low basket for loose cables, reinforcing its base with an extra sc panel and keeping the sides below any desk vents.
- Place the rests in front of—not beneath—the devices and check that the mouse, keyboard and cables can move freely.
Assembly: Stop using the rests if they cause wrist pressure; wash and dry them fully away from all electronics.
Mushroom Controller Carry Case
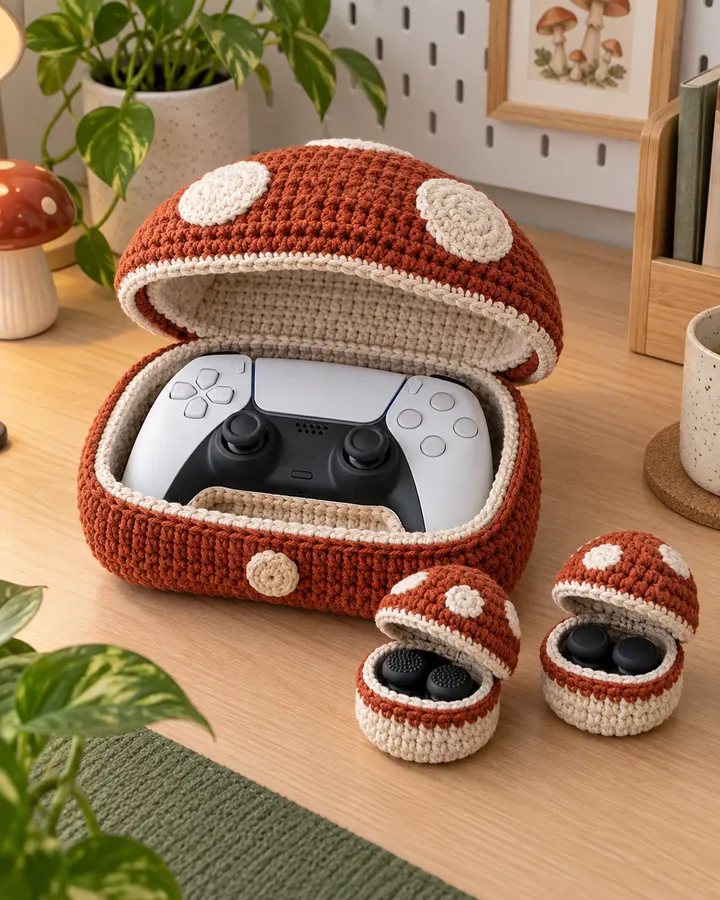
A rust mushroom pouch stores a controller between sessions, with two tiny matching accessory pockets.
- LEVEL
- Intermediate
- TRY IT WITH
- DK cotton in rust 260 yd, cream 190 yd and brown 55 yd; 3.5 mm hook; smooth fabric lining; thin batting
- FINISHING NOTE
- Sized to the controller with 1 in ease.
Short Pattern
Abbreviations: ch chain · sc single crochet · hdc half double crochet · BLO back loop only · sl st slip stitch
- Trace the controller at its widest points and crochet two rounded cream case panels with enough ease for sticks and triggers.
- Add a deep side gusset, keeping the upper opening wide so no control is forced while inserting or removing the device.
- Crochet a rust cap-shaped flap with flat cream spots, line the entire case and use a soft yarn-loop closure.
- Make two tiny matching pockets for removable accessories, but stitch the pockets to the outside rather than placing loose items beside the controller.
- Test the empty case for pressure points, then store only a powered-off, cool and disconnected controller.
Assembly: This is a storage case, not an in-use controller cover; never operate or charge the controller inside it.
Rainbow Cable Management Set
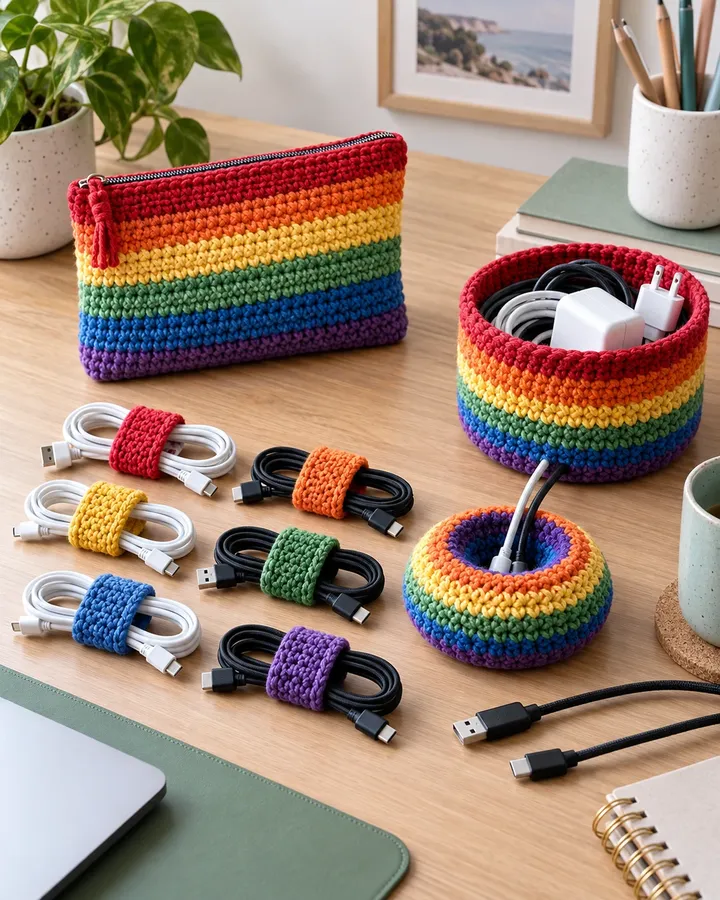
Rainbow wraps, a weighted cable catcher, cord basket and striped pouch organize a busy desk without sharp bends.
- LEVEL
- Beginner
- TRY IT WITH
- DK cotton in six rainbow colors and cream, 420 yd total; 3.5 mm hook; filling for catcher only
- FINISHING NOTE
- Wraps about 1 × 4 in; basket about 7 in wide.
Short Pattern
Abbreviations: ch chain · sc single crochet · hdc half double crochet · BLO back loop only
- Crochet six firm striped rectangles with a small yarn loop at one end, sizing each to close around a loose cable coil.
- Make the desktop catcher as a dense ring-shaped base with enclosed washable filling and several soft outer channels for unplugged cords.
- Crochet an oval power-cord basket with a doubled base and low sides, leaving ample airflow and never placing a power adapter inside.
- Build a striped zip-free pouch with an overlapping flap for adapters that are unplugged, cool and completely disconnected.
- Label sets by color if desired using stitched yarn symbols, then check every cable exits without pinching or a tight turn.
Assembly: Keep adapters, power strips and charging batteries uncovered and ventilated; crochet organizers are for cool disconnected storage only.
Bumblebee Phone Stand Set
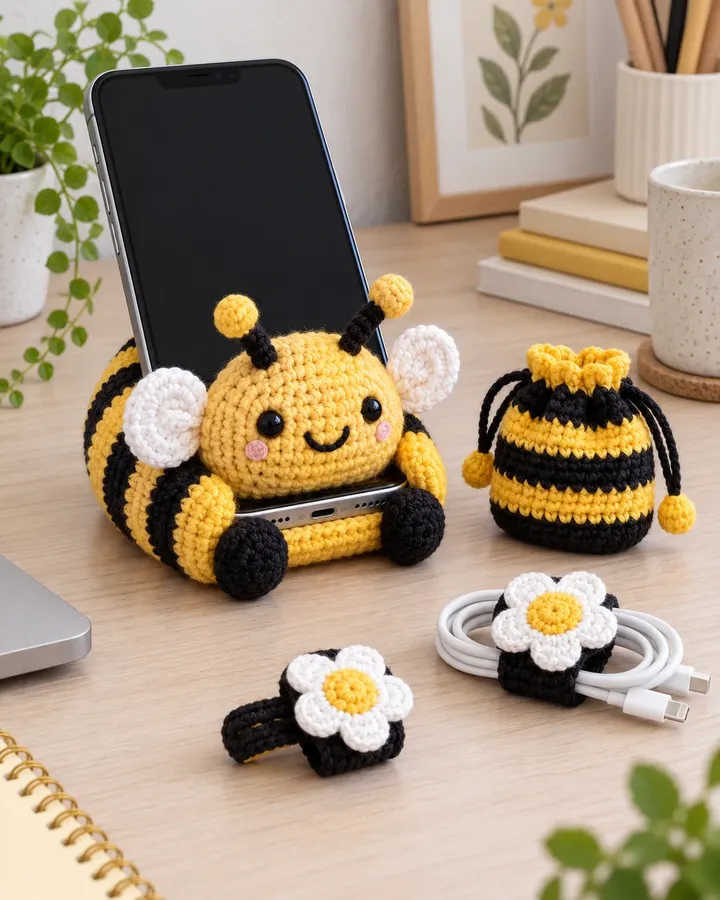
A cheerful bee stand, striped earbud pouch and flower cable keepers make a compact yellow-and-black desk collection.
- LEVEL
- Intermediate
- TRY IT WITH
- DK cotton in yellow 240 yd, black 120 yd, cream 80 yd and white scraps; 3.5 mm hook; enclosed plastic canvas
- FINISHING NOTE
- Stand about 6 × 7 in.
Short Pattern
Abbreviations: MR magic ring · ch chain · sc single crochet · BLO back loop only · hdc half double crochet
- Crochet striped panels for a low triangular stand, enclosing plastic canvas and joining every edge with firm black sc.
- Add a shallow yellow front ledge that supports the phone without blocking the speaker holes or charging port.
- Crochet small wings as double-layer white ovals and sew them flat to the rear sides where they cannot affect stability.
- Make a matching striped earbud pouch with embroidered features and two flat daisy cable keepers closed by yarn loops.
- Place the phone vertically and horizontally to confirm the center of gravity stays inside the stand base on both orientations.
Assembly: Do not charge a phone in the crochet stand; remove it immediately if it becomes warm or the stand begins to tip.
Ocean E-Reader Sleeve and Stand
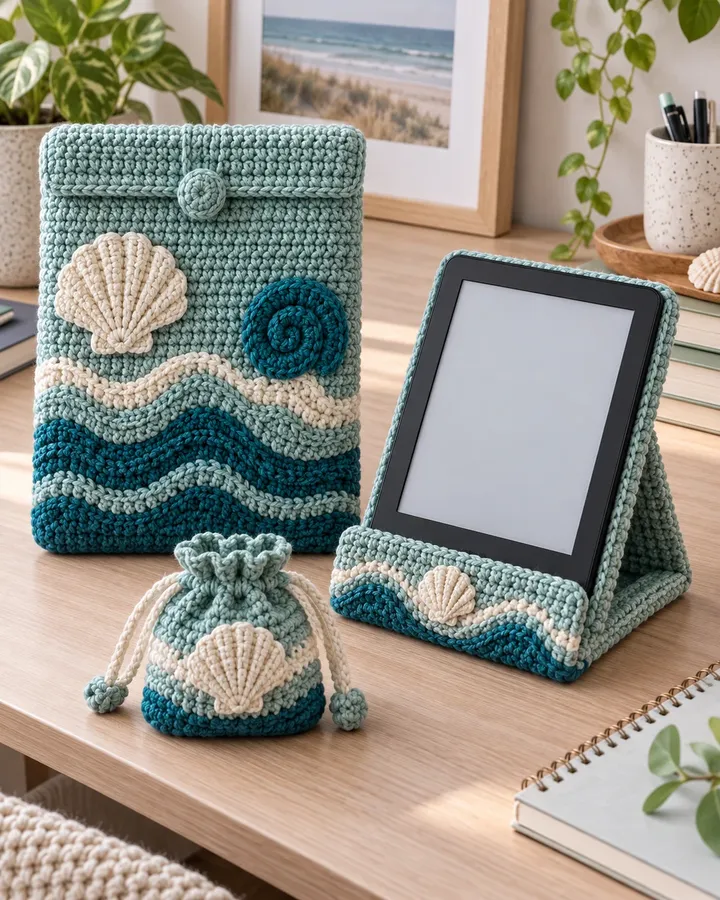
Seafoam waves and yarn shells decorate a padded e-reader sleeve, matching stand and charger pouch.
- LEVEL
- Intermediate
- TRY IT WITH
- Sport cotton in seafoam 270 yd, teal 160 yd, cream 130 yd and sand 70 yd; 3 mm hook; lining; enclosed plastic canvas
- FINISHING NOTE
- Custom fit with 0.5 in ease.
Short Pattern
Abbreviations: ch chain · sc single crochet · hdc half double crochet · dc double crochet · surface sl st surface slip stitch
- Crochet two seafoam sleeve panels to the e-reader measurements, adding a bottom gusset and a smooth washable lining.
- Work wave lines in teal surface slip stitch and sew double-layer yarn shell motifs flat so their edges cannot catch.
- Create an angled stand from sleeved canvas panels and add a cream front stop that leaves the device bottom edge open.
- Make a small sand-and-seafoam drawstring pouch for a disconnected charger and keep it separate from the e-reader sleeve.
- Test the stand at the intended reading angle with the device powered off and add a non-slip crochet base if needed.
Assembly: Never place a charging or warm e-reader in the padded sleeve, stand or accessory pouch.
Gothic Bat Headphone Set
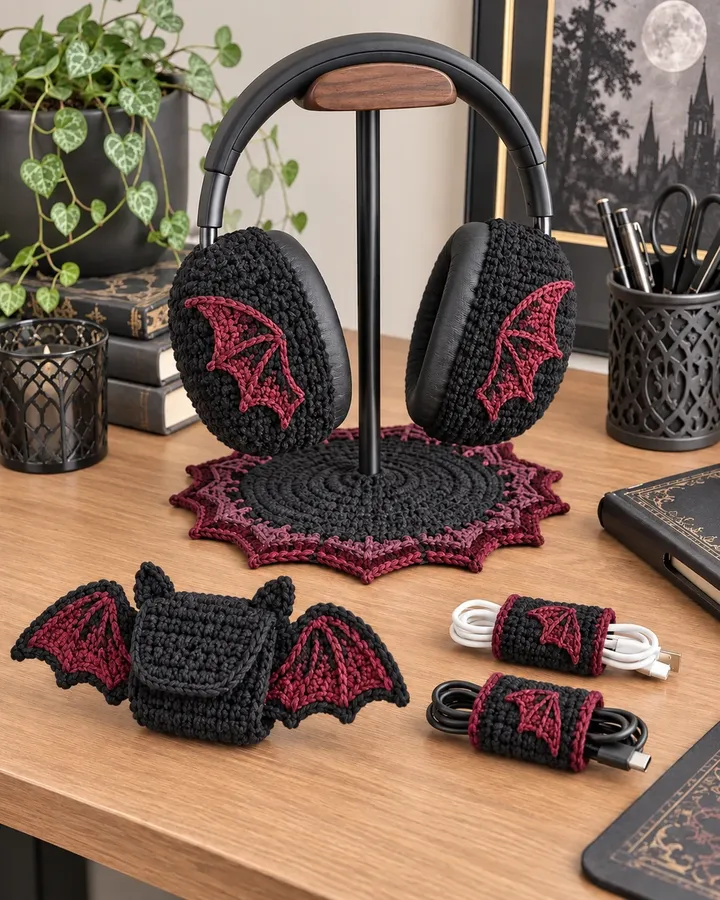
Black earcup dust covers, burgundy bat embroidery, a stand mat and cable pouch bring subtle gothic style to a desk.
- LEVEL
- Intermediate
- TRY IT WITH
- Sport cotton in black 300 yd, burgundy 130 yd and plum 70 yd; 3 mm hook
- FINISHING NOTE
- Custom fit; mat about 10 in diameter.
Short Pattern
Abbreviations: MR magic ring · ch chain · sc single crochet · hdc half double crochet · surface sl st surface slip stitch
- Crochet two shallow black earcup disks with stretch edges, stopping before cushions, controls, ports and vent openings.
- Embroider mirrored burgundy bat-wing shapes on the disks with surface stitches and bury every tail securely.
- Work the stand mat in flat black rounds, adding a plum pointed border that remains low enough for the stand base to sit level.
- Crochet a compact black cable pouch and several short burgundy cord wraps, using yarn loops rather than metal hardware.
- Fit the dust covers only while headphones are cool and idle, then remove them completely before wearing or charging.
Assembly: The earcup pieces are decorative storage dust covers, not listening covers; never block acoustic or ventilation openings during use.
Make thoughtfully and check as you go.
Yarn, hook size and personal tension can change the finished scale. Count every round, stuff gradually and use embroidered features instead of safety eyes when making toys for children under three.