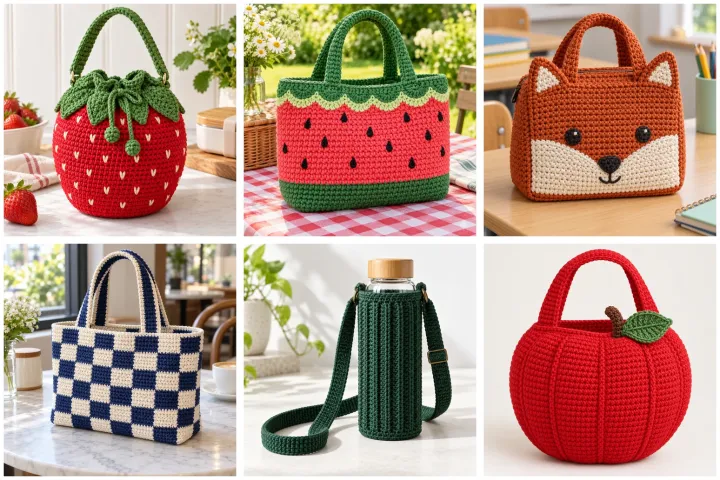
Bring a little personality to packed lunches with seventeen crochet designs sized for school, work and everyday outings. This collection moves between fruit pouches, animal faces, classic checks and grown-up color blocking, with a short pattern guide for each. The instructions are original craft drafts and have not been sample-tested; finished dimensions depend on yarn, hook and tension, so make a gauge swatch and adjust the base before building the sides. Use a washable cotton yarn, reinforce handles at several points and add a fabric lining if you want more structure. Crochet is not a food-safe barrier, so keep unpackaged food in a separate container.
Strawberry Drawstring Lunch Bag
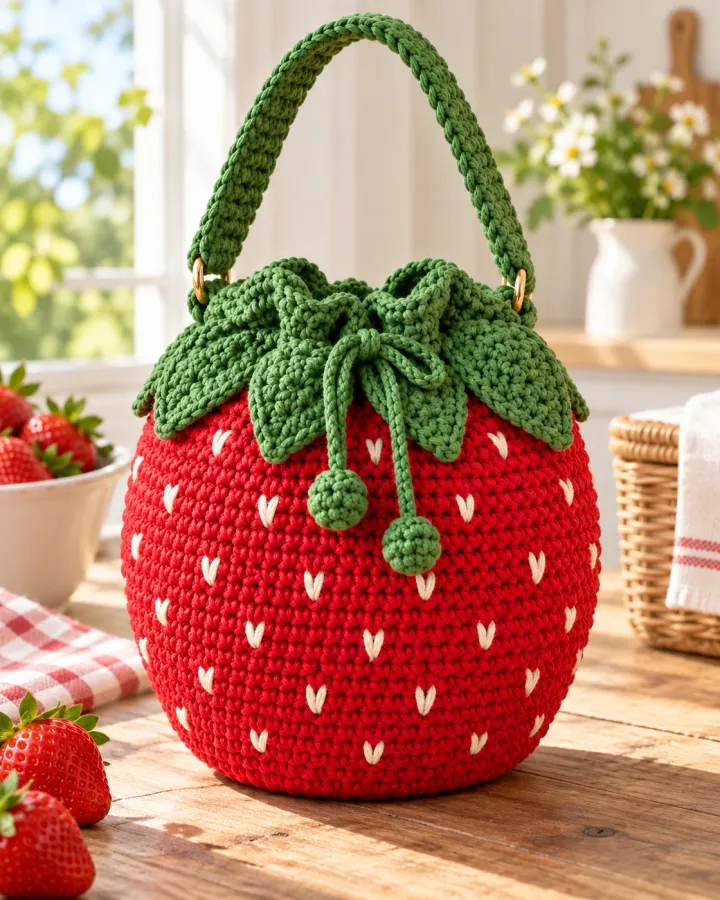
A bright strawberry-red crochet pouch is dotted with tiny embroidered seeds and finished with a leafy green rim. Its rounded base and short carry strap make it a playful lunch companion for school, while the soft cotton construction keeps the shape lightweight.
- LEVEL
- Confident beginner
- TRY IT WITH
- DK cotton: strawberry red 180 yd, leaf green 35 yd, cream 8 yd; 4 mm hook; tapestry needle
- FINISHING NOTE
- Approx. 8 in tall by 7 in wide.
Short Pattern
Abbreviations: ch chain · sl st slip stitch · sc single crochet · hdc half double crochet · inc 2 stitches in one stitch · BLO back loop only
- Base: ch 21. Starting in the second chain, sc 19, work 3 sc in the last chain, sc 18 along the underside and 2 sc in the first chain (42). Work 2 oval rounds, adding 3 stitches at each end to keep the base flat.
- Sides: work one round in BLO, then 18 rounds of sc at the established stitch count. Keep the side walls straight and check the bag opening remains wide enough for a lunch container.
- Top: change to green and work 2 rounds of hdc. Make a drawstring eyelet round by repeating ch 1, skip 1, hdc in next stitch; work one final hdc round.
- Cord and leaves: chain a cord twice the opening width and weave it through the eyelet round. Crochet 5 green leaves from ch 6 with hdc and dc shaping; sew them around the rim.
- Embroider small cream seed stitches across the red body. Add a short red strap if desired, attaching it through several reinforced stitches on each side.
Assembly: Secure the cord ends and handle through multiple stitches. Keep food wrapped separately from the crochet fabric.
Lemon-Slice Bottle Holder
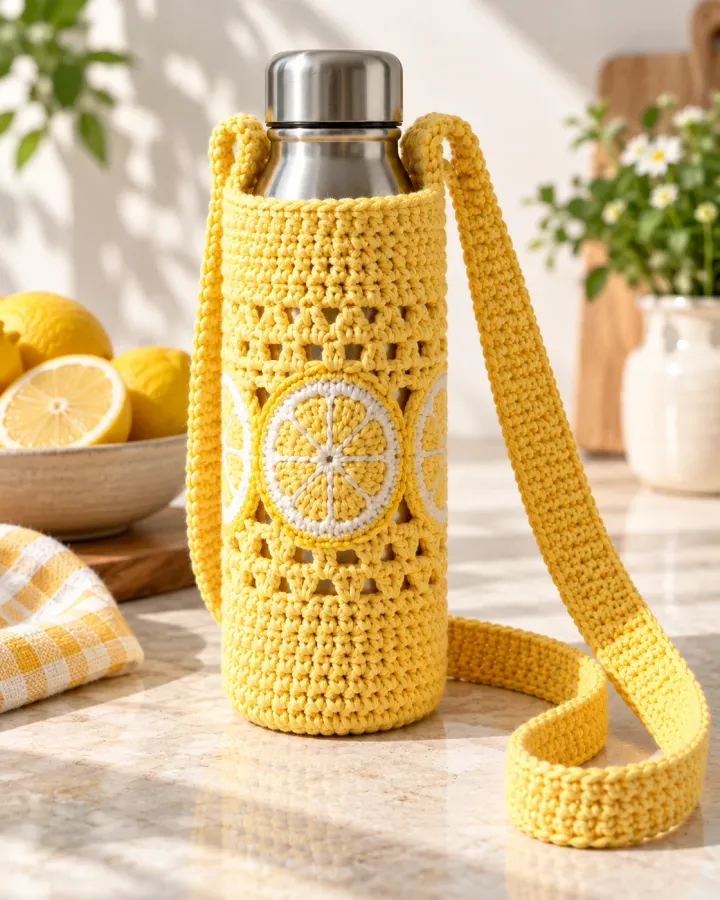
A sunny lemon-yellow bottle sleeve carries a clean citrus-slice motif and a long shoulder strap. Its snug ribbed body stretches around a reusable bottle, making a bright hands-free option for errands, walks or a cheerful school-day accessory.
- LEVEL
- Confident beginner
- TRY IT WITH
- DK cotton: lemon 100 yd, cream 20 yd, leaf green 10 yd; 3.5 mm hook
- FINISHING NOTE
- Fits a bottle about 3 in across and 9 in tall; adjust rounds.
Short Pattern
Abbreviations: MR magic ring · ch chain · sc single crochet · hdc half double crochet · sl st slip stitch · BLO back loop only · inc increase
- Base: make 6 sc in MR. Increase by 6 each round to 36 stitches, or continue increasing until the disk matches the bottle base.
- Sleeve: work one round in BLO, then 24 rounds of sc at 36 stitches. Try the sleeve around the bottle after 18 rounds and add rounds until it reaches the shoulder.
- Citrus motif: crochet a cream circle from MR 6 to 24. Add six surface slip-stitch spokes in white and sew the circle flat to the front.
- Strap: ch 90, work one row of sc back along the chain, then make a second parallel row. Sew each end to opposite sides of the sleeve across at least 8 stitches.
- Add a small green leaf at the top edge and weave in all ends.
Assembly: Test the fit with the intended bottle and reinforce both strap ends. Remove the sleeve before washing the bottle.
Watermelon Picnic Tote
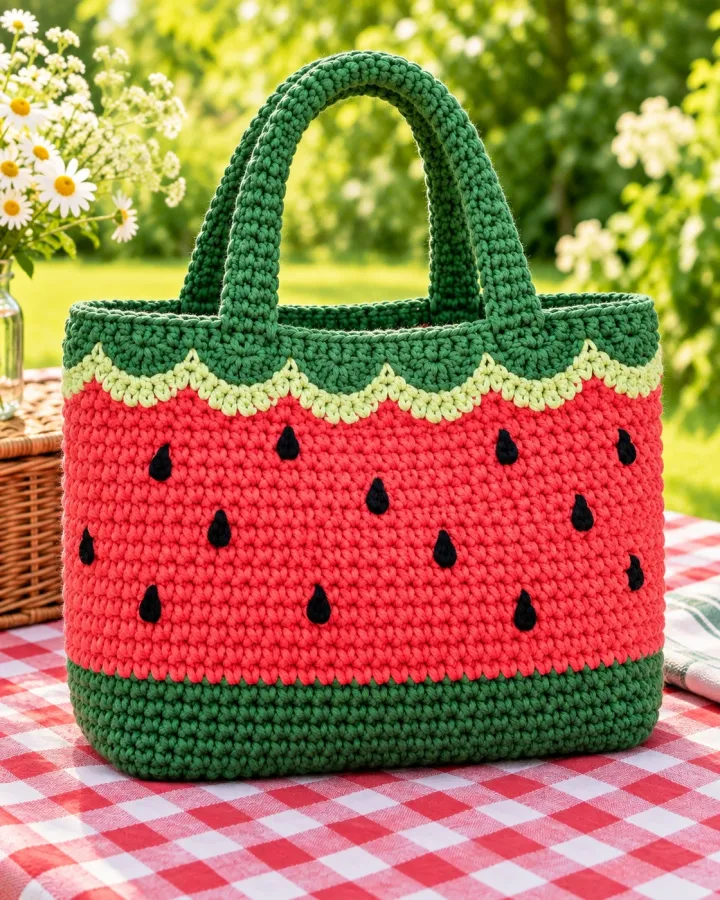
This watermelon-inspired tote pairs a coral-pink body with a deep green rind band and small dark seed stitches. Sturdy crocheted handles and a broad flat base give the summery design a practical shape for snacks, napkins or a light lunch box.
- LEVEL
- Intermediate
- TRY IT WITH
- DK cotton: coral 220 yd, forest green 65 yd, cream 15 yd, charcoal 5 yd; 4 mm hook
- FINISHING NOTE
- Approx. 10 in wide by 9 in tall, excluding handles.
Short Pattern
Abbreviations: ch chain · sl st slip stitch · sc single crochet · hdc half double crochet · dc double crochet · inc increase · BLO back loop only
- Base: ch 31 and work an oval with 3 sc in each end chain; continue around both sides. Work 3 oval rounds, increasing at both rounded ends until the base lies flat.
- Body: work one round in BLO, then 20 rounds of sc in coral. Keep the sides even and check the bottom corners for curling.
- Rind: change to cream for 1 round, then forest green for 4 rounds. Add a final green round of sl st for a neat rim.
- Handles: make two bands by chaining 36 and working 5 rows of sc. Fold each band lengthwise, seam the edges and sew to the front and back across several rows.
- Embroider scattered charcoal seed marks on the pink body using short yarn stitches. Line the tote with washable fabric if extra structure is needed.
Assembly: Reinforce handle joins with a box-shaped seam. Use a separate sealed container for food.
Avocado Pocket Lunch Bag
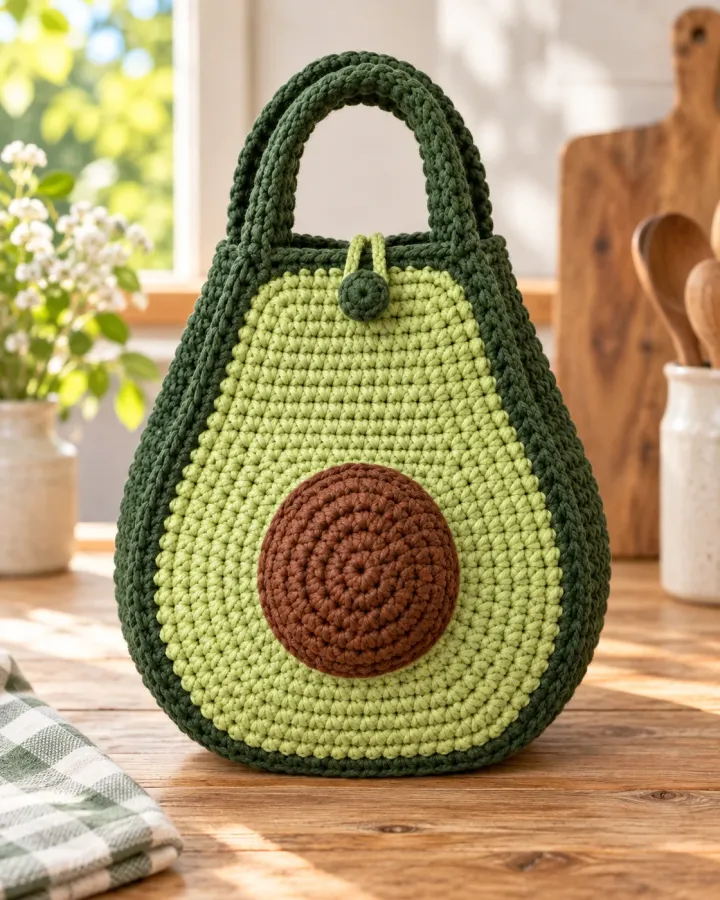
A soft sage avocado pouch has a darker peel border and a round cocoa pit embroidered at the center. The simple fruit silhouette feels playful without being overly childlike, and its short integrated handles suit snacks or a compact lunch container.
- LEVEL
- Intermediate
- TRY IT WITH
- DK cotton: pale sage 160 yd, dark green 45 yd, cocoa 15 yd; 4 mm hook; tapestry needle
- FINISHING NOTE
- Approx. 8 in tall by 7 in wide.
Short Pattern
Abbreviations: ch chain · sc single crochet · hdc half double crochet · dc double crochet · sl st slip stitch · inc increase · dec decrease
- Base: ch 23 and crochet an oval with 3 sc in the final chain and 2 sc at the opposite end. Work 3 oval rounds, adding increases at both tips.
- Body: work one round in BLO, then 16 rounds of sc in pale sage. Decrease 2 stitches at each side over the final 2 rounds to gently taper the top.
- Peel edge: work 3 rounds of sc in dark green around the opening. Add a short hdc flap at the back by working 12 stitches back and forth for 5 rows.
- Pit: crochet a cocoa circle from MR 6 to 24, work one round even and sew it to the center front. Keep it flat and secure around the full edge.
- Make two short handles from ch 24 and 3 rows of sc; sew them to the sides through several stitches. Add an optional yarn loop and crocheted toggle, stitched permanently closed.
Assembly: Do not use a detachable toggle. Line the pouch if desired and keep unpackaged food separate.
Rust Fox Lunch Bag
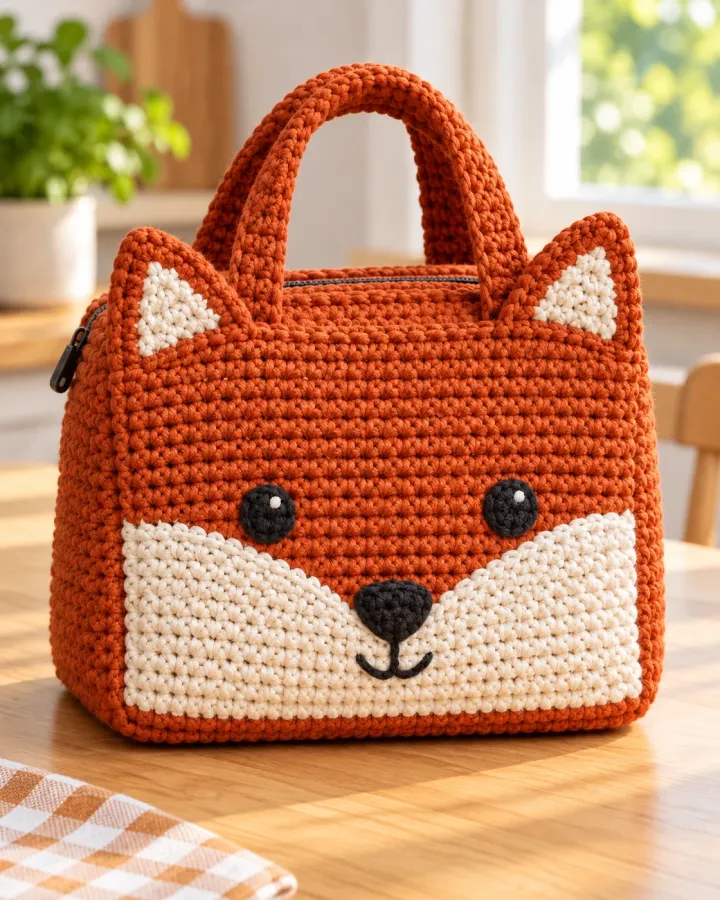
A rust-orange crochet lunch bag features pointed fox ears, a cream muzzle and a flat embroidered face. The animal styling is balanced by a practical rectangular base and short handles, making it a charming handmade bag for kids or woodland-loving adults.
- LEVEL
- Intermediate
- TRY IT WITH
- DK cotton: rust 190 yd, cream 35 yd, charcoal 6 yd; 4 mm hook
- FINISHING NOTE
- Approx. 9 in tall by 8 in wide.
Short Pattern
Abbreviations: ch chain · sc single crochet · hdc half double crochet · inc increase · sl st slip stitch · dec decrease · BLO back loop only
- Base: ch 25 and work an oval foundation, placing 3 sc at each end. Continue for 3 rounds with evenly spaced increases until the base is flat.
- Body: work one round in BLO, then 18 rounds of sc in rust. Keep the side walls straight; add a lining before handles if you want a firmer bag.
- Ears: make two rust triangles from ch 8, work 7 sc and decrease at both ends over the next 3 rows. Add smaller cream triangles and sew them to the upper front corners.
- Muzzle: crochet a cream oval from ch 8, work around both sides and increase at each end for 3 rounds. Sew it flat near the top center and embroider a charcoal nose and eyes.
- Handles: make two bands from ch 30 and 4 rows of sc. Sew each end through 5 or more body stitches.
Assembly: Stitch ears, muzzle and handles firmly. Embroider facial features rather than using plastic parts.
Sleepy Cat Bottle Carrier
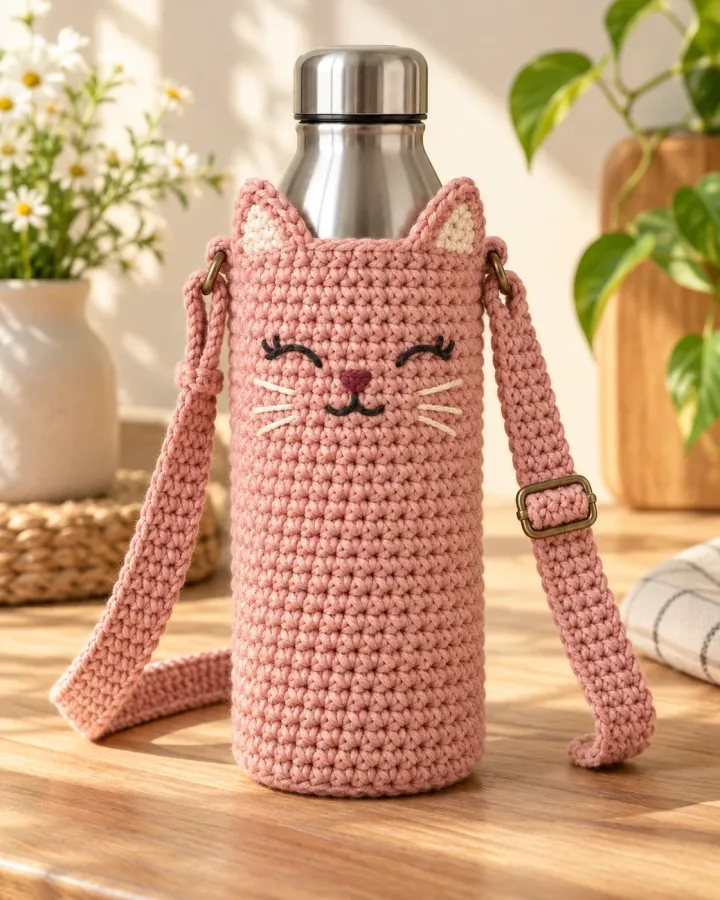
A dusty-pink bottle carrier has tiny cat ears, embroidered sleepy eyes and a long adjustable crochet strap. The fitted sleeve leaves the bottle top accessible and adds a sweet but understated animal detail for school, travel or everyday walks.
- LEVEL
- Confident beginner
- TRY IT WITH
- DK cotton: dusty pink 95 yd, cream 10 yd, charcoal 4 yd; 3.5 mm hook
- FINISHING NOTE
- Fits a bottle about 3 in across; make strap to preferred length.
Short Pattern
Abbreviations: MR magic ring · sc single crochet · hdc half double crochet · inc increase · sl st slip stitch · ch chain · BLO back loop only
- Base: work 6 sc in MR and increase evenly to 36, or to the circumference of the bottle base.
- Sleeve: work 1 round in BLO, then 22 rounds of sc. Check the height against the bottle and leave its cap and drinking opening uncovered.
- Ears: make two small triangles in pink from ch 6, work 5 sc and decrease to a point over 2 rows. Fold the bases and sew them to opposite sides of the sleeve rim.
- Face: embroider two curved charcoal sleepy eyes and a small cream muzzle on the front. Secure every yarn end inside the sleeve.
- Strap: ch 85 and work 2 rows of sc. Sew each end to the side seams across at least 6 stitches; add a few reinforcement passes.
Assembly: Check bottle fit and strap seams with the bottle filled. Keep the carrier away from hot containers.
Oatmeal Bear Lunch Sack
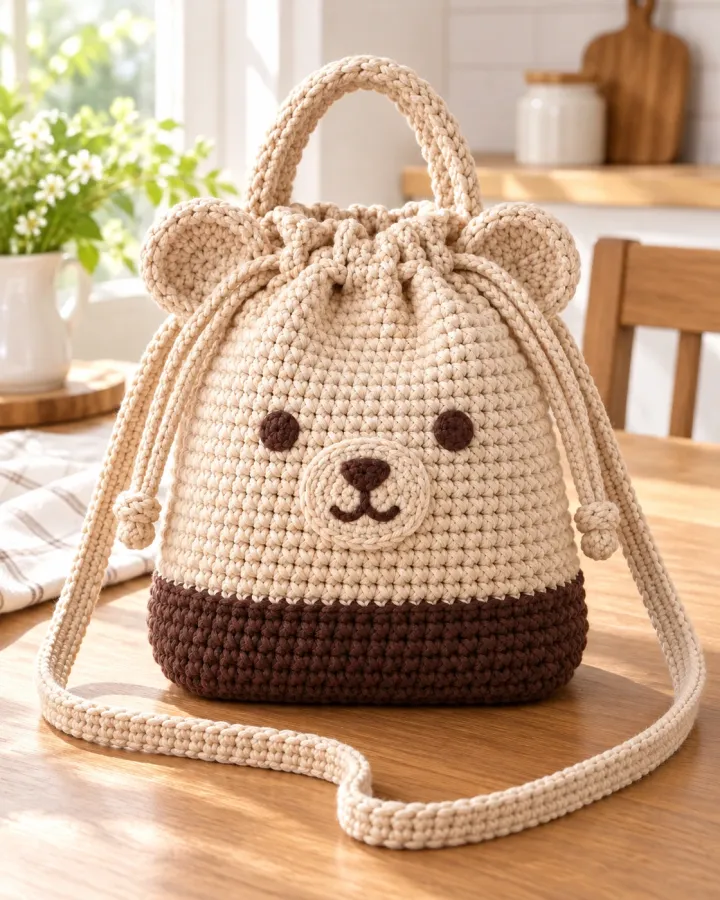
An oatmeal-colored lunch sack uses rounded bear ears, a small embroidered face and a cocoa-toned base for a gentle woodland look. The simple drawstring opening and roomy body make the design suitable for both children and adults who like cozy accessories.
- LEVEL
- Confident beginner
- TRY IT WITH
- DK cotton: oatmeal 190 yd, cocoa 45 yd, cream 15 yd; 4 mm hook
- FINISHING NOTE
- Approx. 9 in tall by 7 in wide.
Short Pattern
Abbreviations: ch chain · sc single crochet · hdc half double crochet · inc increase · sl st slip stitch · BLO back loop only · MR magic ring
- Base: ch 21 and work 3 oval rounds, increasing evenly at both ends. Change to cocoa for one contrast round at the base edge.
- Body: change to oatmeal, work one round in BLO and 18 even rounds of sc. Add a final cream round if you want a narrow color accent.
- Rim: work 2 rounds of hdc. Make an eyelet round by repeating ch 1, skip 1, hdc in next stitch, then add one plain round.
- Ears: make two oatmeal circles from MR 6 to 18, flatten and sew to the front near the rim. Embroider small charcoal eyes and a cocoa nose.
- Crochet a long chain cord, weave through eyelets and knot the ends securely. Add optional short handles, reinforcing them through multiple rows.
Assembly: Tie the cord ends securely and keep food in a separate washable container.
Duckling Bottle Sleeve
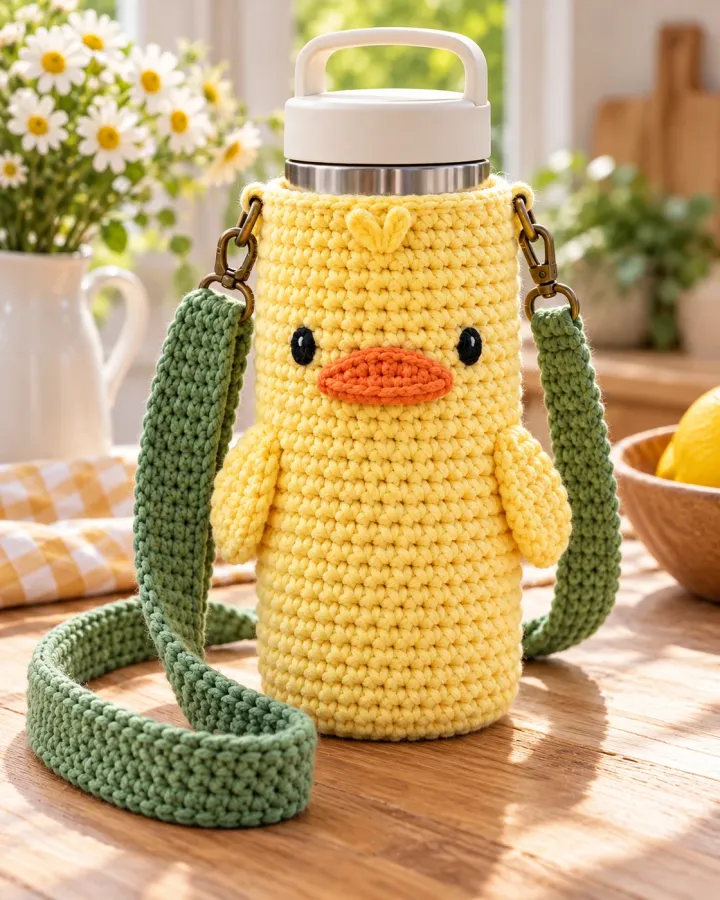
Butter-yellow crochet wraps a reusable bottle with a tiny flat beak, embroidered eyes and a green shoulder strap. The duckling theme is bright and easy to recognize, while the simple sleeve shape keeps the pattern quick to customize for different bottle sizes.
- LEVEL
- Confident beginner
- TRY IT WITH
- DK cotton: butter yellow 95 yd, orange 8 yd, green 25 yd, charcoal 3 yd; 3.5 mm hook
- FINISHING NOTE
- Fits a bottle about 3 in across and 8–10 in tall.
Short Pattern
Abbreviations: MR magic ring · sc single crochet · hdc half double crochet · inc increase · sl st slip stitch · ch chain · BLO back loop only
- Base: make 6 sc in MR and increase evenly to 36 stitches, or stop when the disk matches the bottle bottom.
- Sleeve: work one round in BLO and 22 rounds of sc. Adjust the number of rounds so the bottle top remains fully accessible.
- Beak: with orange, ch 5 and work 4 sc for 2 rows. Shape the tip with one decrease, then sew the flat piece to the front.
- Embroider two charcoal eyes above the beak. Add a small green wing oval on each side, stitching all the way around.
- Strap: ch 80 in green and work 2 rows of sc. Sew each end to opposite sides across 6 stitches and reinforce.
Assembly: Use embroidered features rather than beads. Test the strap with a full bottle before carrying.
Navy Gingham Lunch Tote
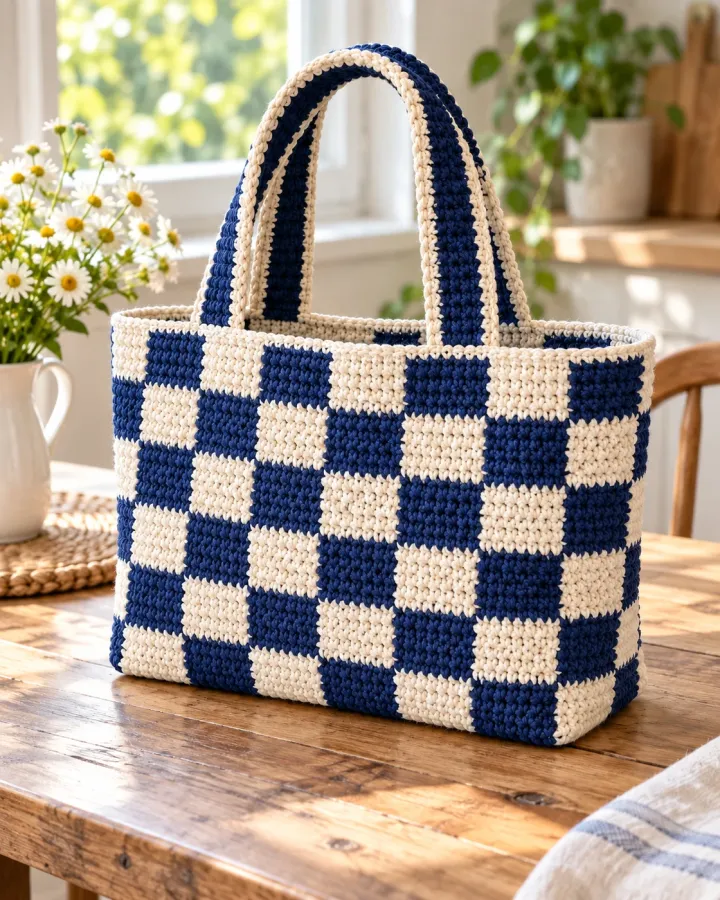
Navy-and-cream checks give this crochet tote a crisp picnic-cloth look, while matching handles and a flat rectangular base keep it practical. The timeless color palette works for adults as well as older students who prefer a classic bag.
- LEVEL
- Intermediate
- TRY IT WITH
- DK cotton: navy 180 yd, cream 180 yd; 4 mm hook
- FINISHING NOTE
- Approx. 10 in wide by 9 in tall.
Short Pattern
Abbreviations: ch chain · sc single crochet · hdc half double crochet · sl st slip stitch · BLO back loop only · color change on last yarn-over
- Base: with navy, ch 31 and work an oval with 3 sc in each end. Continue for 3 rounds, increasing at both curves until the base lies flat.
- Body: work one round in BLO. For checks, crochet 4 rounds in navy, then 4 in cream; carry the unused yarn loosely inside or fasten off at each change. Repeat the color blocks for 5 checker rows.
- Keep color changes aligned by starting each new round at the same side seam. Use a tapestry needle to tidy the carried strands inside.
- Top: work 2 rounds of hdc in navy. Handles: make two bands from ch 34 and 5 rows of sc in alternating navy and cream blocks.
- Sew the handles to the tote with reinforced box seams. Add a fabric lining if you want the bag to hold its shape.
Assembly: Even color tension makes the checkerboard neat. Line the bag if small items might catch in the stitches.
Pink Gingham Lunch Bag
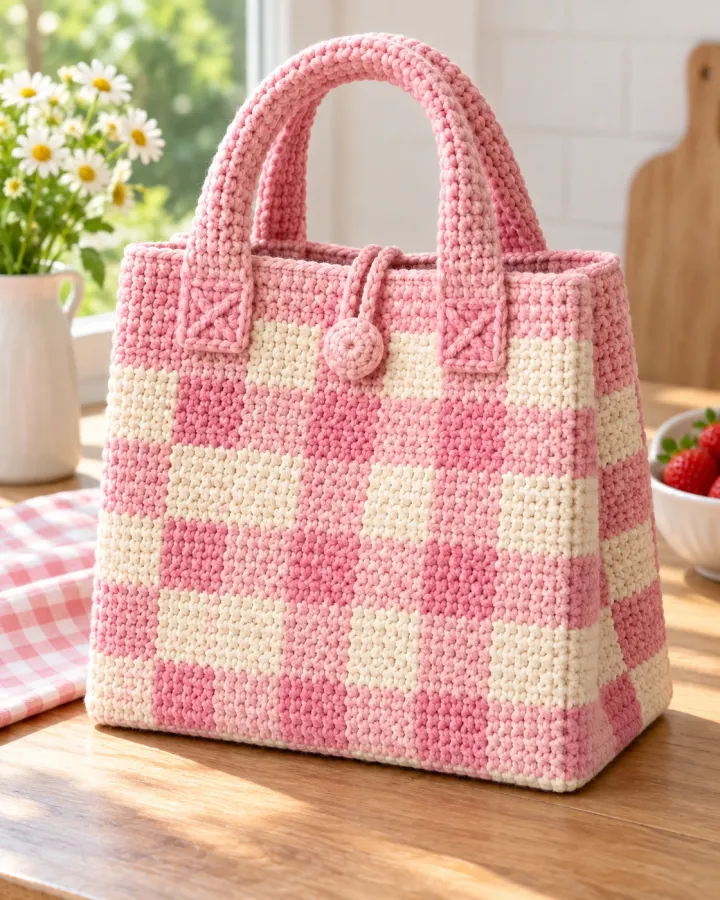
Soft pink-and-cream checks turn this crochet lunch bag into a cheerful school or work accessory. A neat loop closure, reinforced short handles and structured base add useful details without taking away from the classic handmade gingham pattern.
- LEVEL
- Intermediate
- TRY IT WITH
- DK cotton: soft pink 180 yd, cream 180 yd; 4 mm hook; optional washable lining
- FINISHING NOTE
- Approx. 9 in wide by 8 in tall.
Short Pattern
Abbreviations: ch chain · sc single crochet · hdc half double crochet · sl st slip stitch · BLO back loop only · color change on final yarn-over
- Base: ch 27 and crochet 3 oval rounds in pink, increasing at both ends until the base is flat and about 8 in long.
- Body: work one round in BLO. Alternate 4-round color blocks of pink and cream; carry yarn neatly at the side seam or fasten off for a cleaner inside.
- Continue until the bag reaches about 8 in tall. Keep each color block the same height and align the seam at the back.
- Top: work 2 rounds of sc in pink. Crochet a small loop from ch 8 and sew it to the back center; make a flat pink toggle and stitch it permanently to the front.
- Make two short handles from ch 30 and 4 rows of sc. Reinforce all four handle ends with box-shaped seams.
Assembly: The toggle is decorative and permanently attached. A sewn lining helps protect small items from slipping through.
Granny-Square Lunch Tote
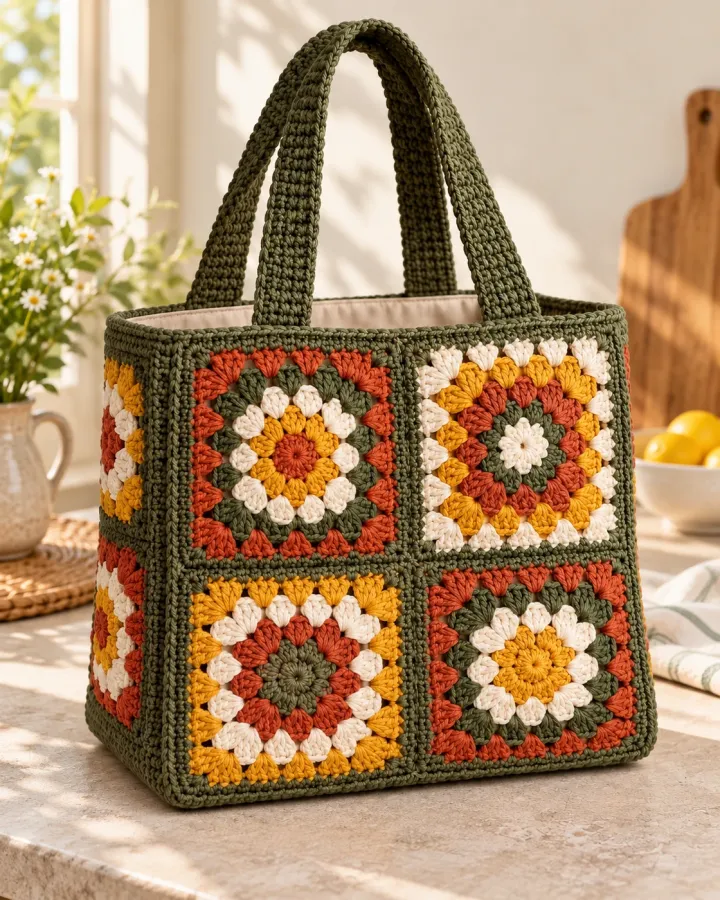
Large granny squares in olive, rust, cream and mustard create a colorful but grown-up lunch tote. The four-panel construction showcases classic crochet motifs, while a sturdy base and simple shoulder straps make it useful beyond a single season.
- LEVEL
- Intermediate
- TRY IT WITH
- DK cotton: olive, rust, cream and mustard 90 yd each; 4 mm hook
- FINISHING NOTE
- Approx. 10 in wide by 10 in tall.
Short Pattern
Abbreviations: ch chain · sl st slip stitch · sc single crochet · dc double crochet · MR magic ring · join new color with sl st
- Make four matching granny squares: MR, ch 3, work 2 dc, ch 2 in the ring; repeat the corner cluster 3 more times, joining with sl st. Increase each round with 3-dc clusters and ch-2 corners until 8 in square.
- Arrange the four squares in a 2-by-2 layout and sew edges together with sc through both loops. Keep the color order consistent on both sides.
- Base: ch 31 and work 3 oval rounds in one solid color. Join the assembled panels around the base with sc, easing corners evenly.
- Add 2 rounds of sc around the top edge. Make two straps from ch 42 and 5 rows of sc, then sew them to the front and back with reinforced box seams.
- Weave in all tails and add a removable fabric lining, attached with hand stitches if desired.
Assembly: Check panel seams for gaps and reinforce the strap joins. Keep food in sealed containers inside the tote.
Terracotta Color-Block Crossbody
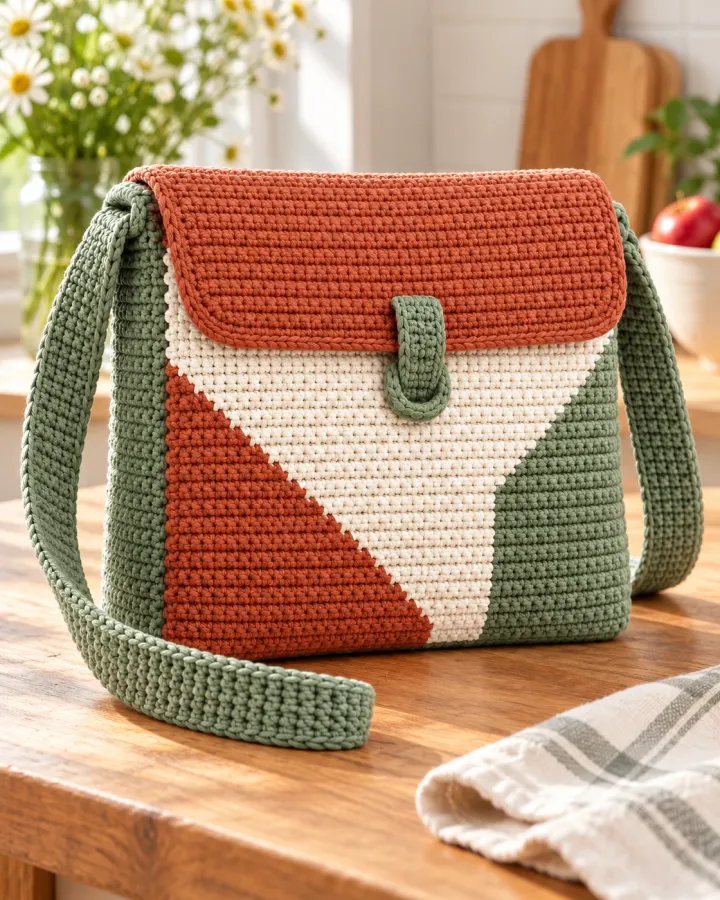
Terracotta, cream and sage panels give this modern crochet lunch crossbody a clean geometric look. Its broad strap and compact flap make it a hands-free choice for adults, with an integrated yarn loop closure instead of metal hardware or buttons.
- LEVEL
- Intermediate
- TRY IT WITH
- DK cotton: terracotta 120 yd, cream 75 yd, sage 55 yd; 4 mm hook
- FINISHING NOTE
- Approx. 9 in wide by 8 in tall; strap about 40 in.
Short Pattern
Abbreviations: ch chain · sc single crochet · hdc half double crochet · sl st slip stitch · BLO back loop only · dec decrease
- Front and back: make two panels, ch 28 and work 27 sc for 30 rows. Change colors in broad blocks, carrying yarn at the side seam or fastening off neatly.
- Base gusset: ch 9 and work 8 sc for 60 rows in terracotta. Sew one long side to the front panel and the other to the back panel, easing around corners.
- Flap: pick up 22 stitches at the back top edge. Work 12 rows of sc, decreasing one stitch at both ends every third row for a rounded point.
- Closure: crochet a small loop at the flap tip and sew it in place. Make a flat yarn toggle on the bag front and stitch it permanently through several rows.
- Strap: ch 145 and work 3 rows of hdc. Sew each end to opposite upper sides with a box seam and reinforce with multiple passes.
Assembly: Check strap length before sewing permanently. The crochet bag is not waterproof; use sealed food containers.
Forest Ribbed Bottle Holder
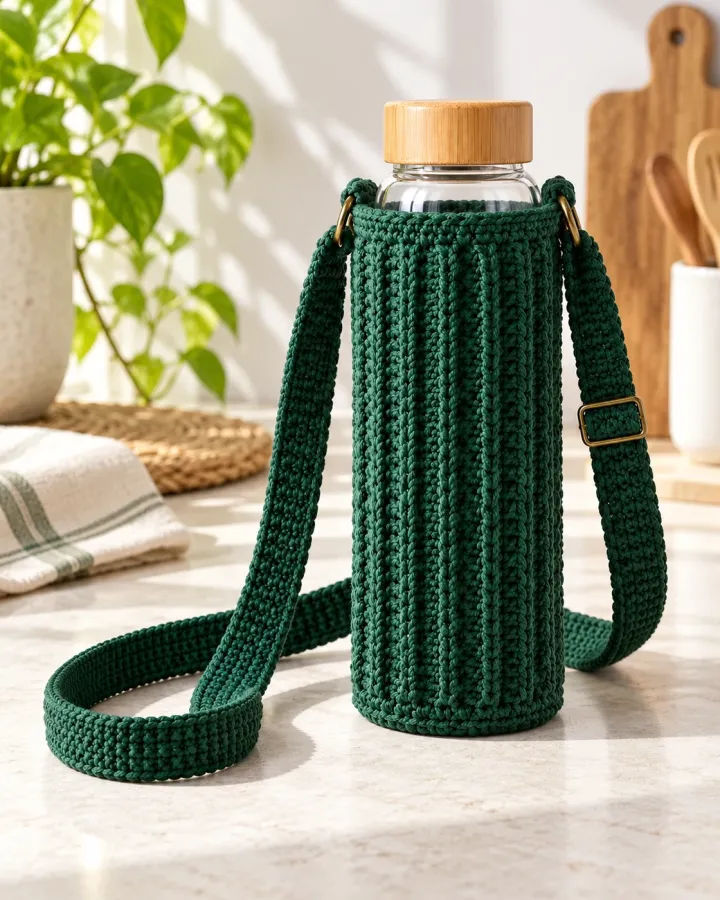
A deep forest-green bottle sleeve uses vertical ribbing and a long adjustable strap for a minimal everyday look. Its understated shape suits adults who want a handmade accessory that feels practical rather than novelty-themed.
- LEVEL
- Confident beginner
- TRY IT WITH
- DK cotton: forest green 110 yd; 3.5 mm hook; optional cord-lock-free strap adjuster made from yarn
- FINISHING NOTE
- Fits a bottle about 3 in across; height about 9 in.
Short Pattern
Abbreviations: MR magic ring · sc single crochet · hdc half double crochet · BLO back loop only · inc increase · sl st slip stitch
- Base: make 6 sc in MR and increase by 6 each round until the disk fits the bottle bottom, usually 36–42 stitches.
- Sleeve: work one round in BLO. For ribbing, alternate one round of sc and one round of hdc in BLO for 24–28 rounds, checking the fit every 4 rounds.
- Top edge: work 2 rounds of sc. Keep the opening snug enough to hold the bottle but loose enough to remove it easily.
- Strap: ch 95 and work 3 rows of sc. Sew each end to the sleeve sides across at least 8 stitches, then reinforce the seams with a second line of stitching.
- Wet block gently if the yarn label permits, dry flat and test the holder with the filled bottle.
Assembly: Choose a washable yarn and inspect the strap seams regularly. Do not carry hot bottles in a soft crochet sleeve.
Sunflower Lunch Tote
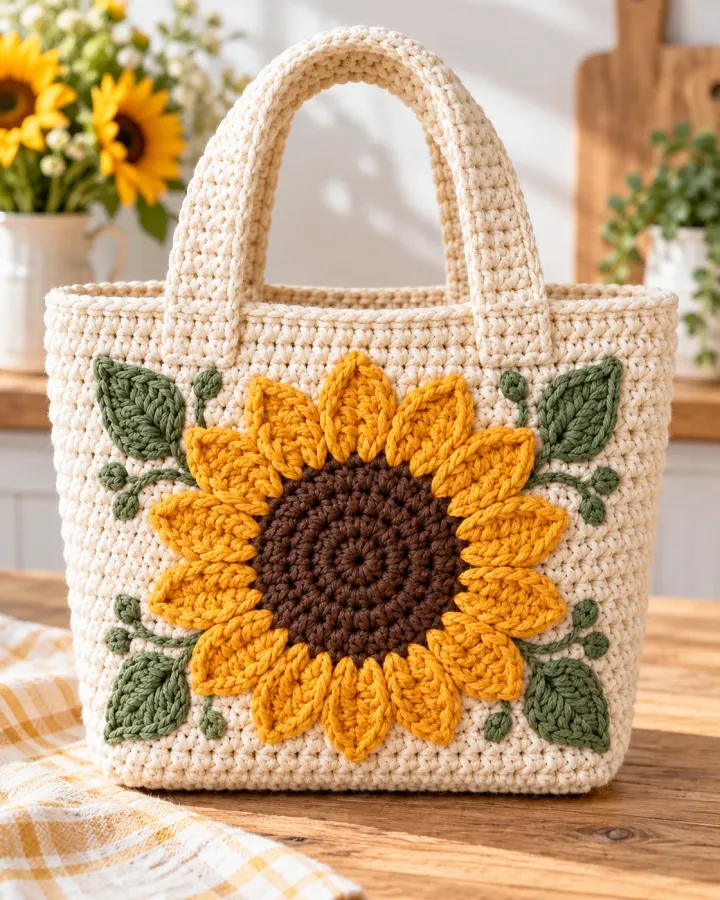
A large golden sunflower motif blooms across a cream crochet tote, framed with sage leaves and sturdy matching handles. The cheerful design works for picnics or everyday errands, while its neutral base keeps the floral color palette easy to style.
- LEVEL
- Intermediate
- TRY IT WITH
- DK cotton: cream 180 yd, golden yellow 35 yd, brown 15 yd, sage 20 yd; 4 mm hook
- FINISHING NOTE
- Approx. 10 in wide by 9 in tall.
Short Pattern
Abbreviations: ch chain · sc single crochet · hdc half double crochet · dc double crochet · MR magic ring · inc increase · sl st slip stitch
- Base: ch 29 and crochet 3 oval rounds in cream. Work one round in BLO, then 18 rounds of sc for the bag body.
- Flower center: crochet a brown circle from MR 6 to 24. Make 8 golden petals by chaining 6 and working sc, hdc, 3 dc in the end, hdc and sc along the chain.
- Sew the center and petals flat to the front panel. Add two sage leaves from ch 7, shaped with hdc and dc, and stitch their edges securely.
- Top: work 2 rounds of hdc in cream. Make two straps from ch 36 and 5 rows of sc.
- Attach straps with box-shaped reinforced seams and line the tote if desired.
Assembly: Sew all flower edges flat so they do not catch. Use a lining for small items and sealed lunch containers.
Muted Rainbow Lunch Pouch
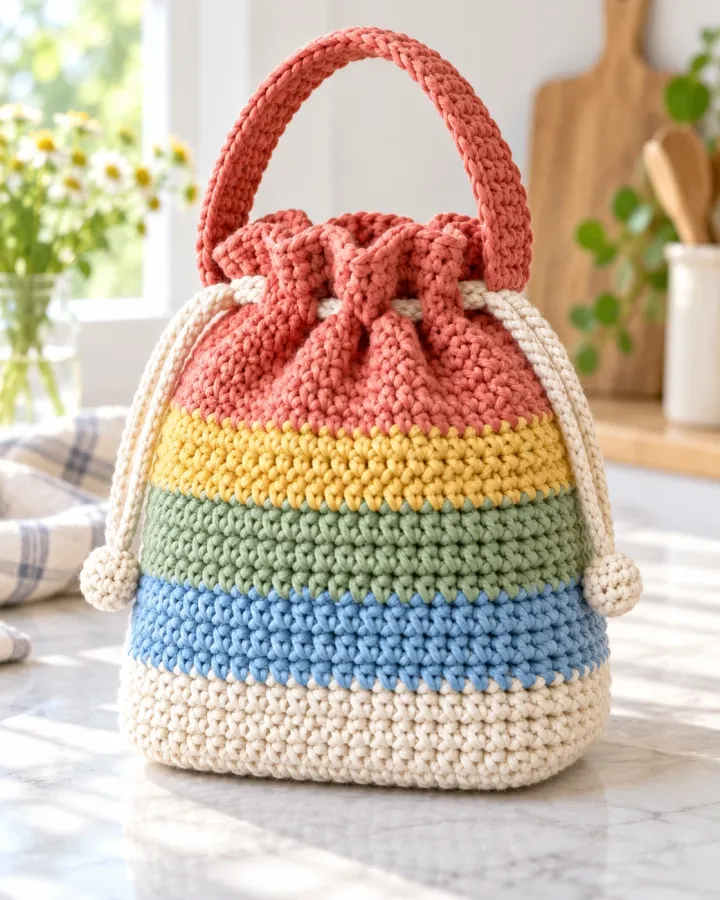
Coral, mustard, sage, sky blue and cream stripes make this compact crochet pouch cheerful but softly toned. The secure drawstring top and short handle suit snacks, utensils or a small lunch container for school and weekend outings.
- LEVEL
- Confident beginner
- TRY IT WITH
- DK cotton: coral, mustard, sage, blue and cream 35 yd each; 4 mm hook
- FINISHING NOTE
- Approx. 7 in wide by 8 in tall.
Short Pattern
Abbreviations: ch chain · sc single crochet · hdc half double crochet · sl st slip stitch · BLO back loop only · color change on last yarn-over
- Base: ch 19 and crochet 3 oval rounds in cream, adding increases at both ends until the base lies flat.
- Body: work one round in BLO, then make 4 rounds each in coral, mustard, sage, blue and cream. Carry yarn at the side seam or fasten off between colors.
- Top: work 2 rounds in cream. Make an eyelet round by repeating ch 1, skip 1, sc in next stitch; add one plain sc round.
- Cord: chain a length about twice the opening circumference and weave it through the eyelets. Tie the ends in a secure knot and trim neatly.
- Add a short handle from ch 22 and 3 rows of sc; sew both ends to one side seam through several stitches.
Assembly: Keep drawstring ends short and knotted. Use a washable lining if carrying small utensils.
Black-and-Cream Checkerboard Tote
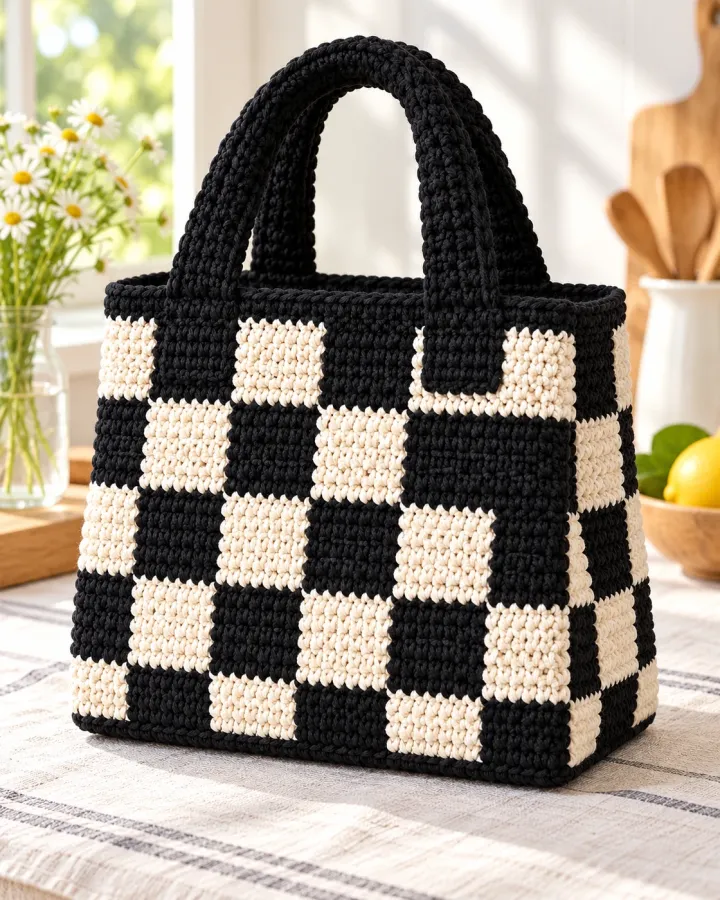
High-contrast black-and-cream squares give this mini lunch tote a modern graphic style. A squared-off base and firm crochet handles make the checkerboard pattern feel polished and practical for adults who prefer clean, minimalist accessories.
- LEVEL
- Intermediate
- TRY IT WITH
- DK cotton: black 180 yd, cream 180 yd; 4 mm hook
- FINISHING NOTE
- Approx. 9 in wide by 8 in tall.
Short Pattern
Abbreviations: ch chain · sc single crochet · hdc half double crochet · BLO back loop only · color change on final yarn-over
- Base: ch 27 and work an oval with 3 sc in each end. Add 3 rounds, increasing evenly at the rounded ends.
- Body: work one round in BLO. For each check, use 6 stitches by 6 rounds: alternate black and cream every 6 stitches, then switch the color arrangement in the next block row.
- Carry the unused color inside the fabric with even tension or fasten off at each check for a tidy lining side. Continue until the body is about 8 in tall.
- Top: work 2 rounds of hdc in black. Make two handles from ch 32 and 4 rows of sc, then fold lengthwise and seam the edges.
- Sew handles down with reinforced box seams. Add a fabric lining to keep the interior smooth and prevent small objects from slipping through.
Assembly: Carry yarn loosely so the fabric stays flexible. Reinforce both handles and line the tote for everyday use.
Apple-Shaped Lunch Bag
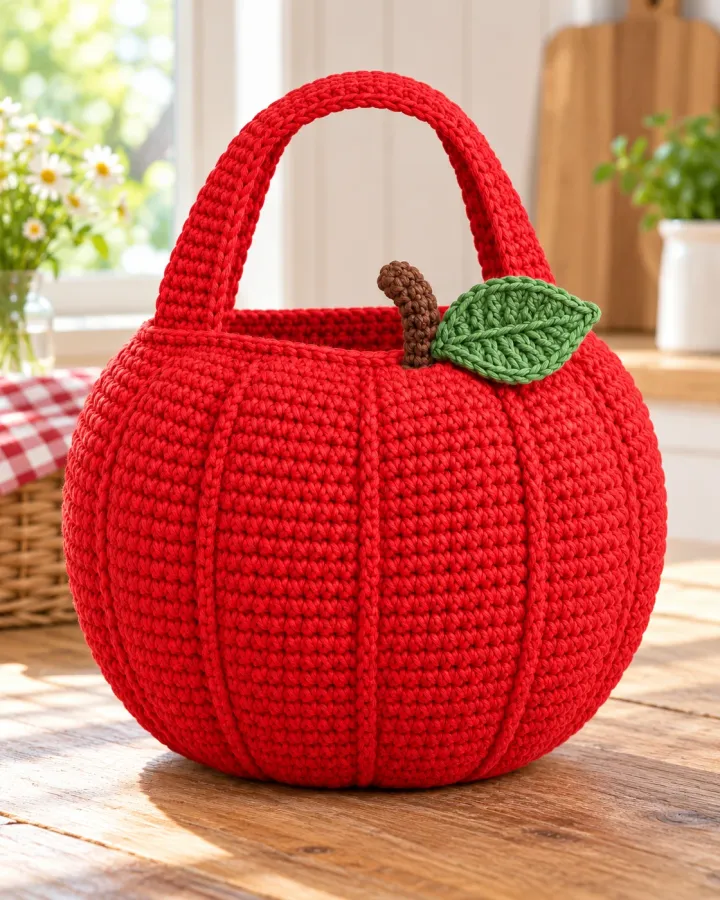
A bright red crochet apple pouch has gentle ribbed shaping, a small green leaf and a compact carry handle. Its familiar fruit silhouette makes a fun school accessory, while the neat opening keeps the design useful for wrapped snacks or small containers.
- LEVEL
- Intermediate
- TRY IT WITH
- DK cotton: apple red 180 yd, leaf green 20 yd, brown 5 yd; 4 mm hook
- FINISHING NOTE
- Approx. 8 in tall by 7 in wide.
Short Pattern
Abbreviations: MR magic ring · ch chain · sc single crochet · hdc half double crochet · inc increase · dec decrease · sl st slip stitch · BLO back loop only
- Base: make 6 sc in MR and increase evenly to 42 stitches. Work 2 rounds in BLO to establish the lower edge.
- Body: work 15 rounds of sc. To create apple lobes, place 6 evenly spaced decreases on the next round, then work 2 rounds even. Keep the opening broad.
- Top: work 2 rounds in green hdc. Make a small brown stem tube from 6 sc for 4 rounds and sew it at the center back.
- Leaf: ch 7 in green and work sc, hdc, 2 dc, hdc and sc along the chain; return along the opposite side. Sew flat beside the stem.
- Add a short handle from ch 24 and 3 rows of sc, joining it across the side seams with reinforced stitches. Finish with a simple drawstring if desired.
Assembly: Secure the stem and leaf firmly. Keep all food wrapped and use a lining if the bag will carry small items.
Make thoughtfully and check as you go.
Yarn, hook size and personal tension can change the finished scale. Count every round, stuff gradually and use embroidered features instead of safety eyes when making toys for children under three.