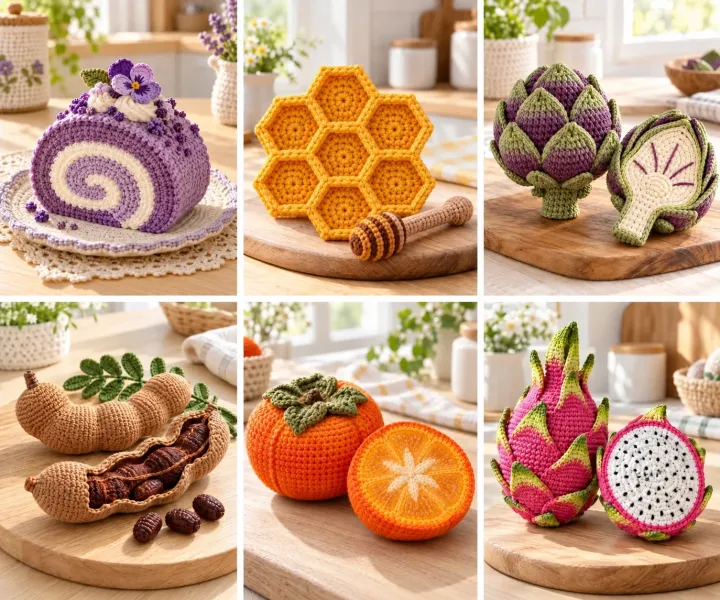
Skip the familiar cupcake-and-strawberry set and make tiny crochet foods with unusual textures, colors and cutaway details. This collection includes fifteen original display designs, each with its own photo, materials, approximate finished size and a step-by-step guide using US crochet terms. Unless a step says to turn, work amigurumi in continuous rounds, mark the first stitch and use a hook that keeps the filling hidden. The AI-created photos are visual design references; these original instructions have not been sample-tested, so adjust shaping to your yarn and tension. These pieces are decorative pretend food, not edible or safety-tested toys. Embroider small details and sew every component firmly in place.
Fizzing Yuzu Soda Float
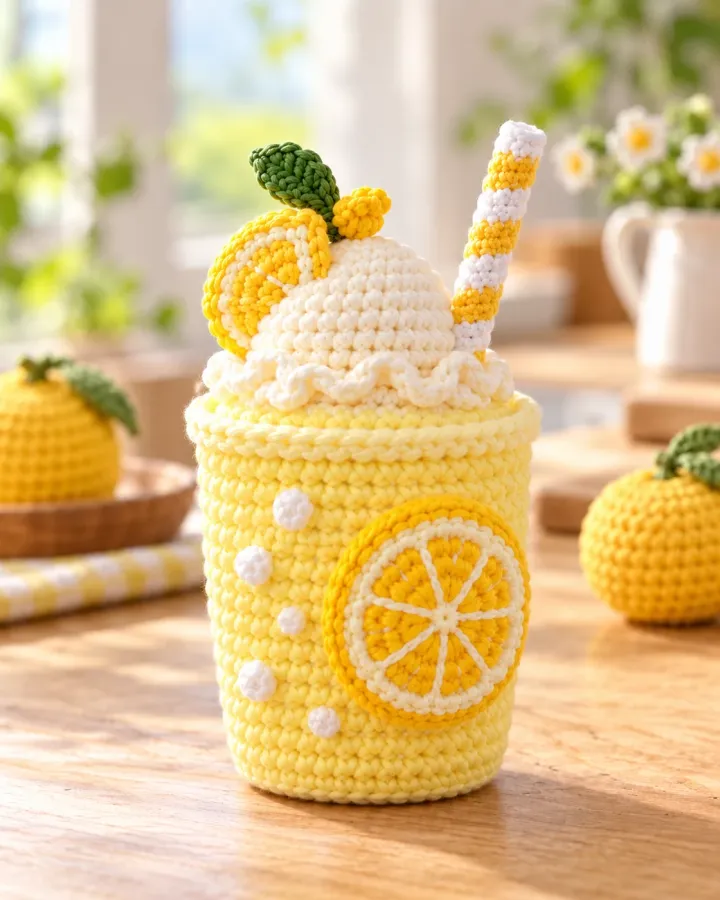
A lemon-yellow crocheted tumbler holds yuzu soda beneath soft cream foam. White bobble bubbles, a striped yarn straw and a citrus wheel keep this miniature drink colorful, recognizable and realistic for an amigurumi maker to recreate.
- LEVEL
- Intermediate
- TRY IT WITH
- DK cotton: lemon yellow 150 yd, cream 65 yd, white 20 yd, golden yellow 25 yd, leaf green 15 yd; 2.75 mm hook; washable filling
- FINISHING NOTE
- Approx. 6 in tall.
Short Pattern
Abbreviations: MR magic ring · sc single crochet · hdc half double crochet · dc double crochet · inc 2 sc in one stitch · dec invisible decrease over 2 stitches · sl st slip stitch · ch chain
- Opaque tumbler base: in lemon yellow, make 6 sc in MR and increase evenly to 48 over 7 rounds. Work one round in BLO to turn upward, then crochet 8 rounds at 48 stitches for straight sides. The finished fabric should be dense and fully opaque.
- Stuff the tumbler firmly but keep the base flat. Crochet a cream top disk: make 6 sc in MR, increase to 48 and fasten off. Sew the disk across the open top, catching every stitch so the cup is closed and remains a soft, solid amigurumi shape.
- Add a raised rim by surface slip stitching one lemon-yellow round around the top edge. Work loosely enough that the circular opening stays flat; the cream top should remain visible as the soda surface.
- Foam scoop: in cream, make 6 sc in MR, increase to 36, work 3 rounds, then decrease to 24. Add a little filling, close and sew the scoop centrally over the cream top. Add small white bobbles around its lower edge for froth.
- Yuzu wheel: crochet a small golden-yellow circle from MR 6 to 24. Add a cream outline and six cream spokes with surface slip stitches. Sew it flat to the front of the tumbler, slightly below the middle.
- Straw: make a narrow tube from 6 sc for 14 rounds, alternating lemon yellow and white every 2 rounds. Stuff lightly, close one end and stitch the other end into the foam scoop at a slight angle.
- Add 5–7 white bobble stitches to the cup front as fizzy bubbles and embroider a few short cream highlights near the yuzu wheel. Secure each end inside the stuffed tumbler and check the cup stands upright.
Assembly: The cup, drink surface, foam, straw and citrus wheel are all yarn crochet. There is no glass insert or transparent fabric; use dense stitches and sew the top disk securely in place.
Croquembouche Celebration Tower
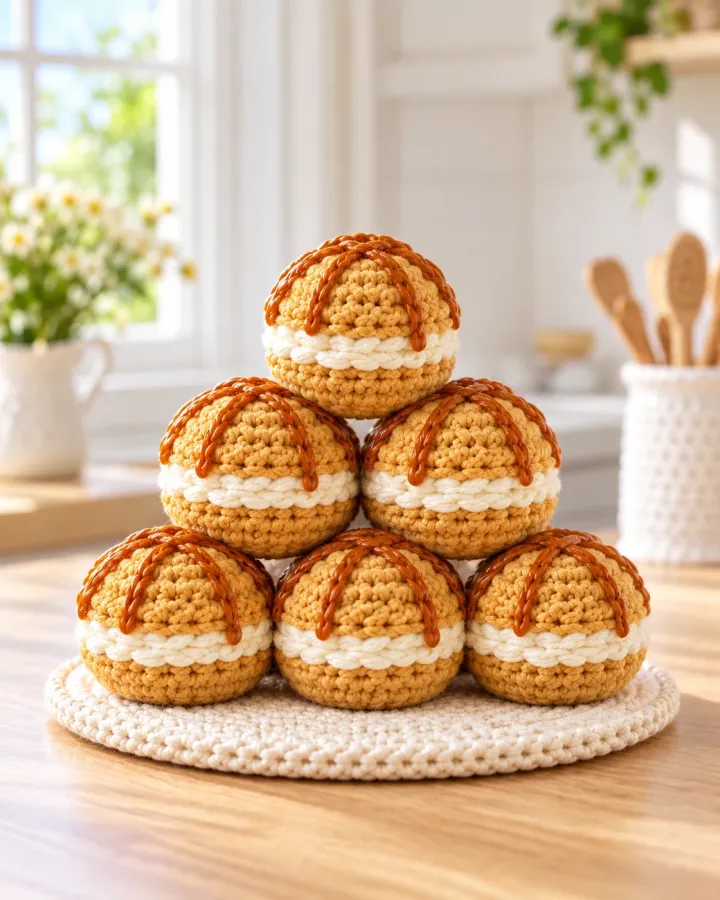
Seven soft crocheted cream puffs form a compact celebration tower on a broad, flat base. Simple cream frosting and short embroidered caramel accents keep the dessert recognizable while making this miniature sculpture practical to construct and sturdy to display.
- LEVEL
- Advanced
- TRY IT WITH
- DK cotton: warm beige 110 yd, cream 55 yd, caramel 15 yd; 2.75 mm hook; washable filling
- FINISHING NOTE
- Approx. 8 in tall.
Short Pattern
Abbreviations: MR magic ring · sc single crochet · hdc half double crochet · inc 2 sc in one stitch · dec invisible decrease over 2 stitches · sl st slip stitch · ch chain
- Flat base: with warm beige, make 6 sc in MR. Increase evenly to 36, then work 3 rounds in BLO to give the disk a shallow edge. Add a small amount of filling and sew a second matching circle to the underside for a firm, softly padded base.
- Make seven puffs: for each, start with 6 sc in MR, increase to 24 over 3 rounds, work 2 rounds even, then decrease to 12. Add a pinch of filling before the opening closes and finish with a smooth round shape.
- Frosting: surface-stitch one short cream curve across the top of each puff. Add a small cream bobble at the crown, keeping both details flat and securely anchored.
- Arrange three puffs in a triangle on the base and sew each one down through the base fabric. Set the next three in the gaps above, stitch them to their neighbors, then place the final puff at the top and sew through several layers.
- Caramel detail: embroider a few short, straight caramel lines across the puff surfaces. Tack each line at both ends and once in the middle; avoid loose chains or dangling loops.
- Add a narrow cream edging around the visible base if desired. Check that the tower stands upright, then weave all tails into the base or puffs.
Assembly: The compact seven-puff arrangement and broad padded base are designed as one soft display piece. Sew every puff to the base and its neighboring puffs; use embroidered caramel marks rather than loose drips.
Finger Lime Caviar Duo
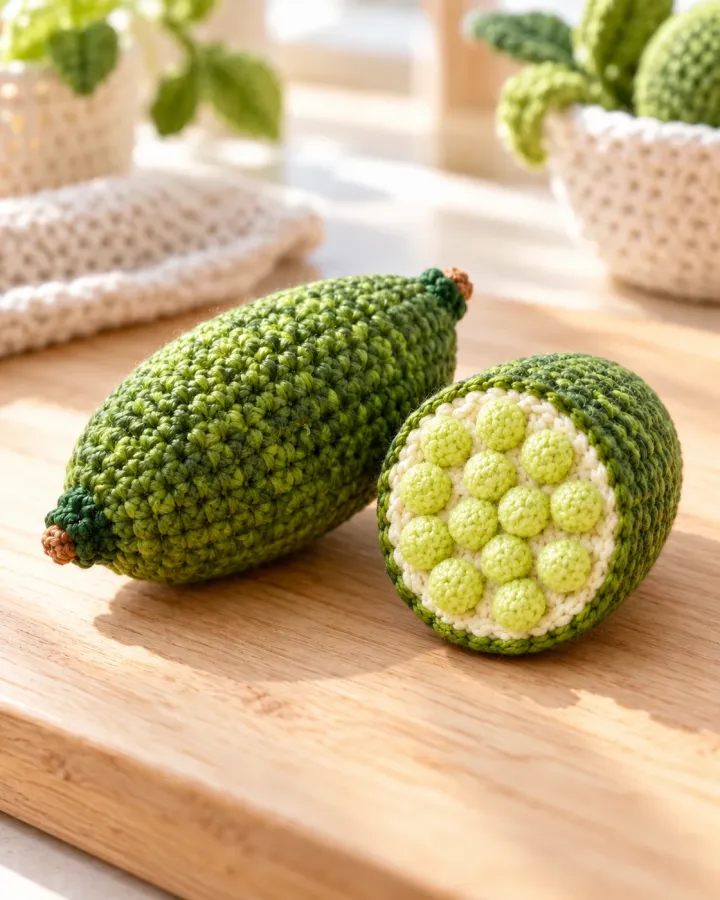
A slim dark-green finger lime sits beside a cut half whose face is covered with neat, opaque pale-green crochet bobbles. The simple repeated texture suggests the fruit’s caviar-like interior without tiny loose beads, making the unusual citrus design much more practical to crochet.
- LEVEL
- Intermediate
- TRY IT WITH
- DK cotton: deep green 45 yd, pale lime 35 yd, cream 15 yd; 2.5 mm hook; washable filling
- FINISHING NOTE
- Approx. 5 in long including cut half.
Short Pattern
Abbreviations: MR magic ring · sc single crochet · inc 2 sc in one stitch · dec invisible decrease over 2 stitches · sl st slip stitch · ch chain
- Whole fruit: with deep green, make 6 sc in MR and increase to 24. Work 10 rounds at 24, then decrease to 18 and 12. Add filling gradually to keep the fruit slim and gently curved; close both ends.
- Cut-half backing: make a pale-lime oval by chaining 8, working around both sides and increasing at each end until you have about 30 stitches. Work one even round and fasten off, leaving a sewing tail.
- Crochet the cut-face bobbles directly onto the oval. Space about 12–15 small bobbles in tidy offset rows, using 3 dc closed together in each chosen stitch. Keep them low and snug so the face remains flat and the stitches are not loose.
- Make a narrow rind frame in deep green: repeat the oval foundation, work one round, and leave the center open as a frame. Sew the bobble oval behind it so a slim green border shows around the cut surface.
- For a finished back, crochet a second green oval and join it to the framed front around the edge. Add only a little filling before closing so the cut half stays flat.
- Add a few short pale-lime surface stitches to the whole fruit, then sew the whole lime and cut half together at one edge for a tidy display pair. Secure all bobbles and weave in the ends.
Assembly: The interior is made from firmly attached yarn bobbles, not beads or translucent materials. Keep the cut face flat and inspect each bobble before displaying.
French Canelé Pair
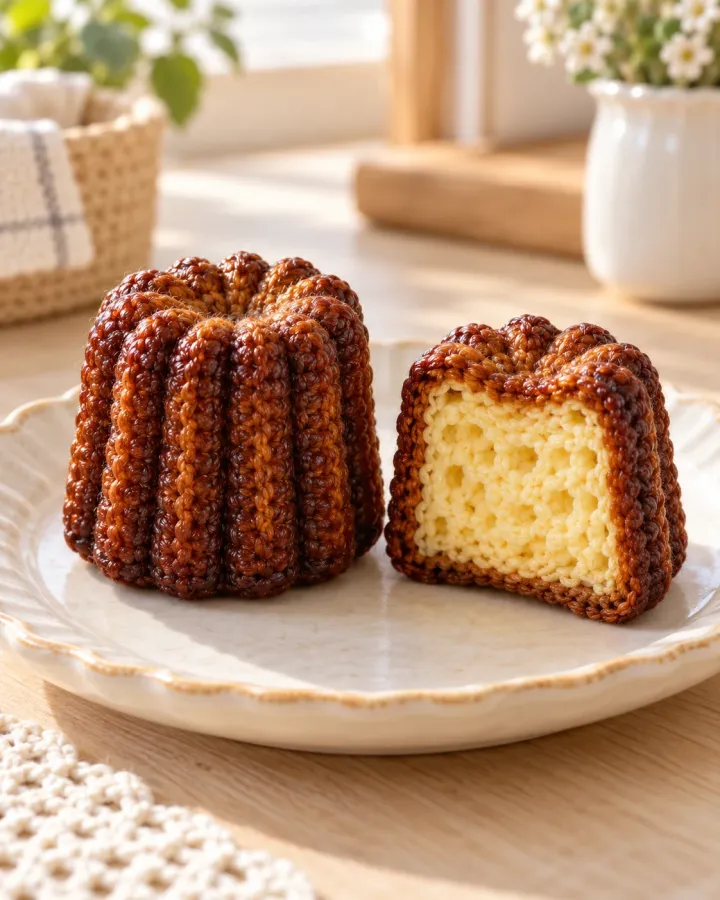
Deep caramel ridges give these tiny canelés their signature fluted shape, while one cut pastry reveals a golden custard center. The dark-and-light contrast turns this classic French bakery treat into an unusually realistic crochet miniature.
- LEVEL
- Intermediate
- TRY IT WITH
- DK cotton: espresso brown 90 yd, caramel 50 yd, custard yellow 35 yd; 2.5 mm hook; light filling
- FINISHING NOTE
- Each pastry approx. 3 in tall.
Short Pattern
Abbreviations: MR magic ring · sc single crochet · hdc half double crochet · inc 2 sc in one stitch · dec invisible decrease over 2 stitches · sl st slip stitch
- Base: in caramel, make 6 sc in MR and increase to 30. Work 1 round in BLO, then work 5 rounds at 30 to create a short cylinder. Keep the sides straight and the base flat.
- Ridges: surface slip stitch 10 vertical lines from top to base, spacing them evenly. Work the lines in espresso brown, then add a thin espresso round along the bottom edge.
- Top: decrease from 30 to 24 and then 18 stitches, stuff lightly and close. Add a small flat espresso circle to the top and sew down its edge to create the dark baked surface.
- Cut pastry: repeat the base and ridge steps, but change to custard yellow before closing the top. Crochet a flat yellow oval and sew it onto one side as the exposed interior.
- Make the second pastry whole in caramel and espresso, matching the height and ridge count. Add a small cream highlight stitch to each top for a soft bakery sheen.
- Arrange the cut canelé slightly in front of the whole one. Secure the pieces together with a few hidden stitches if this is intended as a single ornament.
- Weave all tails inside the pastries and shape the fluted sides with your fingers while the pieces are still lightly damp.
Assembly: Keep the outside ridges raised but not tight enough to distort the cylinder. These pastries are yarn decor and not edible.
Basque Burnt Cheesecake Slice
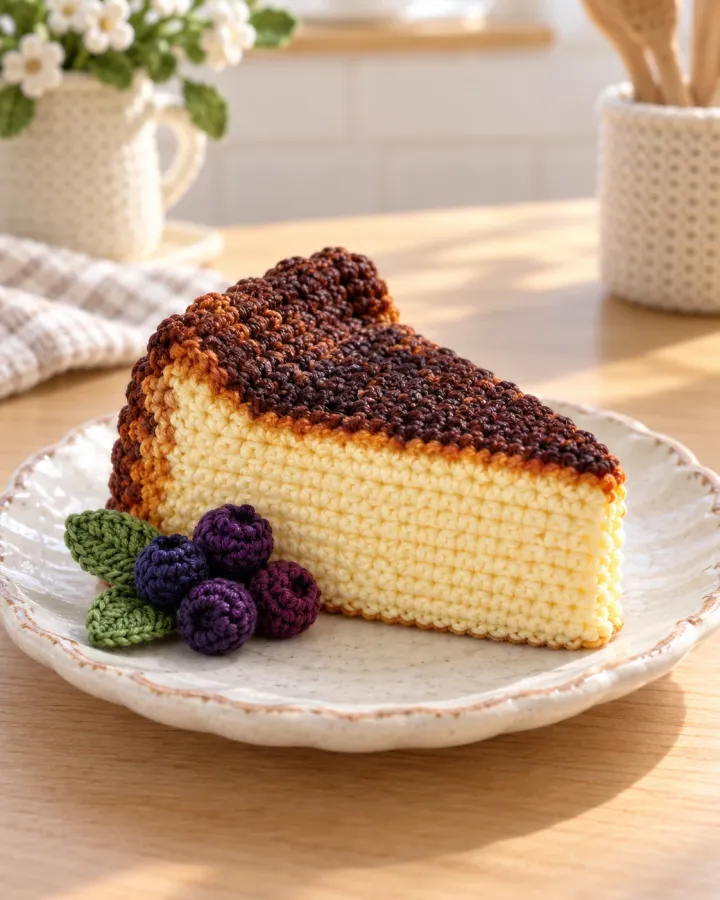
A thick cheesecake wedge wears a dark espresso-brown top above a creamy golden interior and a fine pale crust. The dramatic toasted edge and clean slice make this familiar dessert feel surprisingly special in miniature.
- LEVEL
- Confident beginner
- TRY IT WITH
- DK cotton: cream 95 yd, golden yellow 55 yd, espresso 30 yd, tan 25 yd; 2.75 mm hook; filling
- FINISHING NOTE
- Approx. 5 in wide.
Short Pattern
Abbreviations: ch chain · sc single crochet · hdc half double crochet · dc double crochet · inc 2 sc in one stitch · sl st slip stitch
- Crust base: in tan, ch 18. Work 17 sc across, ch 1 and turn for 4 rows. Add one row of hdc along the front edge to create a slightly rounded crust lip.
- Cheesecake body: make two matching wedge panels in cream. Start with ch 17 and decrease one stitch at the beginning of each row until 1 remains, creating a triangle. Work 5 rows in golden yellow at the widest base before continuing in cream.
- Join the two wedge panels with sc around the sloped sides, leaving the wide back open. Stuff the shape firmly but keep the point narrow and the top edge gently rounded.
- Sew the tan crust strip along the bottom edge, easing it around the wedge. Stitch the back seam closed after adjusting the filling so the slice holds a triangular profile.
- Burnt top: crochet a dark espresso triangle matching the upper surface, decreasing row by row. Sew it over the top, leaving a narrow cream border visible along the side edges.
- Add mottled toast marks using short tan and dark-brown embroidery stitches. Keep them scattered and subtle, concentrating the darkest color near the center of the top.
- Sew a few tiny dark berries and green leaves beside the slice if desired. Secure the garnish with matching yarn and weave ends inside the wedge.
Assembly: Add filling gradually to preserve the wedge shape. Keep the dark top panel smooth and securely sewn around its full edge.
Sourdough Boule and Airy Slice
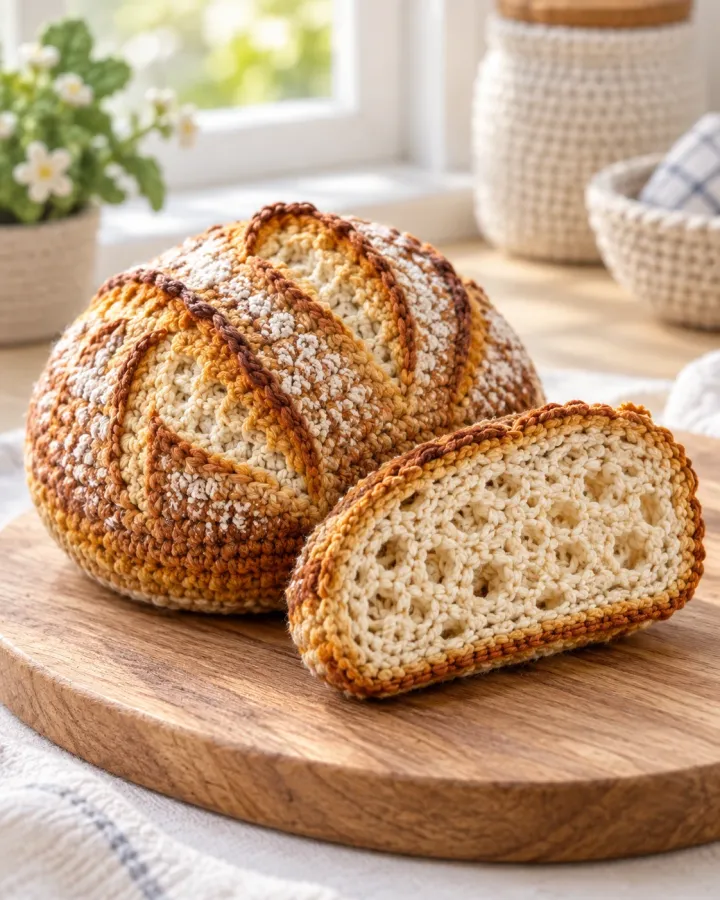
A flour-dusted sourdough boule sits beside a cut slice filled with open, uneven crumb stitches. Scored golden crust lines and the contrast between loaf and interior make this miniature bakery set feel especially convincing.
- LEVEL
- Intermediate
- TRY IT WITH
- DK cotton: wheat 100 yd, cream 65 yd, tan 45 yd, toasted brown 20 yd; 2.75 mm hook; filling
- FINISHING NOTE
- Boule approx. 5 in wide.
Short Pattern
Abbreviations: MR magic ring · sc single crochet · hdc half double crochet · inc 2 sc in one stitch · dec invisible decrease over 2 stitches · ch chain
- Loaf body: in wheat, make 6 sc in MR and increase to 48. Work 7 rounds at 48, then decrease to 42, 36 and 30. Add filling, keeping the top domed and the base slightly flatter.
- Continue decreasing to 18 and 6, fill firmly and close. Use tan yarn to embroider three curved scoring lines across the top; make each line a chain of loose surface stitches rather than pulling the fabric tight.
- Cut slice outline: crochet two wheat-colored panels in a rounded wedge shape, starting with ch 10 and increasing at the wider end over 6 rows. Make the panels the same size and shape.
- Crumb face: on one panel, work uneven cream bobbles and short hdc clusters across the center, leaving a narrow wheat border. Vary the stitch heights to suggest irregular air pockets.
- Join both wedge panels around the curved edge with sc, insert a small amount of filling and leave the crumb face visible. Add toasted-brown surface stitches along the curved crust.
- Add scattered cream surface stitches to the whole boule for flour. Keep the marks sparse so the golden crust remains visible.
- Place the slice against the boule and tack the lower corner in place. Check that the open crumb face points forward and that the loaf sits steadily.
Assembly: Use irregular, varied stitches for the crumb texture. Avoid stuffing the slice too firmly so the cut face stays flat.
Magenta Dragon Fruit Pair
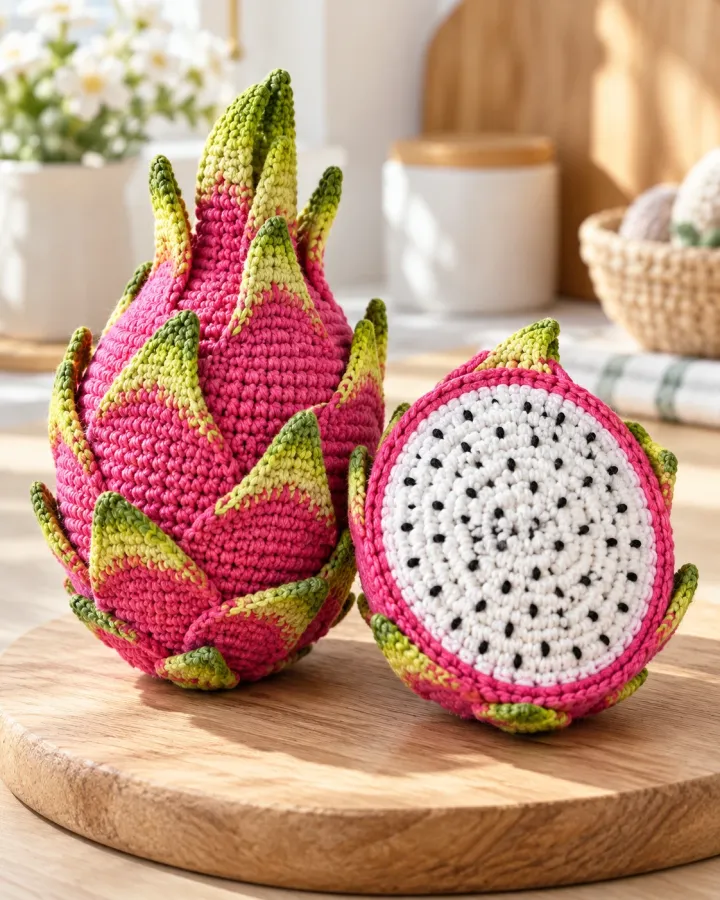
Vivid magenta skin and soft green scales surround a white cut face dotted with tiny black seeds. This tropical fruit pair uses high-contrast colors and a clear cross-section to stand out from the usual crocheted apple or strawberry.
- LEVEL
- Confident beginner
- TRY IT WITH
- DK cotton: magenta 90 yd, white 55 yd, green 25 yd, black 5 yd; 2.75 mm hook; filling
- FINISHING NOTE
- Approx. 5 in long.
Short Pattern
Abbreviations: MR magic ring · sc single crochet · inc 2 sc in one stitch · dec invisible decrease over 2 stitches · sl st slip stitch · ch chain
- Whole fruit: in magenta, make 6 sc in MR and increase to 30. Work 8 rounds, then decrease to 24, 18, 12 and 6. Stuff firmly to form an oval with tapered ends and close.
- Cut half: crochet a magenta oval from ch 8 around both sides, increasing at the ends to 30 stitches. Work 2 rounds and flatten the piece into a half-fruit shape.
- White center: make a white oval slightly smaller than the rind using the same foundation chain and 4 oval rounds. Sew it onto the magenta half, leaving a narrow border visible.
- Add black seeds by embroidering tiny straight stitches across the white center. Scatter them evenly and keep them short so they read as seeds instead of long marks.
- Crochet 8 green scale leaves from ch 5, working hdc and dc into the end chain and returning with sc. Sew the leaves around the whole fruit and along the curved rind edge of the half.
- Add a green stem tip to the whole fruit and a few magenta surface stitches near the cut edge. Arrange the two pieces together and tack them lightly.
- Check that all green scales are secure and the seeds are stitched through the white fabric. Weave in ends behind the rind.
Assembly: Keep the green scales soft and sewn down at both ends. Embroider seeds with yarn rather than adding beads.
Black Sesame Mooncake
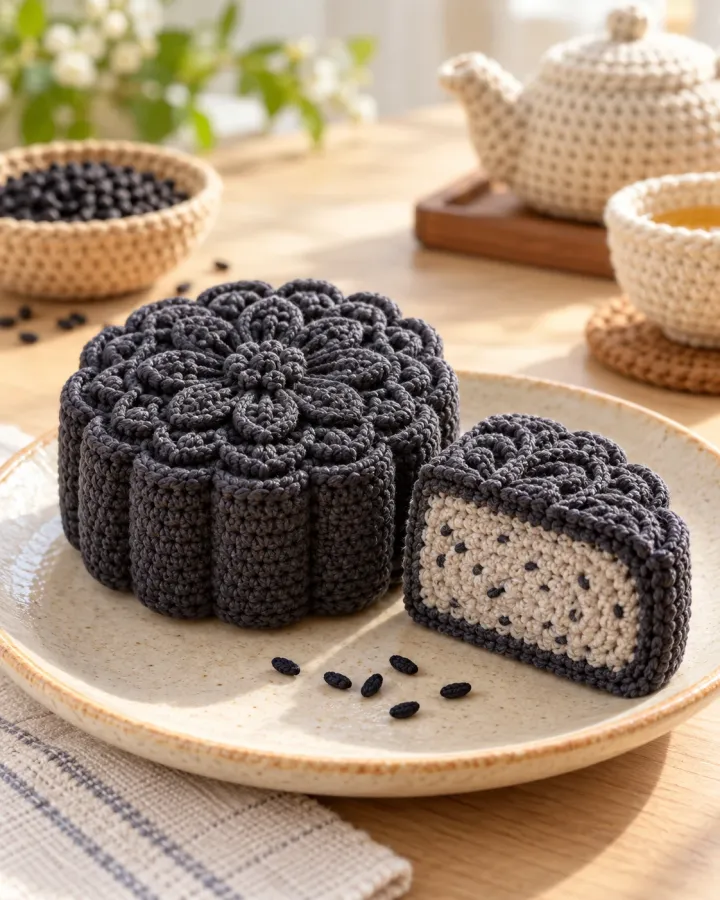
A charcoal black-sesame mooncake has an ornate floral top and a neat cutaway filled with pale sesame cream. Its monochrome outside and bright interior create an elegant, unexpected miniature bakery treat.
- LEVEL
- Intermediate
- TRY IT WITH
- DK cotton: charcoal 75 yd, black 35 yd, cream 50 yd, gray 20 yd; 2.5 mm hook; filling
- FINISHING NOTE
- Approx. 4 in across.
Short Pattern
Abbreviations: MR magic ring · sc single crochet · hdc half double crochet · inc 2 sc in one stitch · dec invisible decrease over 2 stitches · sl st slip stitch
- Top disk: in charcoal, make 6 sc in MR and increase evenly to 42. Work 2 rounds at 42. Add a raised black floral pattern with surface slip stitches radiating from the center.
- Side wall: continue in BLO for 3 rounds at 42, then work 2 rounds in charcoal. This creates the vertical cake edge beneath the decorated top.
- Bottom disk: crochet a second charcoal circle to 42 stitches. Add a small amount of filling between the disks, join around the edge with sc and close firmly.
- Cut half: make a semicircle by working rows in charcoal, beginning with ch 2 and increasing at both ends until 21 stitches. Work 2 rows even and add cream embroidery to the exposed face.
- Make a second smaller cream half-circle and sew it over the cut face to suggest filling. Add short gray seed stitches across the cream center.
- Embroider a thin pale-gray line along the side wall and repeat a small section of the floral motif on the cut piece. Keep the surface pattern flat and tidy.
- Set the cut half beside the whole mooncake and secure both to a small display arrangement with hidden stitches.
Assembly: Use surface stitching for the decorative top so the circle remains flat. Keep the cutaway filling panel firmly sewn.
Ube Spiral Roll Cake
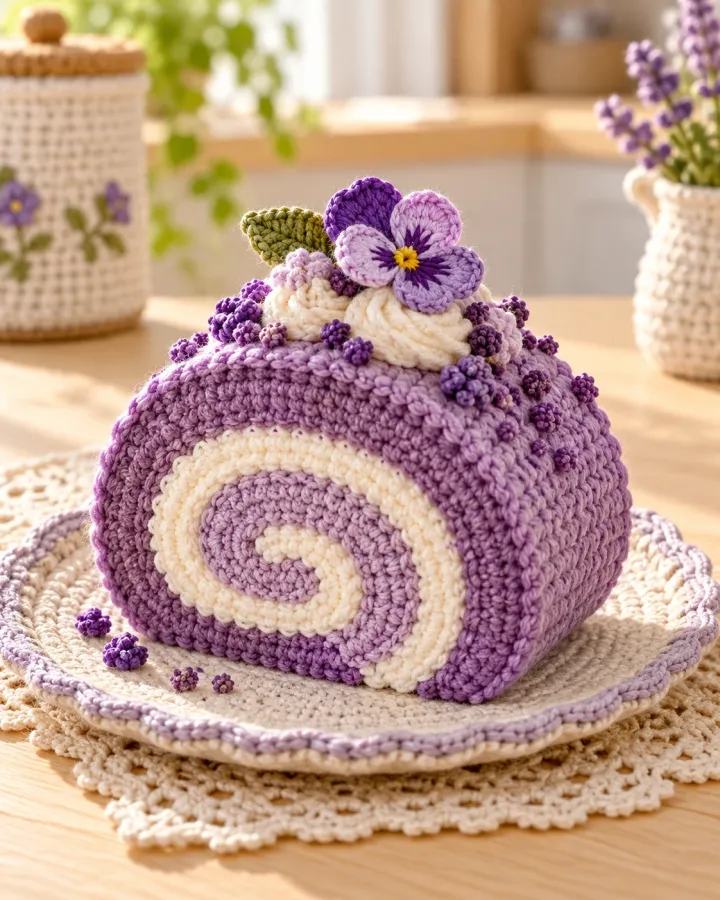
A lavender ube roll cake reveals a precise cream spiral through its cut slice, with tiny purple crumbs and floral accents on top. The graphic swirl and saturated color give this miniature dessert a strong Pinterest-friendly silhouette.
- LEVEL
- Intermediate
- TRY IT WITH
- DK cotton: ube lavender 100 yd, cream 50 yd, pale purple 25 yd, white 20 yd; 2.75 mm hook; filling
- FINISHING NOTE
- Approx. 5 in long.
Short Pattern
Abbreviations: ch chain · sc single crochet · hdc half double crochet · inc 2 sc in one stitch · sl st slip stitch
- Cake strip: in ube lavender, ch 28 and work 27 sc for 8 rows. Change to pale purple for the final 2 rows to create a darker outer edge. Keep the rectangle even and block it flat.
- Filling: crochet a cream strip of the same width from ch 28 and 4 rows. Place it on top of the cake strip, aligning the long edges, and sew one long side lightly.
- Roll both layers together from the short edge into a tight spiral. Stitch the outer edge down as you roll, then secure the end with several hidden passes through the cake layers.
- Cut slice: crochet a lavender rectangle 12 by 8 sc. Add a small cream spiral applique made from a chain of 18 worked back with sl st; coil and sew it to the center.
- Join a second matching lavender panel to the first around the edge, add a thin layer of filling and leave the spiral side uncovered. Sew the cut slice beside the full roll.
- Add tiny purple crumb bobbles along the top of the roll and a small white flower made from five chained petals. Stitch each embellishment firmly in place.
- Check the spiral faces forward and trim no tails until every seam is secure. Weave ends into the cake body.
Assembly: Roll the cake strip evenly for a clear spiral. Secure the outer edge as you go so the roll does not unwind.
Honeycomb and Tiny Dipper
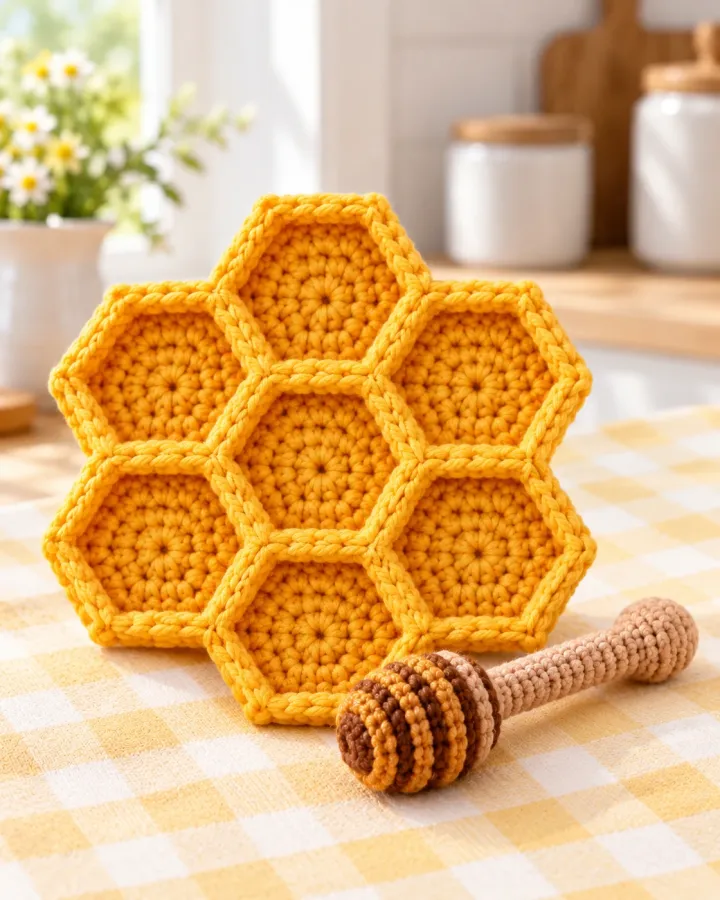
A compact cluster of golden crocheted hexagons sits beside a small brown yarn dipper. Flat stitches define each honeycomb cell, while a few embroidered amber accents add color without glossy drips or complicated raised details.
- LEVEL
- Intermediate
- TRY IT WITH
- DK cotton: honey gold 75 yd, amber 15 yd, cream 15 yd, brown 20 yd; 2.75 mm hook; small amount of washable filling
- FINISHING NOTE
- Approx. 6 in wide.
Short Pattern
Abbreviations: MR magic ring · sc single crochet · hdc half double crochet · dc double crochet · inc 2 sc in one stitch · sl st slip stitch · ch chain
- Make a flat hexagon: with honey-gold yarn, chain 4 and join into a ring. Work 6 groups of 3 dc into the ring, placing ch-1 spaces between groups to form six corners. Fasten off and gently flatten. Make five hexagons.
- Join the cells in a compact cluster by sewing neighboring edges together with matching yarn. Add a second plain hexagon cluster for the back, sew the layers around their perimeter, and use only a light pinch of filling so the piece remains flat.
- Outline each cell with one surface slip-stitch line, working loosely so the hexagon shape is visible without puckering the fabric. Add a few short amber embroidery stitches to one or two cells for color variation.
- Dipper handle: make 6 sc in MR and work 12 rounds. For the grooved head, increase to 12, work 2 rounds, then decrease to 6. Stuff the head lightly and close.
- Wrap a short amber yarn line around the dipper head and stitch it flat. Sew the head to one end of the handle, then tack the dipper diagonally across the honeycomb with several hidden stitches.
- Check that all six corners of each visible cell remain distinct. Weave in the tails and flatten the finished piece by hand.
Assembly: Use flat surface stitches and embroidery for the honey details. The dipper is a soft crocheted accessory and should be securely sewn to the honeycomb.
Striped Heirloom Tomato Cutaway
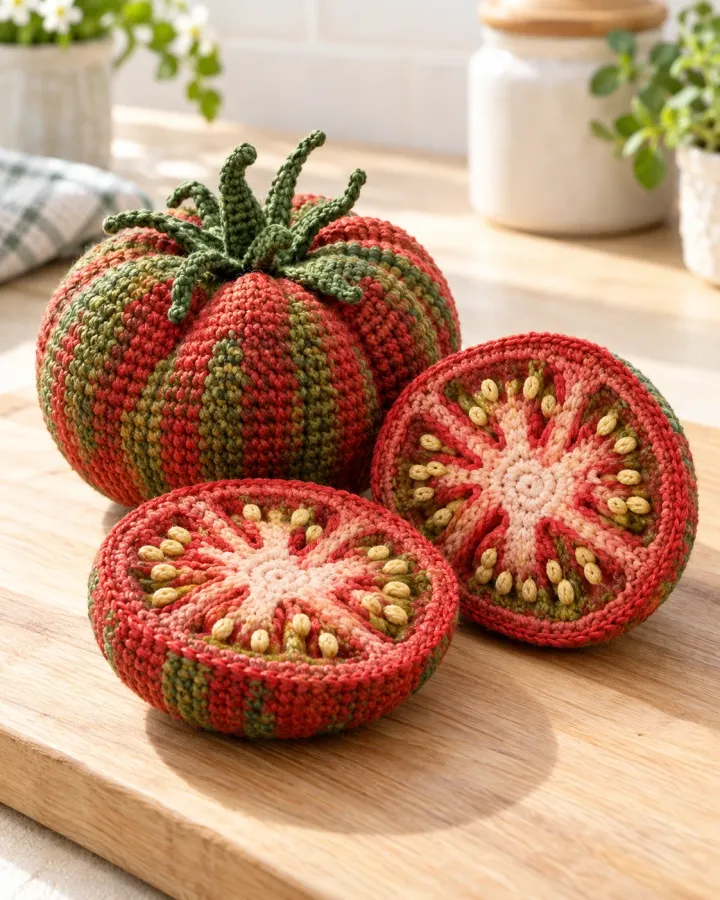
A ribbed red-and-green heirloom tomato sits beside two juicy-looking cross-sections with stitched seed chambers. Its unusual striping and starburst interior make this garden vegetable more visually distinctive than a plain round tomato.
- LEVEL
- Intermediate
- TRY IT WITH
- DK cotton: tomato red 90 yd, sage 55 yd, cream 20 yd, golden yellow 15 yd; 2.75 mm hook; filling
- FINISHING NOTE
- Approx. 5 in across the full set.
Short Pattern
Abbreviations: MR magic ring · sc single crochet · hdc half double crochet · inc 2 sc in one stitch · dec invisible decrease over 2 stitches · sl st slip stitch · ch chain
- Whole tomato: in red, make 6 sc in MR and increase to 36. Work 5 rounds, changing randomly to sage for narrow vertical bands. Decrease gradually to 18, stuff and close to create a gently flattened globe.
- Rib the shape by adding 6 long surface slip-stitch lines from the top center to the base. Alternate red and sage lines and pull only enough to create shallow grooves.
- Calyx: crochet a small sage circle from MR 6 to 18. Make 5 pointed leaf tips by chaining 4 and returning with sl st. Sew the calyx over the top center.
- Cut faces: make two red circles from MR 6 to 30, working 5 rounds. Add a sage ring around one edge of each circle and a cream center star made from surface embroidery.
- Seed chambers: embroider five short golden seed shapes around the cream star on each cut face. Outline the sections with pale cream lines radiating from the center.
- Add a second plain red circle behind each cut face, place a little filling between layers and sew around the edge. Keep the seed pattern visible.
- Arrange both slices beside the whole tomato and tack them lightly together. Check the green bands and seeds are evenly spaced.
Assembly: Use embroidered seed shapes rather than beads. The ribbed body should stay soft and slightly flattened at both ends.
Purple Artichoke Heart
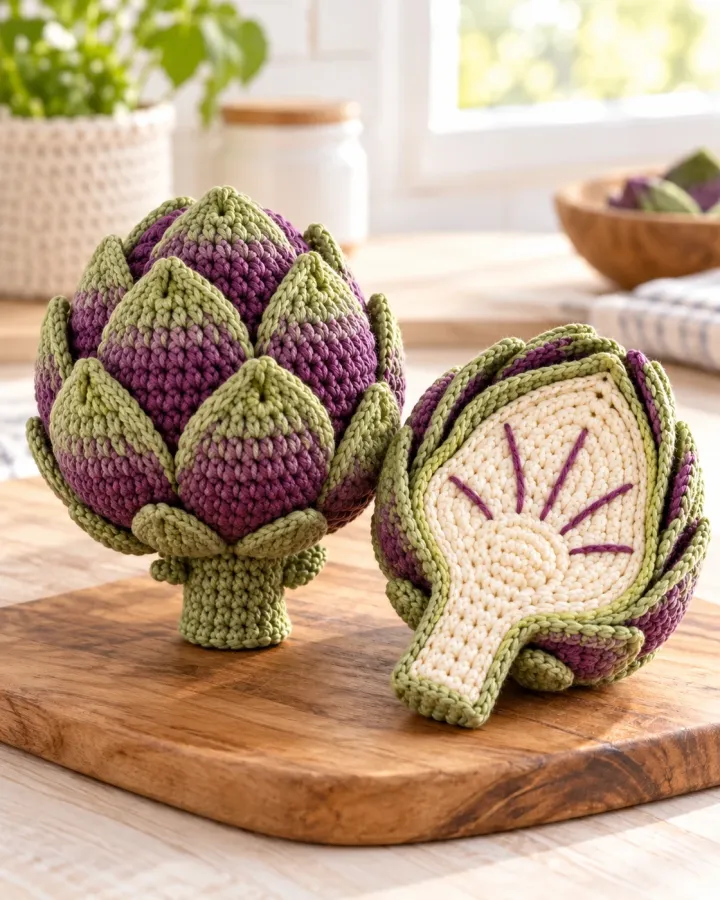
A small sage-green artichoke is built from a few broad, overlapping crochet leaves around a pale center. Its companion cut half uses simple curved stitches to suggest the packed heart, preserving the distinctive vegetable silhouette with far fewer layers and details.
- LEVEL
- Advanced
- TRY IT WITH
- DK cotton: sage 65 yd, violet 25 yd, pale green 25 yd, cream 15 yd; 2.75 mm hook; washable filling
- FINISHING NOTE
- Approx. 6 in tall.
Short Pattern
Abbreviations: MR magic ring · sc single crochet · hdc half double crochet · dc double crochet · inc 2 sc in one stitch · dec invisible decrease over 2 stitches · sl st slip stitch
- Heart: with pale green, make 6 sc in MR and increase to 24. Work 4 rounds at 24, then decrease to 18 and 12. Add a little filling and close to make a short, rounded cone.
- Leaves: make eight broad leaves. For each, chain 6; work sc, hdc, dc, hdc and sc along the chain, then slip stitch down the opposite side. Make six in sage and two in muted violet. Leave a long tail for sewing.
- Sew four sage leaves around the lower half of the heart, with their tips angled upward. Add the remaining sage leaves between the first set, then place two violet leaves near the crown. Overlap only the leaf bases so the center remains visible.
- Base and stem: crochet a flat sage circle from MR 6 to 24. Sew it beneath the leaves. Make a short stem from 6 sc for 4 rounds, lightly stuff and attach under the base.
- Cut half: make two small oval panels, one sage and one pale green. On the pale panel, embroider five curved cream lines from the center outward to suggest the tightly packed heart. Join the panels around the edge with sc and add a little filling.
- Add one violet leaf along the cut half’s outer edge and sew the half beside the whole artichoke. Secure each leaf at its base, shape the tips by hand and weave in all ends.
Assembly: This simplified version uses eight broad leaves rather than many tiny layers. Secure each leaf base firmly, keep the pale center visible, and avoid wire or stiffeners.
Blood Orange Tartlet
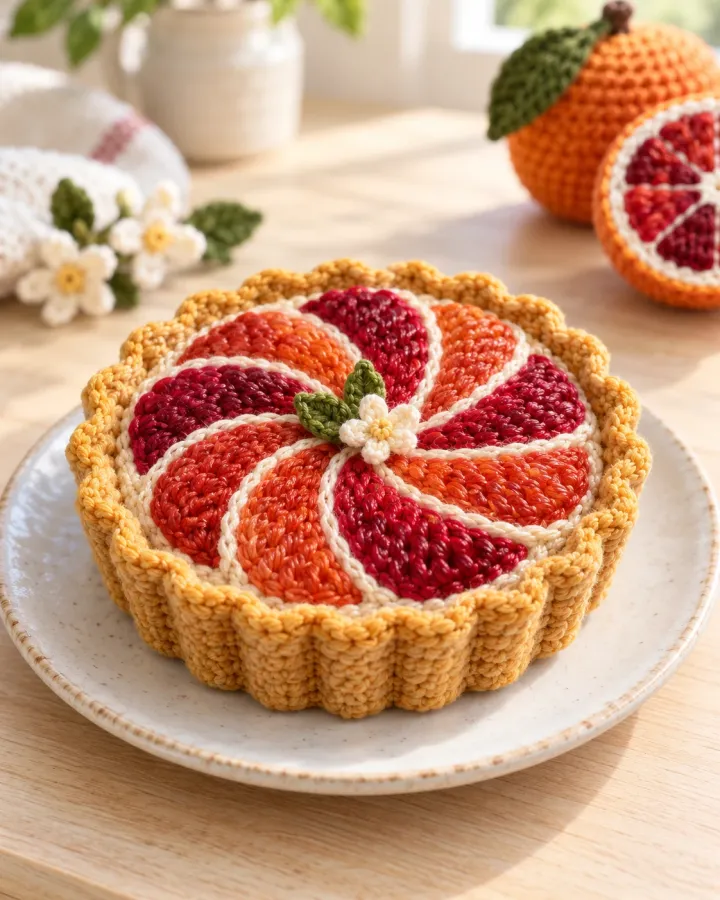
Ruby blood-orange segments form a pinwheel over a golden fluted tart shell with a neat cut edge. Bright citrus colors and the radial fruit pattern create a crisp miniature pastry that feels fresh and sophisticated.
- LEVEL
- Intermediate
- TRY IT WITH
- DK cotton: golden tan 80 yd, cream 35 yd, ruby 55 yd, orange 25 yd, deep red 20 yd; 2.75 mm hook; filling
- FINISHING NOTE
- Approx. 4.5 in across.
Short Pattern
Abbreviations: MR magic ring · sc single crochet · hdc half double crochet · inc 2 sc in one stitch · sl st slip stitch · ch chain
- Crust base: in tan, make 6 sc in MR and increase to 48. Work 1 round in BLO, then 4 rounds at 48. Add a cream surface line around the upper edge to define the pastry filling.
- Crust sides: work 3 rounds in FLO at 48 to build a raised rim. Add a final round of alternating sc and ch 1 around the edge for a subtle fluted look.
- Filling: make a cream circle from MR 6 to 42. Place inside the shell, add a thin layer of filling and sew it to the inner rim with small hidden stitches.
- Citrus segments: crochet 8 ruby wedges from ch 4, increasing at the curved outer end and decreasing to a point at the center. Add a smaller orange wedge layer to each piece.
- Arrange the wedges as a pinwheel, narrow tips meeting at the center. Sew down each wedge and embroider a deep-red line along the outer curve for contrast.
- Add a small cream center circle and a few dark-red seed stitches. Make a second small tart wedge from two joined triangles and attach at the front edge if desired.
- Check the pinwheel is balanced and the crust rim stays visible all the way around. Weave ends beneath the filling.
Assembly: Keep the citrus wedges flat and densely stitched so the pinwheel reads clearly from above.
Tamarind Pods, Whole and Split
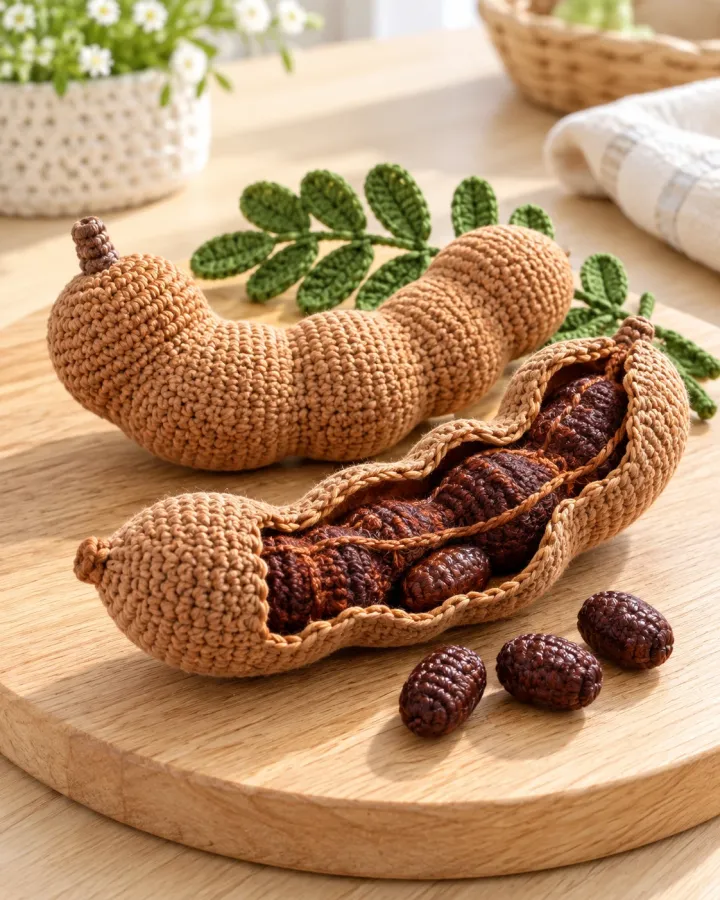
Curved cinnamon-brown tamarind pods sit beside one split shell filled with dark sticky pulp and glossy seed shapes. Their wrinkled organic form makes a curious, less familiar pantry fruit with a wonderfully tactile crochet texture.
- LEVEL
- Intermediate
- TRY IT WITH
- DK cotton: cinnamon 85 yd, deep brown 45 yd, tan 30 yd, dark espresso 20 yd; 2.5 mm hook; filling
- FINISHING NOTE
- Approx. 6 in long as a pair.
Short Pattern
Abbreviations: MR magic ring · sc single crochet · hdc half double crochet · inc 2 sc in one stitch · dec invisible decrease over 2 stitches · sl st slip stitch · ch chain
- Whole pod: in cinnamon, make 6 sc in MR and increase to 18. Work 14 rounds, stuffing lightly every few rounds. Decrease to 12 and 6, then close. Curve the pod gently while the filling is still adjustable.
- Add shell texture with short tan surface stitches in irregular bands. Pull each stitch slightly to create shallow ridges without drawing the pod out of shape.
- Split shell: crochet two narrow cinnamon panels from ch 16, tapering each end with decreases over the final 3 rows. Add a darker brown outline along the inner edge.
- Pulp: make a slim espresso-brown oval from ch 12 around both sides. Work 2 rounds and add short bumpy surface stitches in dark brown and tan to suggest sticky fruit flesh.
- Sew the pulp oval to one shell panel, then attach 5 small dark-brown seed ovals across it. Keep the seeds flat and spaced along the center.
- Join the second shell panel along one long edge only, leaving it opened like a pod. Add a few light tan stitches along the outside and curve the shell around the pulp.
- Arrange the whole pod beside the opened one and tack them together at one end. Hide all yarn ends inside the shells.
Assembly: Keep the split shell edges soft and open. Secure every seed oval through the pulp fabric with several stitches.
Persimmon Star-Center Pair
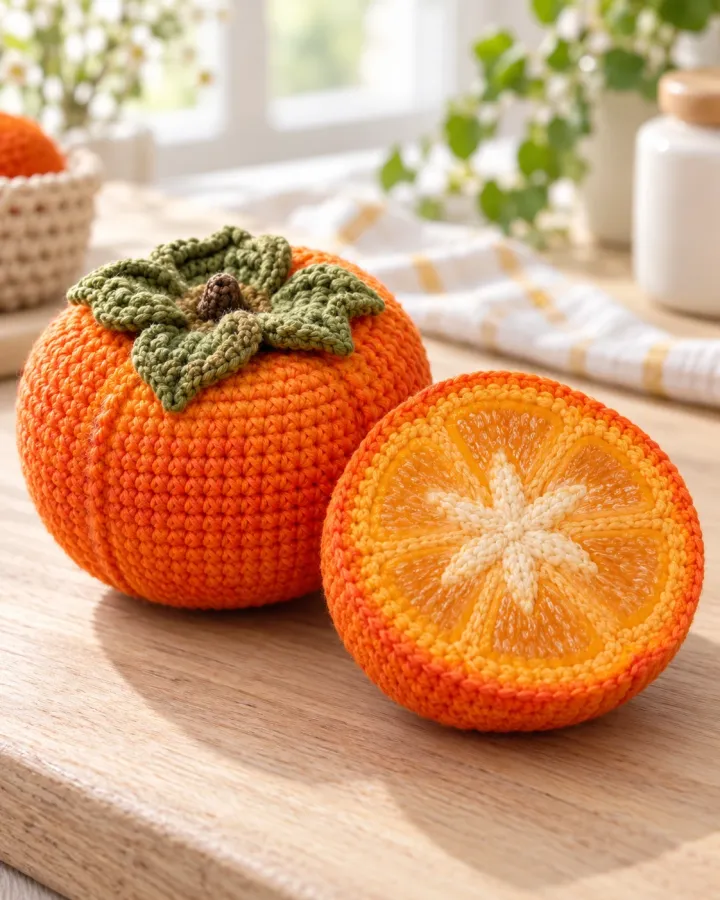
A ripe orange persimmon rests beside a cut half with a delicate pale star-shaped center. Its leafy green crown and translucent-looking segments add bright autumn color and an unusual botanical cutaway to this miniature fruit set.
- LEVEL
- Intermediate
- TRY IT WITH
- DK cotton: orange 90 yd, cream 35 yd, pale orange 35 yd, sage 30 yd, dark brown 10 yd; 2.75 mm hook; filling
- FINISHING NOTE
- Approx. 5 in tall as a pair.
Short Pattern
Abbreviations: MR magic ring · sc single crochet · hdc half double crochet · inc 2 sc in one stitch · dec invisible decrease over 2 stitches · sl st slip stitch · ch chain
- Whole fruit: in orange, make 6 sc in MR and increase to 36. Work 5 rounds, then decrease to 30, 24, 18, 12 and 6. Stuff firmly to form a slightly flattened round fruit and close the crown.
- Calyx: in sage, make a small 5-point leaf crown. Start with MR 5, then chain 5 from each stitch and work back with sl st, hdc and sc. Sew over the top opening and add a short dark stem.
- Cut half: crochet an orange circle from MR 6 to 36. Work 3 rounds, then add a cream center star with 5 narrow wedge panels meeting at the middle.
- Use pale-orange embroidery to divide the flesh into 5 segments radiating from the star. Add a few short cream stitches along the inner edge for a soft translucent effect.
- Make a second plain orange backing circle, add a little filling between the pieces and join around the edge with sc. Keep the decorated face smooth and flat.
- Add a sage leaf at the top of the cut half and a short dark-brown stem. Place it beside the whole fruit with the star center facing forward.
- Secure both stems and the calyx with hidden stitches, then weave every end into the fruit body.
Assembly: Keep the cut face flat so the star and segments remain easy to see. Embroider all interior details with yarn.
Make thoughtfully and check as you go.
Yarn, hook size and personal tension can change the finished scale. Count every round, stuff gradually and use embroidered features instead of safety eyes when making toys for children under three.