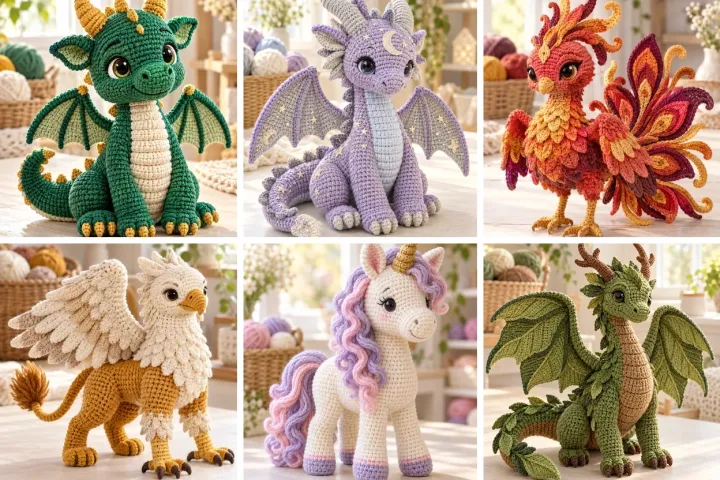
Bring a little storybook magic to your yarn basket with thirteen original dragons and fantasy creatures in emerald, moonlit lavender, sunrise coral and forest green. Each project includes its own image, materials, approximate size and a step-by-step construction guide using US crochet terms. Work amigurumi in continuous rounds unless a step says to turn, mark each round and choose a hook that keeps the stuffing hidden. The AI-created photos are visual design references, and these original instructions have not been sample-tested, so adjust shaping to your yarn and tension. Embroider facial features and sew every horn, wing and tail securely. These are decorative designs, not safety-tested toys; small parts may be unsuitable for young children.
Emerald Dragon with Golden Horns
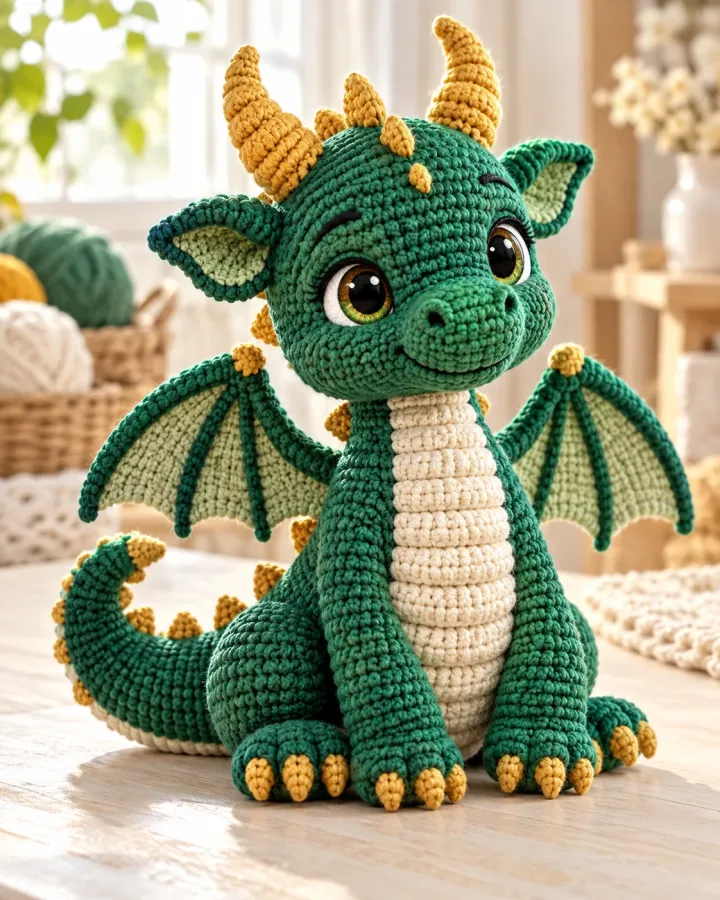
An emerald dragon sits with a cream segmented belly, golden horns and softly veined wings. Its curled tail and bright embroidered eyes give the classic fantasy silhouette a friendly handmade look, with small details that reward careful stitching.
- LEVEL
- Advanced beginner
- TRY IT WITH
- DK cotton: emerald 180 yd, cream 70 yd, gold 25 yd, dark green 25 yd; 2.75 mm hook; filling
- FINISHING NOTE
- Approx. 9 in tall.
Short Pattern
Abbreviations: MR magic ring · sc single crochet · inc 2 sc in one stitch · dec invisible decrease over 2 stitches · BLO back loop only · sl st slip stitch · ch chain
- Body: in emerald, make 6 sc in MR and increase evenly to 42. Work 8 rounds at 42, then decrease to 36, 30, 24, 18, 12 and 6. Fill firmly as the shape narrows, keeping the lower body broad enough for the dragon to sit.
- Head: make 6 sc in MR, increase to 36, work 6 rounds even, then decrease gradually to 12. Stuff and close. Add a projecting muzzle from MR 6, increase to 18, work 3 rounds, lightly fill and sew across the lower face.
- Belly plates: crochet 6 cream ovals, each starting with ch 7 and working around both sides. Increase at the curved ends for 3 rounds. Overlap them slightly up the front of the body and sew only around their edges.
- Legs: make four short tubes. Start with 6 sc, increase to 12, work 1 BLO round, then 5 rounds at 12. Stuff the feet firmly, flatten the top and sew two evenly spaced legs beneath each side of the body.
- Wings: crochet two emerald wing panels from a short chain, increasing toward the outer edge to make a curved triangle. Work a second matching layer, join around the edge and embroider three gold vein lines before sewing each wing behind the shoulders.
- Horns: make two small gold cones from MR 4, increase to 8, work 3 rounds and decrease closed. Sew above the eyes. Add pointed ears, a long curved tail tube and a small tail tip; anchor each part through several body stitches.
- Embroider eyes, nostrils and a gentle smile. Sew the head to the body, test the seated balance and reinforce both wing roots and horns with hidden matching stitches.
Assembly: Keep the wings flexible and the tail lightly stuffed so the dragon can sit upright. All decorative pieces should be stitched, not glued.
Moonlight Lavender Dragon
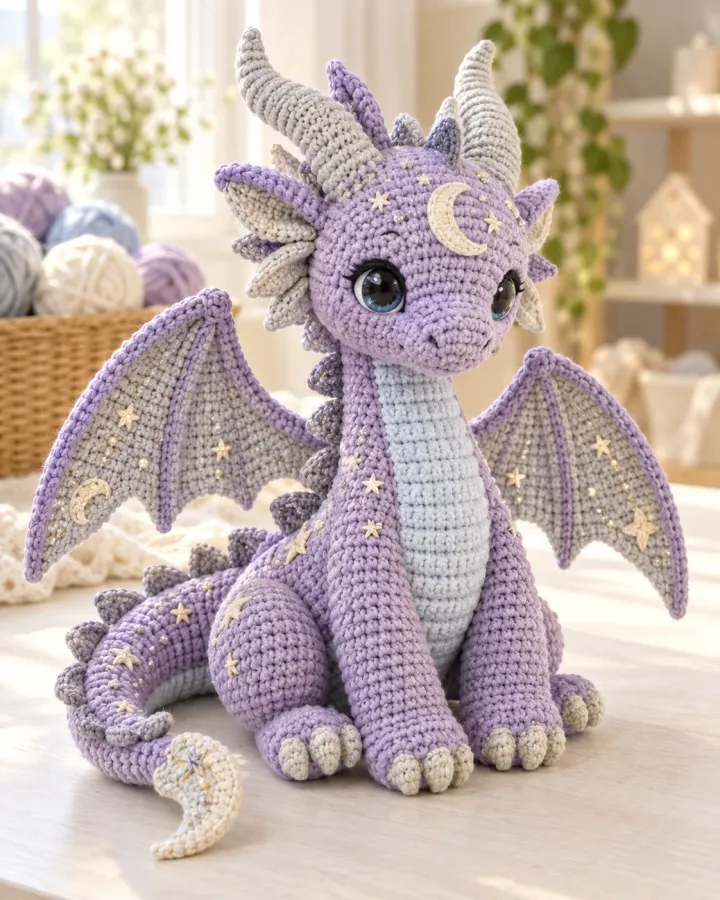
A lavender dragon shimmers with pearl-gray wings, a pale blue belly and tiny stitched moon accents. Soft horns frame its curious face, while the long curling tail adds movement to this gentle nighttime creature without making the palette too dark.
- LEVEL
- Intermediate
- TRY IT WITH
- DK cotton: lavender 170 yd, pearl gray 75 yd, pale blue 65 yd, silver 20 yd; 2.75 mm hook; filling
- FINISHING NOTE
- Approx. 9 in tall.
Short Pattern
Abbreviations: MR magic ring · sc single crochet · inc 2 sc in one stitch · dec invisible decrease over 2 stitches · sl st slip stitch · ch chain
- Body: crochet an oval lavender body from ch 9, working around both sides and increasing at the ends to 42 stitches. Work 7 rounds at 42, then decrease in stages to 12. Stuff gradually and close the opening.
- Head: make 6 sc in MR and increase to 36. Work 5 rounds at 36, then decrease to 18. Add a small pale blue muzzle oval, lightly stuff it and sew to the lower front. Embroider a tiny nose and smile.
- Belly: make 5 pale blue oval plates as for the emerald dragon. Pin them in a neat vertical line from chest to lower belly, overlapping each edge slightly, then sew flat without pulling the body out of shape.
- Wings: make two pearl-gray panels with a curved scalloped outer edge. Join two layers around each panel and add silver surface slip stitches from the wing base to each outer point. Sew them at matching heights behind the shoulders.
- Horns and ears: crochet two small gray cones and two lavender pointed ears. Sew the horns above the eyes and place the ears just below them, angled outward. Add a small silver crescent applique to the forehead.
- Tail: crochet a lavender tube of 8 sc for 24 rounds, stuff lightly and taper the last rounds to a closed point. Curve it toward the front and tack the curve at two places with hidden yarn stitches.
- Embroider small silver stars across the wing panels and add eyes, brows and nostrils. Join the head and body securely, then check the wings and tail do not pull the dragon backward.
Assembly: Use light tail stuffing to preserve the curl. Secure the moon applique and embroidered stars with several small stitches.
Sunrise Phoenix
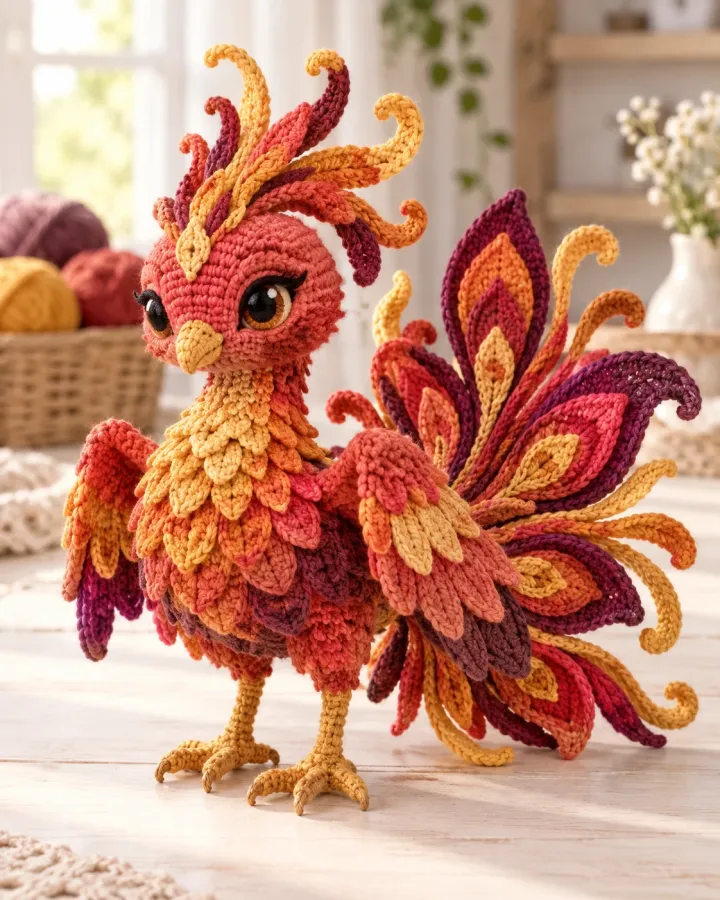
Coral, gold and plum feathers build a dramatic fan around this bright crochet phoenix. Layered wing panels and a curved neck create a proud pose, while embroidered eyes keep the fiery color story warm, polished and approachable.
- LEVEL
- Advanced
- TRY IT WITH
- DK cotton: coral 130 yd, gold 120 yd, plum 80 yd, orange 60 yd, cream 25 yd; 2.75 mm hook; filling
- FINISHING NOTE
- Approx. 10 in tall.
Short Pattern
Abbreviations: MR magic ring · sc single crochet · hdc half double crochet · dc double crochet · inc 2 sc in one stitch · dec invisible decrease over 2 stitches · sl st slip stitch
- Body: in coral, make 6 sc in MR and increase to 36. Work 7 rounds, then decrease to 24 and 18. Stuff firmly, close the base and keep the front slightly flatter for the chest patch.
- Neck and head: make a 12-stitch tube for 7 rounds, increase to 18 for 3 rounds, then shape the head with 4 even rounds. Stuff the neck lightly so it can hold its curve. Add a small gold beak cone and sew at the front.
- Tail feathers: crochet 9 pointed leaf panels in coral, orange, gold and plum. For each, ch 8, work sc, hdc and dc along the chain, then mirror the stitches down the opposite side. Add a second layer for a fuller fan.
- Arrange the feathers in a wide semicircle behind the body, alternating colors and overlapping each base. Sew through the body and all feather layers, then add a few surface stitches to secure the outer tips.
- Wings: make two large feather-shaped panels in coral and gold. Add three plum feather overlays to each wing and sew the layered panels to the sides, angled slightly upward.
- Feet and crest: crochet two gold legs with three short toes each. Sew below the body. Make three small pointed crest feathers and attach across the crown in a compact fan.
- Embroider the eyes, add a cream chest patch and reinforce every feather base. Set the phoenix upright and adjust the tail fan until it supports a balanced display pose.
Assembly: The many layered feathers require strong base seams. Keep the phoenix as decorative shelf art and supervise around small children.
Pocket Griffin
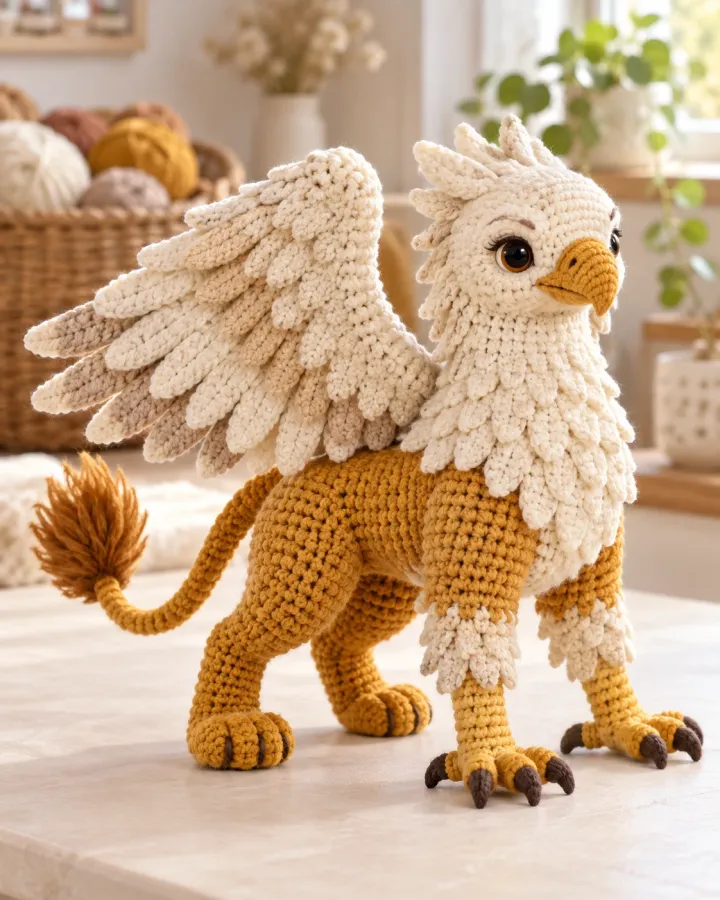
A golden lion body, cream eagle head and broad feathered wings combine in this pocket-sized griffin. Its tufted tail and alert expression bring two familiar fantasy animals together in one richly textured crochet companion.
- LEVEL
- Advanced
- TRY IT WITH
- DK cotton: golden tan 170 yd, cream 120 yd, brown 40 yd, gold 25 yd, black 3 yd; 2.75 mm hook; filling
- FINISHING NOTE
- Approx. 8 in long.
Short Pattern
Abbreviations: MR magic ring · sc single crochet · hdc half double crochet · dc double crochet · inc 2 sc in one stitch · dec invisible decrease over 2 stitches · sl st slip stitch
- Lion body: in golden tan, crochet an oval from ch 8 around both sides to 36 stitches. Work 8 rounds even, then decrease to 24 and 18. Stuff firmly and close. Make four short legs from 6 sc tubes; stuff the paws and sew evenly underneath.
- Eagle head: in cream, make 6 sc in MR and increase to 30. Work 5 rounds and decrease to 18. Add a small cream muzzle and a curved gold beak cone. Embroider the eyes and eyebrows before attaching the head.
- Wings: make two cream panels shaped like broad leaves. Work a chain foundation and build rows of hdc and dc, increasing toward the outer edge. Add three smaller feather overlays to each panel and stitch them in a fan pattern.
- Attach both wings across the upper back, allowing the tips to spread beyond the body. Sew through several rows of the body and reinforce the wing roots with a second line of stitches.
- Make two pointed cream ear tufts and a golden tail tube. Add a brown yarn tuft to its tip by folding short strands and stitching them down. Sew the tail at the rear center and curve it gently.
- Join the head to the front of the body, add two small gold feet and embroider toe lines. Position the head so the beak points forward and the wings remain level.
- Check the griffin from the front and side. Add hidden support stitches beneath the wings and tail tuft, then weave all ends into the body.
Assembly: The feather panels are decorative and soft. Reinforce the head, wings and tail tuft before displaying the griffin.
Starlight Unicorn
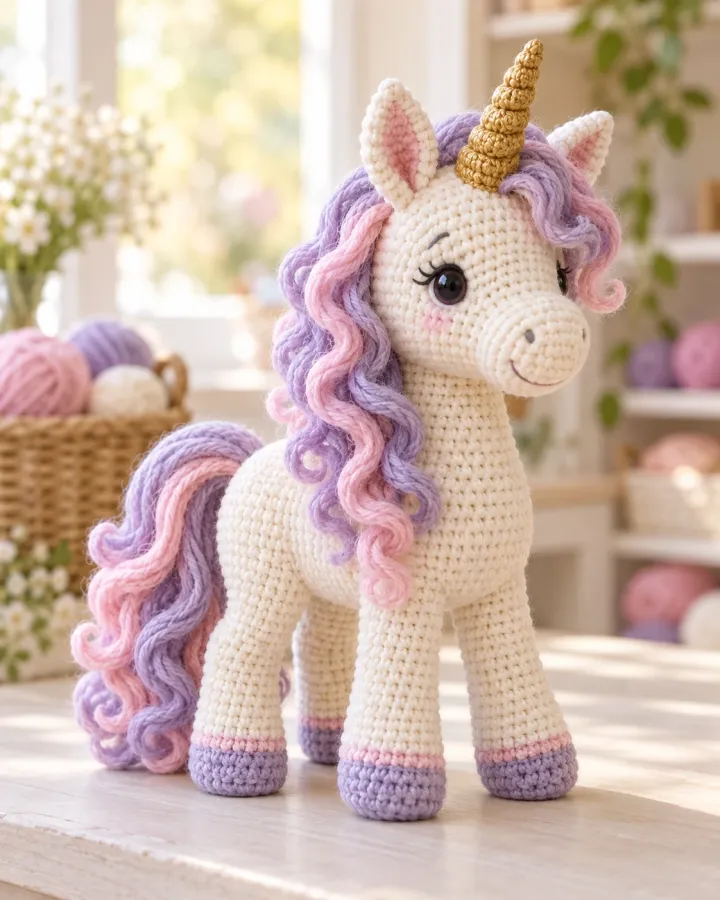
A cream unicorn wears a softly spiraled golden horn above a flowing lavender-and-pink mane. Pastel hooves and a gently arched neck give this graceful amigurumi a storybook feel, with layered yarn texture that looks lovely from every side.
- LEVEL
- Advanced
- TRY IT WITH
- DK cotton: cream 210 yd, lavender 65 yd, pink 55 yd, gold 25 yd, pastel lilac 25 yd; 2.75 mm hook; filling
- FINISHING NOTE
- Approx. 10 in tall.
Short Pattern
Abbreviations: MR magic ring · sc single crochet · hdc half double crochet · inc 2 sc in one stitch · dec invisible decrease over 2 stitches · sl st slip stitch · ch chain
- Body: crochet a cream oval from ch 9, work around both sides and increase to 42. Work 8 rounds and decrease gradually to 18. Stuff firmly and close. Make four cream legs, changing to pastel lilac for the final 3 hoof rounds.
- Neck: make a cream tube beginning with 18 sc, work 10 rounds and decrease to 12. Stuff as you go, leaving the lower edge open. Sew the neck to the front of the body at a slight upward angle.
- Head: make 6 sc in MR and increase to 30. Work 5 rounds, then decrease to 18. Add a cream muzzle oval and two small pointed ears. Embroider the eyes and nostrils before sewing the head to the neck.
- Horn: make a gold cone from MR 6, increase to 12 and work 8 rounds at 12. Decrease to 6 and close. Wrap a second gold strand diagonally around the cone and tack it at regular intervals to create a gentle spiral.
- Mane: cut equal lengths of lavender and pink yarn, fold each in half and latch-knot along the crown and back of the neck. Alternate colors in short rows, then trim the ends to soft even waves.
- Tail: crochet a small cream cone, attach alternating pink and lavender yarn strands and sew the base to the rear. Add a few short gold stitches near the horn base for a subtle accent.
- Attach all four legs beneath the body in mirrored pairs. Set the unicorn on a flat surface, adjust hoof placement, then reinforce the horn and mane roots with hidden stitches.
Assembly: Sew the horn deeply into the head rather than attaching only to surface stitches. Keep the yarn mane secured and evenly trimmed.
Forest Wyvern
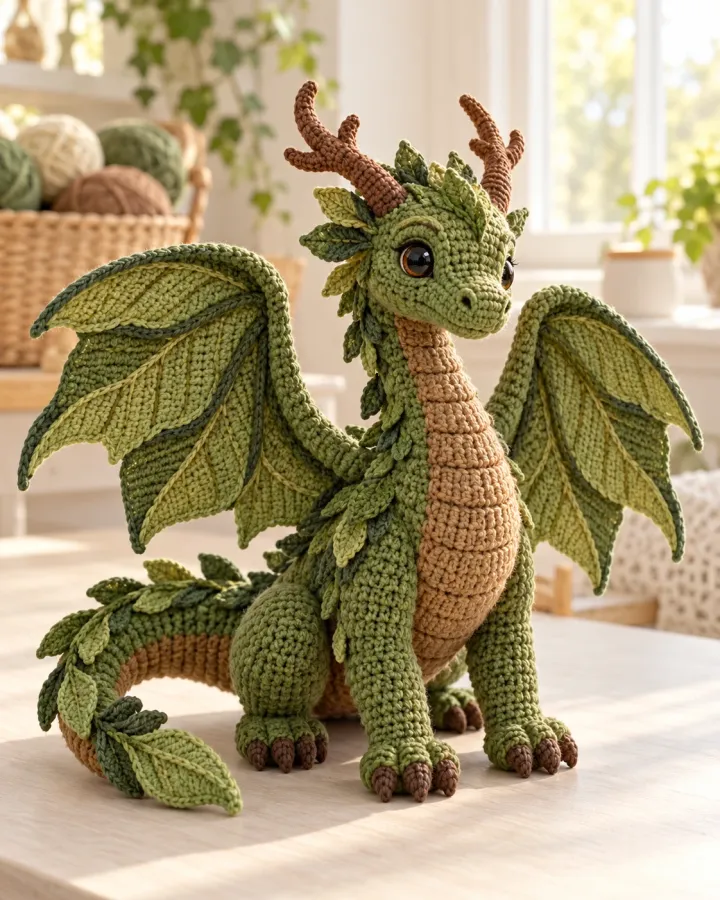
A moss-green wyvern spreads leaf-shaped wings beside a warm brown belly and curled tail. Small branch-like horns and layered green details make it feel woodland-born, while its friendly face keeps the fantasy design inviting rather than fierce.
- LEVEL
- Advanced
- TRY IT WITH
- DK cotton: moss green 190 yd, olive 80 yd, brown 55 yd, cream 40 yd; 2.75 mm hook; filling
- FINISHING NOTE
- Approx. 9 in tall.
Short Pattern
Abbreviations: MR magic ring · sc single crochet · hdc half double crochet · dc double crochet · inc 2 sc in one stitch · dec invisible decrease over 2 stitches · sl st slip stitch
- Body: make a moss-green oval from ch 8 and increase around both sides to 36 stitches. Work 8 rounds, then decrease to 24 and 18. Stuff and close, keeping a broad flat base for sitting.
- Neck and head: crochet a 12-stitch tube for 8 rounds and attach it at the front. Make a rounded head from MR 6, increase to 30, work 5 rounds and decrease to 18. Add a small olive muzzle and embroidered eyes.
- Belly: crochet 6 narrow brown ovals from short chains, increasing at the ends. Overlap the plates up the front of the neck and body, sewing each around its edge.
- Wings: make two large leaf panels in moss green. Work a foundation chain of 18, then alternate sc, hdc and dc to form a pointed outer curve. Add an olive border and embroider branching vein lines from the base.
- Sew the wings to the upper back at matching heights. Make two small branch-shaped horns using short tubes with a forked tip; attach above the head and reinforce each base.
- Tail: crochet a tapered moss tube from 8 stitches for about 28 rounds, lightly stuff and curve it around the side. Tack the curve at two points and add a small olive leaf-shaped tip.
- Attach four short legs, embroider nostrils and a smile, and check the wyvern sits evenly. Hide all yarn ends inside the body and wings.
Assembly: Keep the wing veins flat and flexible. Secure both horns and the tail curve with concealed stitches through the body fabric.
Amethyst Crystal Dragon
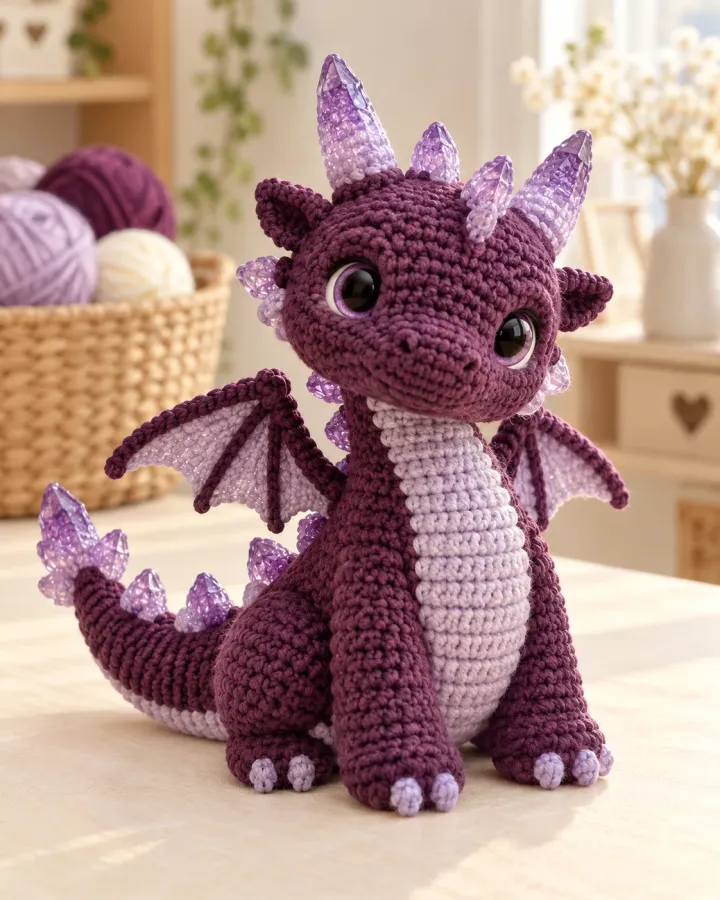
A deep plum dragon is crowned with pale amethyst crystal shapes and framed by matching wings. Its lilac belly and bright eyes soften the jewel-toned palette, creating a fantasy creature that feels dramatic while staying cute and cuddly.
- LEVEL
- Advanced
- TRY IT WITH
- DK cotton: plum 180 yd, lilac 85 yd, pale amethyst 50 yd, cream 30 yd; 2.75 mm hook; filling
- FINISHING NOTE
- Approx. 8.5 in tall.
Short Pattern
Abbreviations: MR magic ring · sc single crochet · hdc half double crochet · inc 2 sc in one stitch · dec invisible decrease over 2 stitches · sl st slip stitch · ch chain
- Body: in plum, make 6 sc in MR and increase to 42. Work 7 rounds, then decrease to 30, 24, 18 and 12. Add filling gradually, shape the underside flat and close the opening.
- Head: make 6 sc in MR, increase to 36, work 5 rounds, then decrease to 18. Add a lilac muzzle oval and embroider the eyes. Sew the head to the front of the body with several passes of matching yarn.
- Belly: make 5 lilac ovals from ch 7, increasing at the ends for 3 rounds. Stack from chest to lower belly with slight overlap and stitch around each oval edge.
- Crystal spikes: make 7 faceted-looking soft cones in pale amethyst. Start with MR 4, increase to 8, work 3 rounds, then decrease to 4. Add a tiny amount of filling and close. Group three above the brow and four along the back.
- Wings: crochet two plum panels with angled outer points, add lilac scallop overlays and embroider short amethyst vein lines. Join both layers around the edge and sew each wing behind the shoulders.
- Make four short legs and a narrow curled tail. Attach the legs beneath the body, then curve and tack the tail along one side. Keep the last tail rounds lightly stuffed.
- Position the crystal cones in a balanced line and sew through each base several times. Add small pale stitches on the wing edges and check that all details are firmly attached.
Assembly: The crystal shapes are soft yarn cones, not hard inserts. Keep them rounded and securely sewn to the dragon.
Coral-Finned Sea Serpent
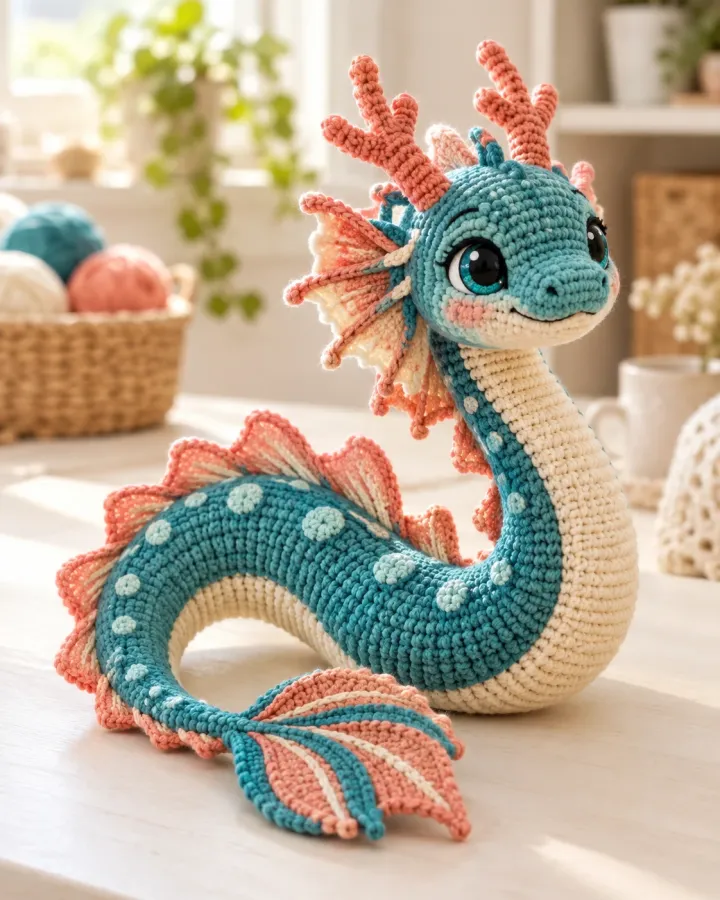
A teal sea serpent curves through a line of coral fin frills above its cream underside. Its long flowing body creates a striking display pose, while small embroidered eyes and soft fins keep the ocean creature warm and approachable.
- LEVEL
- Advanced
- TRY IT WITH
- DK cotton: teal 180 yd, coral 60 yd, cream 70 yd, deep teal 25 yd; 2.5 mm hook; filling
- FINISHING NOTE
- Approx. 16 in long when curved.
Short Pattern
Abbreviations: MR magic ring · sc single crochet · hdc half double crochet · inc 2 sc in one stitch · dec invisible decrease over 2 stitches · sl st slip stitch
- Body: in teal, make 6 sc in MR and increase to 18. Work a long tube at 18 stitches for about 45 rounds, adding filling in small amounts every few rounds. Bend gently as you work to create a natural curve.
- Shape the head by increasing to 24 for 4 rounds, then decrease to 18. Add a cream muzzle oval and embroider the face before stuffing the head firmly. Close the end neatly.
- Belly: crochet a long cream strip from ch 7, work around the chain and increase at the ends until it is wide enough to cover the lower curve. Sew along the underside, easing the strip around the neck and body.
- Fin frill: make 10 coral leaf panels. For each, begin with ch 5, work hdc and dc into the end chain, then return with smaller stitches to create a pointed fan. Sew panels down the back from head to tail.
- Make two larger coral side fins and a split tail fin. Join each from two layers, flatten and sew at the rear third and tail tip respectively.
- Embroider eyes on both sides and add short deep-teal gill lines behind the head. Curve the body into an S shape and tack two contact points so the serpent holds its display pose.
- Reinforce every fin base and check stuffing is even along the long body. Weave the seam ends inside the tube.
Assembly: Do not use wire inside the long body. Shape and secure the display curve with soft yarn tacks only.
Ember Dragon with Flame Wings
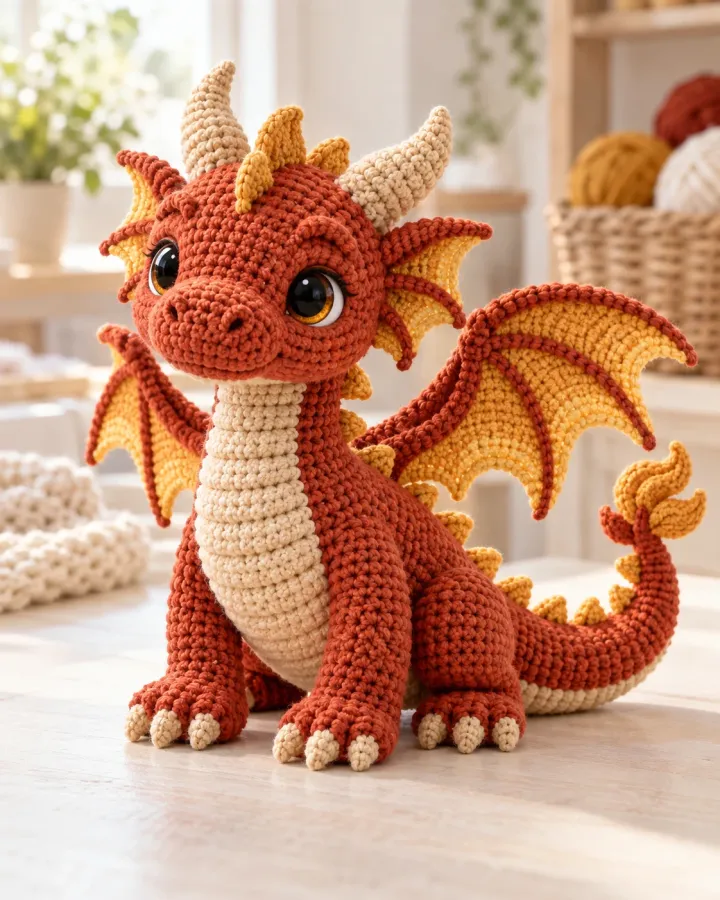
A copper-red baby dragon opens golden flame-shaped wings above a cream belly and curled tail. Rounded horns and glowing warm colors suggest a tiny fire guardian, while soft crochet construction keeps the character gentle and decorative.
- LEVEL
- Advanced beginner
- TRY IT WITH
- DK cotton: copper 170 yd, gold 75 yd, orange 45 yd, cream 60 yd; 2.75 mm hook; filling
- FINISHING NOTE
- Approx. 8.5 in tall.
Short Pattern
Abbreviations: MR magic ring · sc single crochet · hdc half double crochet · dc double crochet · inc 2 sc in one stitch · dec invisible decrease over 2 stitches · sl st slip stitch
- Body: crochet a copper oval from ch 8 around both sides, increasing to 42. Work 7 rounds and decrease gradually to 18. Stuff firmly and close the base; add a cream belly oval over the lower front.
- Head: make 6 sc in MR, increase to 30, work 5 rounds and decrease to 18. Add a short muzzle tube in copper and embroider eyes and nostrils. Sew the head to the body at a slight upward angle.
- Wings: make two gold flame panels with a broad base and three rounded points along the outer edge. Work the shape in rows of hdc and dc, then add an orange inner flame panel to each.
- Sew the layered wings behind the shoulders with the flame tips angled upward. Work a line of orange surface slip stitches along each point and secure the wing roots through several body stitches.
- Horns: make two gold cones from MR 4, increase to 8 and work 3 rounds. Sew above the brow. Add two small copper ears behind the horns.
- Tail: make a copper tube of 8 sc for 22 rounds, taper and close. Add a gold flame-shaped tip made from two joined panels and attach it to the tail end.
- Make four short legs with gold toe details, then sew beneath the body. Check the dragon sits upright and reinforce the horns, wing roots and tail tip.
Assembly: Use layered crochet panels for the flame effect and keep all edges soft. Avoid stiff or wired wing supports.
Cloud-White Pegasus
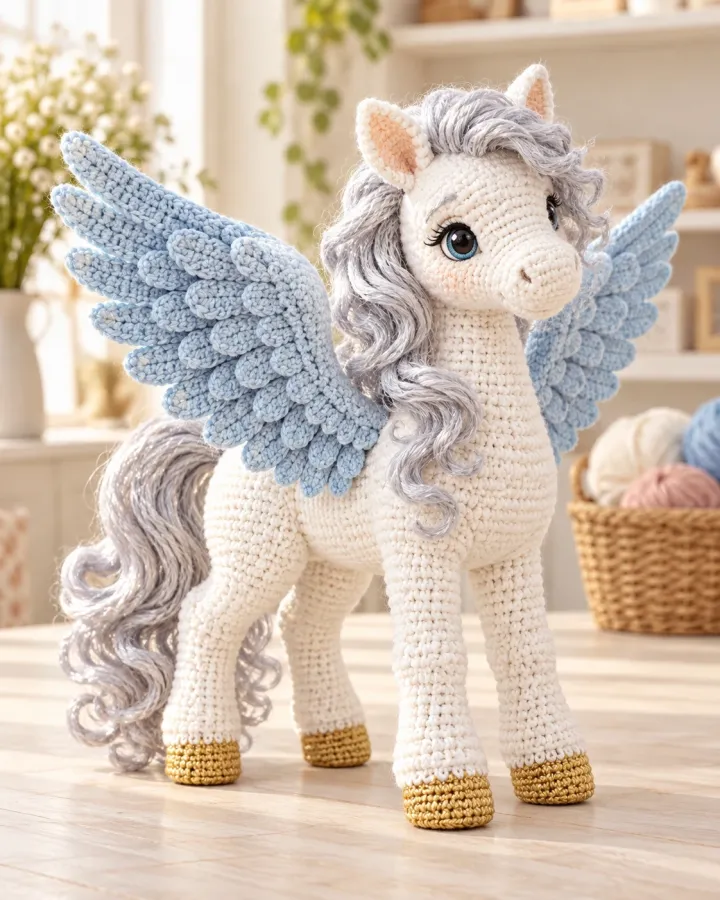
A soft white pegasus spreads pale blue feathered wings beneath a flowing silver mane. Tiny golden hooves and a gentle stitched expression bring a light, airy finish to this fantasy horse, designed to stand proudly on a shelf.
- LEVEL
- Advanced
- TRY IT WITH
- DK cotton: white 220 yd, sky blue 90 yd, silver 60 yd, gold 20 yd; 2.75 mm hook; filling
- FINISHING NOTE
- Approx. 10 in tall.
Short Pattern
Abbreviations: MR magic ring · sc single crochet · hdc half double crochet · dc double crochet · inc 2 sc in one stitch · dec invisible decrease over 2 stitches · sl st slip stitch
- Body: crochet a white oval from ch 9 around both sides and increase to 42. Work 8 rounds, then decrease to 24 and 18. Stuff firmly and close. Make four white legs and change to gold for the final 2 hoof rounds.
- Neck: crochet a white tube from 18 stitches for 10 rounds, stuff lightly and sew to the front of the body, angled upward. Make the head from MR 6, increase to 30, work 5 rounds and decrease to 18.
- Muzzle and ears: add a small white muzzle oval and two pointed ears. Embroider nostrils and eyes before sewing the head to the neck. Keep the ears upright and symmetrical.
- Wings: make two sky-blue oval bases from ch 10 and work 4 rounds around the chain. Crochet six small feather shapes per wing from short chains using hdc and dc, then layer and sew them over the base.
- Attach the wings high on the back, checking from the front that their tips match. Reinforce the lower edge and add a few silver surface stitches to suggest feather shafts.
- Mane and tail: latch-knot silver yarn lengths along the crown, neck and tail base. Trim the mane in a soft curve and secure each section with hidden stitches. Add a small gold horn only if you want a unicorn variation; omit for the pegasus design.
- Sew the legs in matched pairs, test that all hooves touch a flat surface and reinforce the wing roots. Weave in every loose end.
Assembly: The design is a decorative winged horse. Keep the mane yarn firmly anchored and do not leave long loose strands.
Moon Moth Sprite
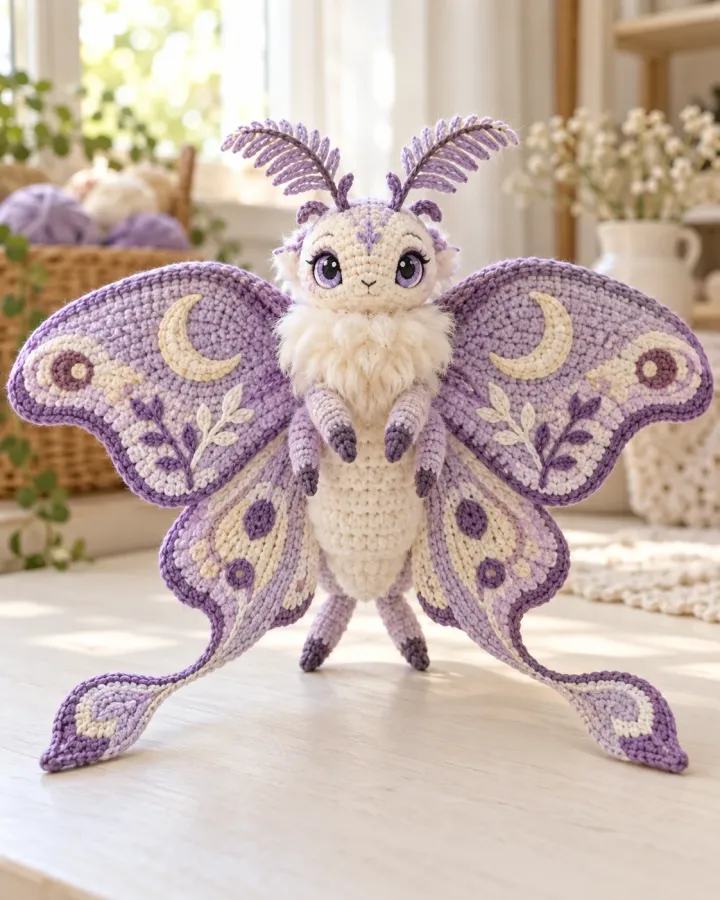
Lavender patterned wings frame a tiny cream-bodied moon moth with delicate antennae and gentle embroidered eyes. Its broad symmetrical shape displays the stitched wing details beautifully, bringing a softer, whimsical fantasy character to the collection.
- LEVEL
- Intermediate
- TRY IT WITH
- DK cotton: lavender 130 yd, pale lilac 80 yd, cream 80 yd, silver 20 yd; 2.75 mm hook; light filling
- FINISHING NOTE
- Approx. 8 in across wings.
Short Pattern
Abbreviations: MR magic ring · sc single crochet · hdc half double crochet · dc double crochet · inc 2 sc in one stitch · sl st slip stitch · ch chain
- Body: in cream, make 6 sc in MR and increase to 24. Work 8 rounds at 24, then decrease to 12. Stuff lightly and close. Make a small round head from MR 6 to 18, work 4 rounds and sew to the upper body.
- Upper wings: crochet two lavender panels from ch 10. Work around both sides, increasing at the outer end to form a broad oval point. Add 2 more rounds, then create a shallow scallop along the outer edge with alternating sc and hdc.
- Lower wings: make two smaller pale-lilac panels using ch 7 and 3 oval rounds. Join a cream inner layer to each and embroider silver dots and curved lines before attaching them beneath the larger wings.
- Join each upper and lower wing at the inner base, then sew the complete pair to the sides of the body. Keep the wing tips open and symmetrical, using several hidden stitches at the join.
- Add short cream antennae from chains worked back with slip stitches. Sew them to the crown and embroider two eyes and a tiny smile on the face.
- Add small lavender spots or a silver crescent to the center of each wing. Check that the moth sits upright with the wings spread and that the antennae are firmly anchored.
Assembly: Keep the wings lightly filled or unfilled so they remain flat and display the embroidered pattern.
Nine-Tailed Kitsune Fox
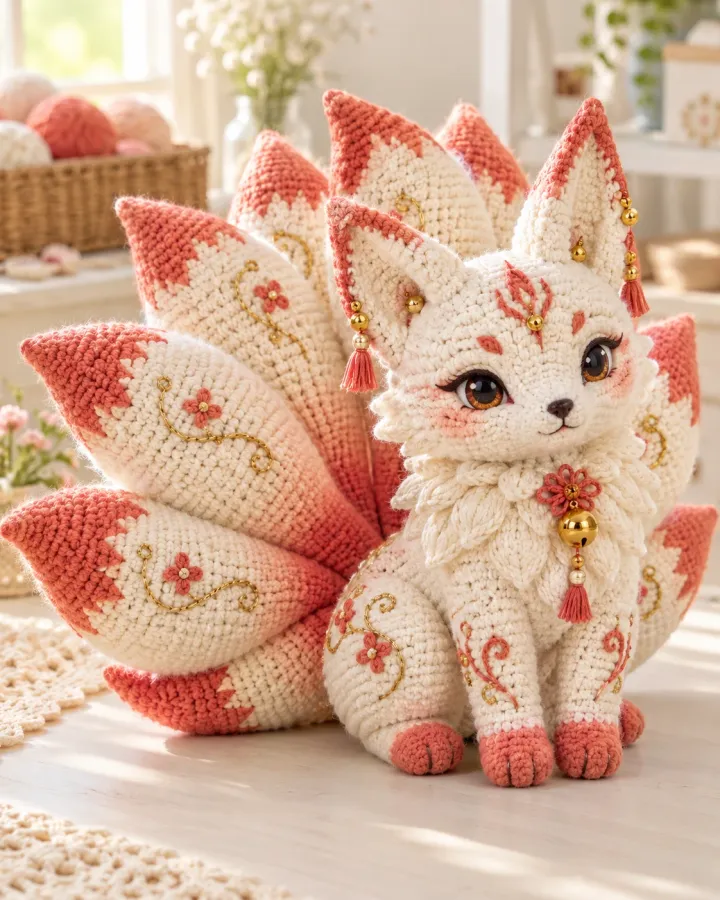
A cream-and-coral kitsune fox sits before nine layered fluffy tails tipped with gold. Pointed ears and a sweet embroidered face balance the dramatic fan, turning this Japanese folklore-inspired creature into a colorful crochet display piece.
- LEVEL
- Advanced
- TRY IT WITH
- DK cotton: cream 150 yd, coral 110 yd, gold 30 yd, pale pink 25 yd, black 3 yd; 2.75 mm hook; filling
- FINISHING NOTE
- Approx. 9 in tall.
Short Pattern
Abbreviations: MR magic ring · sc single crochet · hdc half double crochet · inc 2 sc in one stitch · dec invisible decrease over 2 stitches · sl st slip stitch · ch chain
- Body: in cream, make 6 sc in MR and increase to 36. Work 6 rounds, then decrease to 24 and 18. Stuff and close. Make four short cream legs with coral toe accents and sew beneath the body.
- Head: make 6 sc in MR, increase to 30, work 5 rounds and decrease to 18. Add a coral muzzle oval and two tall pointed ears with pale pink inner panels. Embroider eyes, nose and a small smile.
- Tails: make nine tapered tubes, each beginning with 6 sc and increasing to 12. Work 10 rounds at 12, change to coral for 4 rounds and taper to a closed tip. Stuff lightly to keep each tail flexible.
- Arrange the tails in a fan behind the body: one centered upward, four angled diagonally on each side. Sew the bases together first, then attach the full fan to the lower back through several body stitches.
- Add narrow gold surface slip stitches along a few tail tips and a small gold diamond on the forehead. Keep accents sparse so the cream and coral shapes remain distinct.
- Set the fox in a seated pose and adjust the fan so the tails do not pull it backward. Add hidden support stitches where the fan meets the body and check all nine tails are secure.
Assembly: The nine tails create a wide display piece. Reinforce their shared base and keep the fox away from small children.
Sleepy Rose Dragon and Egg
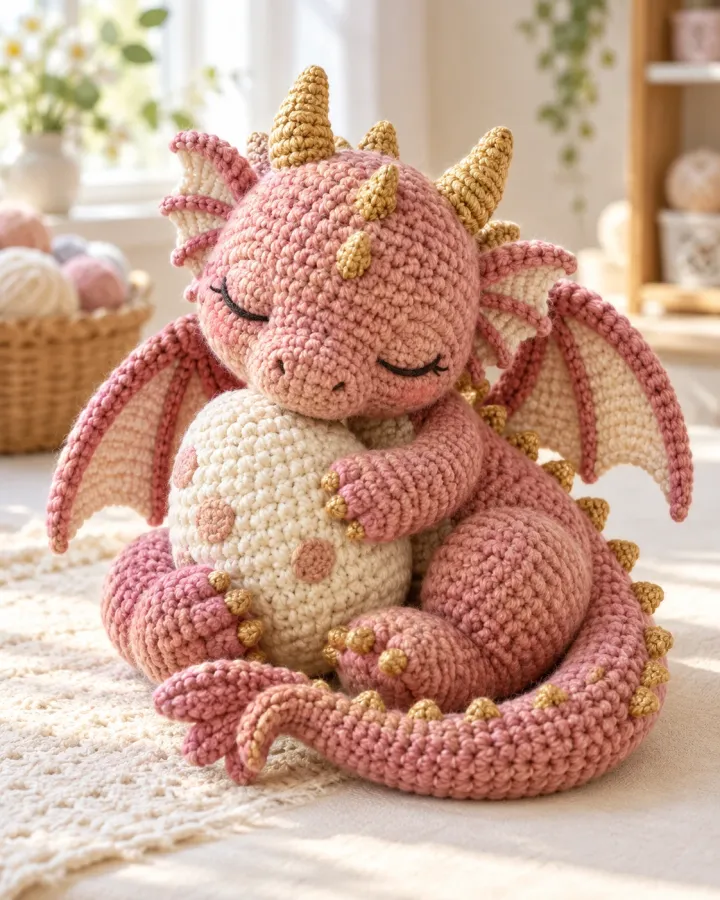
A rose-pink dragon curls protectively around a small cream egg, folding its wings close as it rests. Gold horns and peaceful embroidered eyes add gentle detail, making this scene feel like a quiet storybook moment captured in yarn.
- LEVEL
- Intermediate
- TRY IT WITH
- DK cotton: rose pink 170 yd, cream 70 yd, gold 20 yd, pale pink 25 yd; 2.75 mm hook; filling
- FINISHING NOTE
- Approx. 8 in wide including tail.
Short Pattern
Abbreviations: MR magic ring · sc single crochet · hdc half double crochet · inc 2 sc in one stitch · dec invisible decrease over 2 stitches · sl st slip stitch · ch chain
- Body: in rose, make 6 sc in MR and increase to 36. Work 7 rounds, then decrease gradually to 18. Stuff firmly and shape into a curled oval by adding slightly more filling along the outer curve.
- Head: make 6 sc in MR, increase to 30, work 4 rounds and decrease to 18. Add a pale pink muzzle oval and embroider closed sleepy eyes with curved black yarn lines. Sew the head low on the body, angled toward the egg.
- Wings: make two small rose panels from ch 8, work 3 rows increasing at the outer edge, then add pale pink scallops along the top. Flatten and sew folded against the dragon sides.
- Horns: crochet two small gold cones from MR 4, increase to 8 and work 3 rounds. Sew above the eyes, angled outward. Add two small rose ears behind them.
- Tail: crochet a rose tube from 8 sc for 20 rounds and curve it around the body. Tack the curl at two points with matching yarn, leaving enough space to place the egg inside.
- Egg: in cream, make 6 sc in MR and increase to 24. Work 5 rounds, then decrease to 18, 12 and 6. Stuff lightly as it narrows and close. Add a pale pink surface heart or small spot if desired.
- Position the egg in the open curve and tack the dragon forearms around it with a few hidden stitches. Make sure the egg remains visible and the figure sits securely.
Assembly: The egg is a separate small decorative piece. Sew it to the dragon if you need a single display ornament.
Make thoughtfully and check as you go.
Yarn, hook size and personal tension can change the finished scale. Count every round, stuff gradually and use embroidered features instead of safety eyes when making toys for children under three.