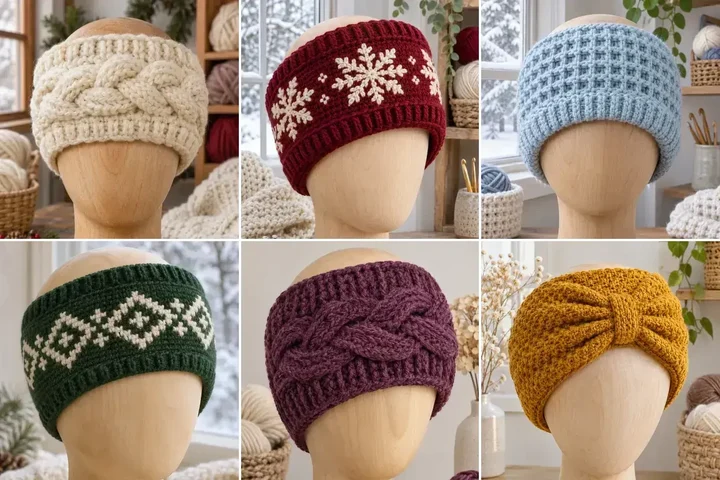
These winter headbands are intentionally wide, dense and warm enough to cover the ears in cold weather. The designs use bulky yarn, ribbing, cables and layered fabric rather than the lightweight ties and narrow bands used for bandanas. Instructions use US crochet terms and adult sizing as a starting point. Measure the wearer’s head around the forehead and over the ears, make a gauge swatch, and adjust the band length for a snug fit with gentle stretch.
Alpine Twist Ear Warmer
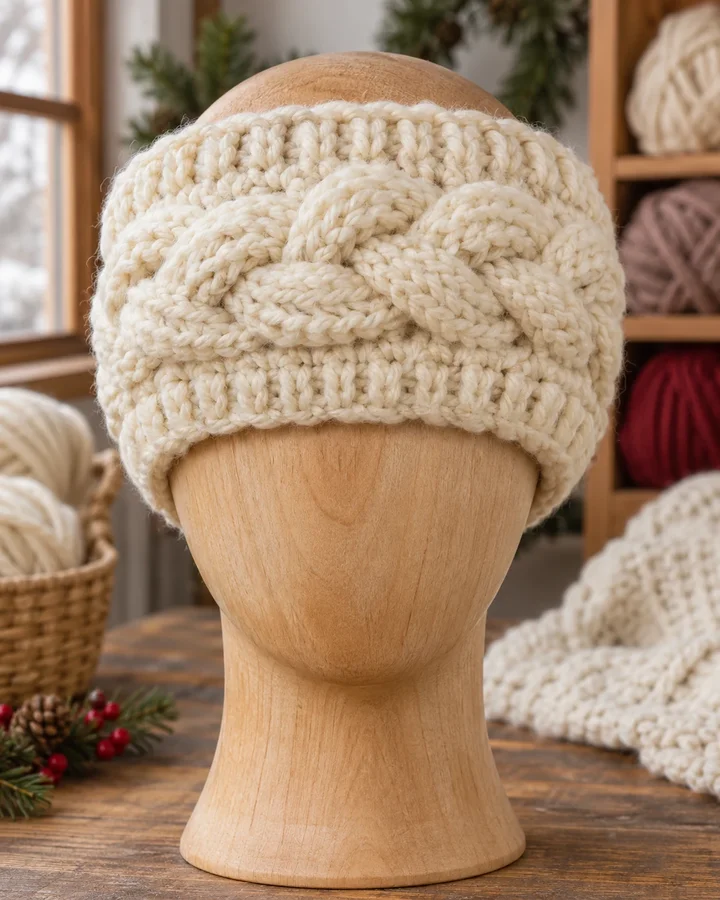
A thick ivory band pairs a bold central cable twist with dense ribbing that covers the ears. The soft bulky yarn and wide silhouette make this alpine-inspired warmer a practical cold-weather accessory that still looks polished with a winter coat.
- LEVEL
- Confident beginner
- TRY IT WITH
- Bulky #5 wool blend, about 120 yd; 6 mm hook; stitch marker; tapestry needle.
- FINISHING NOTE
- Adult medium starting size: 4.5 in / 11.5 cm wide and 20-21 in / 51-53 cm long before joining. Measure and adjust for a snug fit.
Short Pattern
Abbreviations: US terms: ch chain · sl st slip stitch · sc single crochet · hdc half double crochet · BLO back loop only · rep repeat.
- Foundation: ch 18. Hdc in the third chain from the hook and across (16 hdc). Ch 2, turn. Work hdc in the back loop only across every row to create a stretchy ribbed strip. Continue until the strip measures 20-21 in, stretching it lightly as you measure; add or remove rows for head size.
- Cable panel: mark the center 8 stitches. On a right-side row, work 4 hdc, then make a front-post treble around the fourth marked stitch, skip the next 3 stitches, work a front-post treble around the first skipped stitch, and then work front-post trebles around the remaining two skipped stitches in order. Hdc across the rest of the row. Work 3 ribbed rows between cable-cross rows.
- Repeat the cable cross every fourth row for 3-4 crossings, keeping the outer ribbing in BLO hdc. End after a plain ribbed row so the seam lies flat. Fasten off with a tail about 18 in long.
- Lay the short ends together, rotate one end by half a turn to create the twist, and overlap the four layers evenly. Use the long tail to whipstitch through all layers securely. Weave in the end and turn the seam to the inside.
Assembly: Before sewing, try the band around the head form or measure it against the wearer; the finished loop should stay in place without pressing tightly. Align the ribbed edges and stitch through all four layers at the twist so the join cannot loosen.
Snowberry Double-Layer Ear Warmer
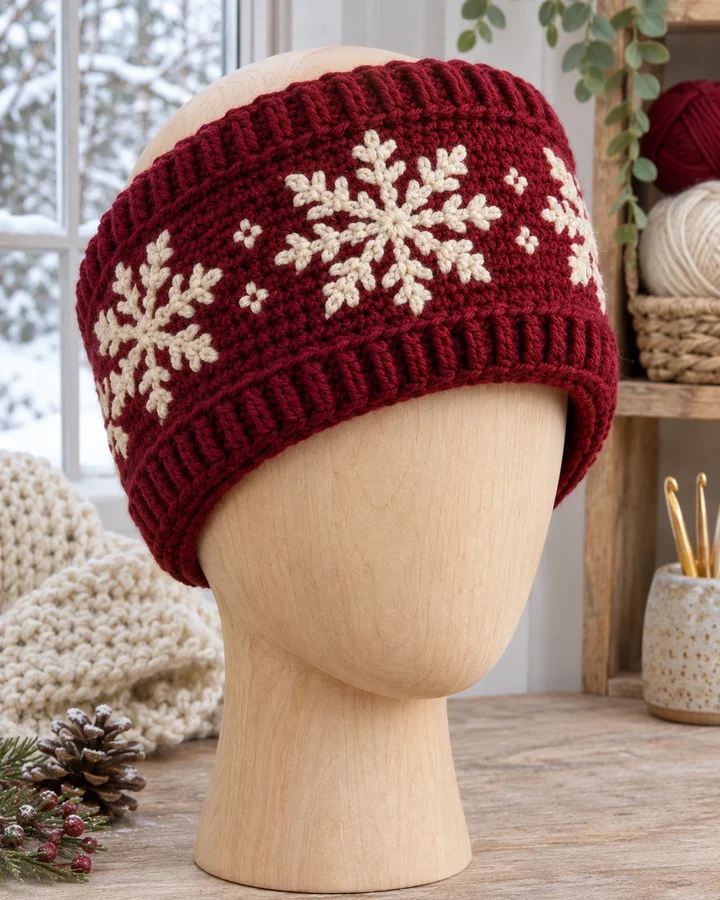
Cranberry yarn and cream snowflakes bring a classic winter look to this wide, double-layer headband. The folded construction creates a warm inner layer over both ears, while a sturdy ribbed edge keeps the colorwork neat and comfortable.
- LEVEL
- Intermediate
- TRY IT WITH
- Worsted #4 wool: cranberry 150 yd, cream 35 yd; 4.5 mm hook; stitch markers; tapestry needle.
- FINISHING NOTE
- Adult medium starting size: about 4 in / 10 cm wide when folded, with a 20-21 in / 51-53 cm finished loop. Adjust length to head measurement.
Short Pattern
Abbreviations: US terms: ch chain · sl st slip stitch · sc single crochet · hdc half double crochet · BLO back loop only · rep repeat.
- Make a colorwork strip: ch 22 and hdc in the third chain from the hook and across (20 hdc). Ch 2, turn. Work hdc rows until the strip measures 8 in / 20 cm wide, keeping the first and last 2 stitches in cranberry as a tidy border. Use a simple 10-stitch snowflake repeat in cream across the center, carrying the unused strand loosely and catching it every 3-4 stitches.
- Continue until the strip measures 20-21 in / 51-53 cm long, checking against the head measurement with gentle stretch. Keep the snowflake band centered along the length and end with a plain cranberry row. Fasten off and weave in colorwork ends without tightening the inside floats.
- Fold the long strip lengthwise with wrong sides together so the patterned side faces outward and both long edges align. Join the long edges with a row of sl st through both layers, easing the fabric so it does not pucker. This creates a double-thickness band about 4 in wide.
- Bring the short ends together into a loop, keeping the seam on the inside. Overlap the ends by about 1/2 in and whipstitch securely through both layers. Add a narrow ribbed cuff over the join if desired, then weave in the final tail.
Assembly: Check that the snowflake motif faces outward and the inner floats remain loose before closing the tube. Place the joining seam at the back of the head and secure both layers so the folded band cannot roll open during wear.
Frosted Rose Bobble Ear Warmer
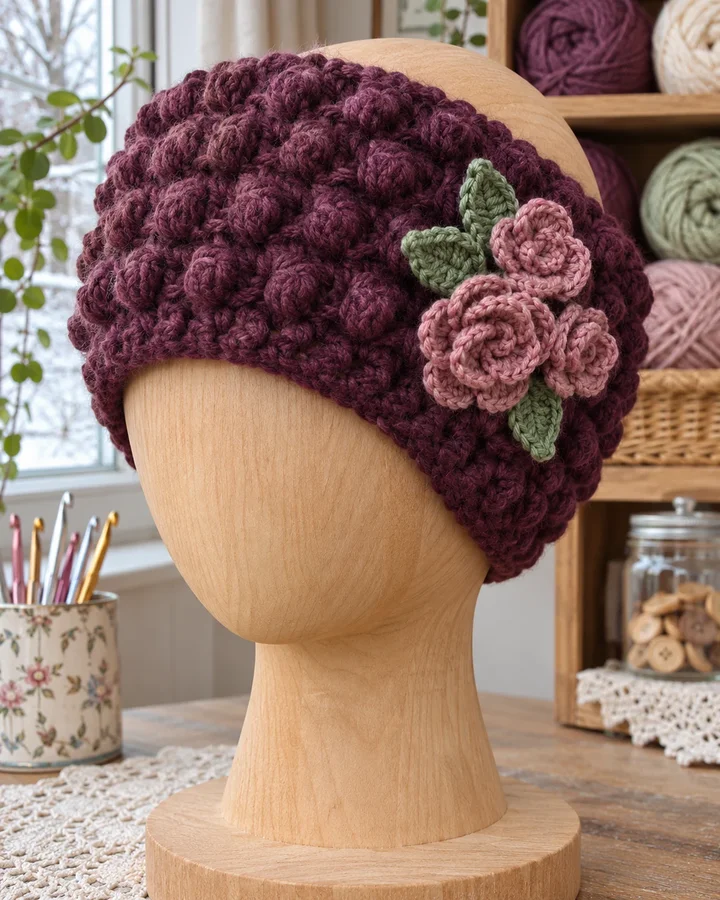
Plum bobble stitches give this broad ear warmer a plush, tactile surface, while a small cluster of dusty-rose flowers adds a soft accent over one ear. The dense fabric is designed to cover the ears comfortably on cold days.
- LEVEL
- Confident beginner
- TRY IT WITH
- Bulky #5 yarn: plum 130 yd, dusty rose 20 yd, sage 10 yd; 6 mm hook; tapestry needle; stitch marker.
- FINISHING NOTE
- Adult medium starting size: 4.5 in / 11.5 cm wide and 20-21 in / 51-53 cm long before joining; adjust for head circumference.
Short Pattern
Abbreviations: US terms: ch chain · sl st slip stitch · sc single crochet · hdc half double crochet · dc double crochet · bobble: 5 dc in same stitch, close together · rep repeat.
- Foundation: ch 16. Hdc in the third chain and across (14 hdc). Ch 2, turn. Work 2 rows of hdc in the back loop only for a firm lower edge.
- Texture: work *2 hdc, bobble in next stitch, 2 hdc* across the row, ending with hdc as needed to keep 14 stitches. On the return row, work hdc evenly, placing each stitch into the top of the bobble securely. Repeat these two rows, offsetting each bobble row so the raised bumps form a staggered texture.
- Continue until the strip measures 20-21 in / 51-53 cm with a gentle stretch. Finish with 2 rows of BLO hdc to match the starting edge. Fasten off with a long tail, bring the ends together and seam securely to form a loop; hide the seam at the back.
- For each flower, make a small magic ring and work 6 sc into it. Join; *ch 3, 2 dc in same stitch, ch 3, sl st in next stitch* around for six petals. Make 2-3 flowers in dusty rose, add small sage leaves, and sew them flat over one ear area with matching yarn.
Assembly: Place the flower cluster slightly to one side, away from the joining seam. Sew through the flower centers and the band at several points, then secure the leaves separately so their edges do not curl or snag.
Glacier Ridge Waffle Ear Warmer
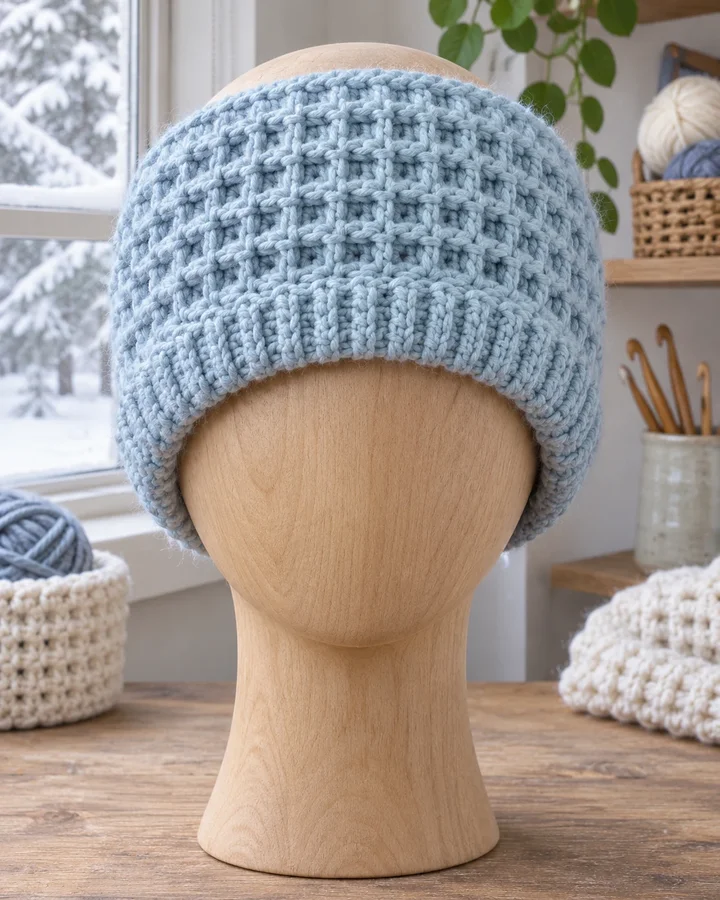
Pale glacier-blue yarn and a raised waffle texture give this wide ear warmer a soft, cushioned feel. A folded ribbed edge adds extra coverage over the ears, making the clean icy color both practical and easy to pair with winter coats.
- LEVEL
- Confident beginner
- TRY IT WITH
- Bulky #5 wool blend, about 130 yd; 6 mm hook; stitch marker; tapestry needle.
- FINISHING NOTE
- Adult medium starting size: about 4.5 in / 11.5 cm wide and 20-21 in / 51-53 cm long before joining; adjust to head measurement.
Short Pattern
Abbreviations: US terms: ch chain · sl st slip stitch · sc single crochet · hdc half double crochet · FPdc front-post double crochet · rep repeat.
- Ch 18; hdc in the third chain and across (16 hdc). Ch 2 and turn. Work 2 rows of hdc through the back loop only to create a stable lower edge.
- For the waffle texture, repeat *FPdc around the next stitch, hdc in the next stitch* across the row. On the return row, work hdc into hdc and FPdc around the front-post stitches. Repeat this two-row texture, keeping the first and last stitch in hdc for a neat edge.
- Continue until the strip measures 20-21 in with gentle stretch. Work the final 2 rows in BLO hdc to match the beginning. Fasten off with a long tail and check that the strip sits about 4.5 in wide over the ears.
- Bring the short ends together and seam through both layers with whipstitch. For extra warmth, fold the top edge inward by 1/2 in and tack at the seam, leaving the rest of the band softly doubled.
Assembly: Keep the waffle columns facing outward and align the ribbed edge before seaming. Try the loop on before weaving in the tail; if it feels loose, take in a small amount at the back seam rather than tightening the whole band.
Nordic Pine Diamond Ear Warmer
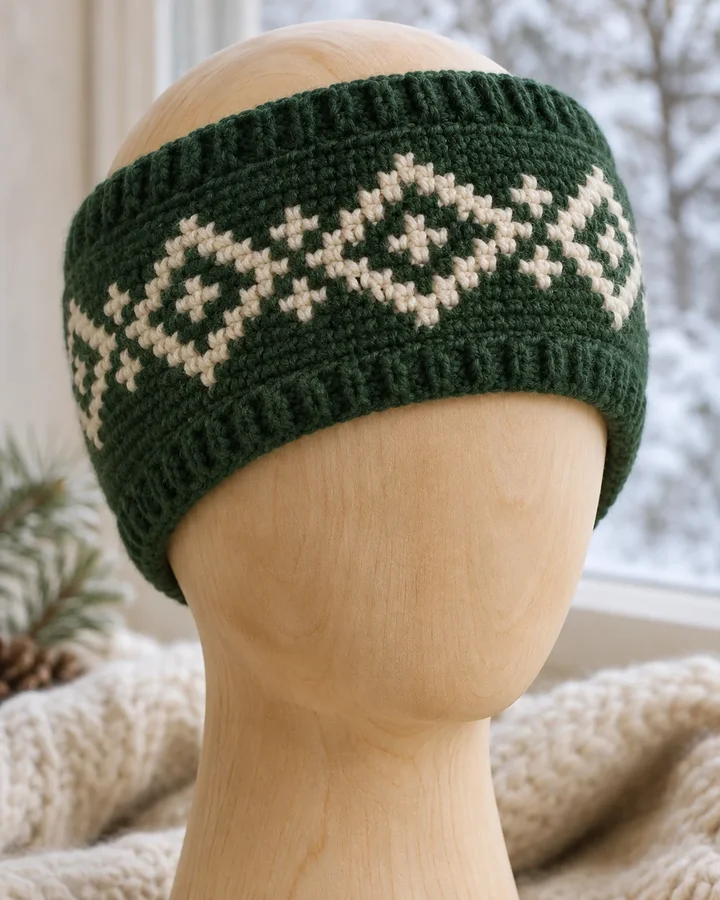
A cream diamond motif stands out against pine-green wool in this broad, densely crocheted ear warmer. Ribbed edges help it hold its shape, while the understated geometric colorwork gives a classic winter accessory a crisp Nordic finish.
- LEVEL
- Intermediate
- TRY IT WITH
- Worsted #4 wool: pine 120 yd, cream 25 yd; 4.5 mm hook; stitch markers; tapestry needle.
- FINISHING NOTE
- Adult medium starting size: 4 in / 10 cm wide, 20-21 in / 51-53 cm loop circumference before joining.
Short Pattern
Abbreviations: US terms: ch chain · sl st slip stitch · sc single crochet · hdc half double crochet · BLO back loop only · rep repeat.
- With pine, ch 19 and hdc in the third chain and across (17 hdc). Ch 2, turn. Work 2 rows in BLO hdc for the lower rib. Keep the first and last stitch in pine throughout the colorwork rows as a tidy border.
- Use a 9-stitch motif across the center: on row 1, work 4 pine hdc, 1 cream hdc, 4 pine hdc; on row 2, work 3 pine, 3 cream, 3 pine; on row 3, work 2 pine, 5 cream, 2 pine; on row 4, repeat row 2; on row 5, repeat row 1. Work remaining edge stitches in pine.
- Carry the unused yarn loosely inside the stitches and catch it every 3 stitches so no long floats remain. Work 2 plain pine rows, then repeat the diamond chart along the strip until it measures 20-21 in. Finish with 2 rows of BLO hdc in pine.
- Join the short ends with a flat seam at the back, matching the rib rows. Weave color tails into their matching sections and lightly steam from the reverse, keeping the band’s stretch and raised stitch texture intact.
Assembly: Keep the cream floats loose enough for the headband to stretch over the ears. Center the diamond motif on the forehead before closing the back seam, then secure the two pine rib edges together without adding bulk.
Deep Harbor Reversible Ear Warmer
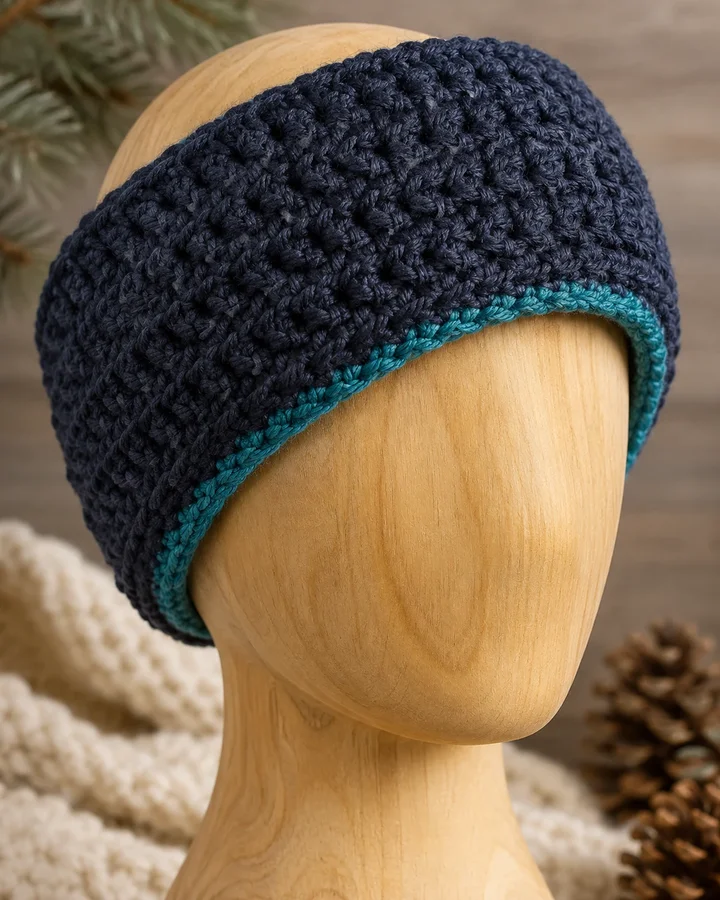
Navy and teal form a clean two-tone reversible ear warmer with a dense, cushioned fabric and a narrow contrast edge. The broad double layer covers both ears comfortably, while its simple color pairing works well for everyday winter wear.
- LEVEL
- Confident beginner
- TRY IT WITH
- Worsted #4 wool: navy 130 yd, teal 50 yd; 4.5 mm hook; tapestry needle.
- FINISHING NOTE
- Adult medium: about 4 in / 10 cm wide and 20-21 in / 51-53 cm around; measure for a snug but comfortable fit.
Short Pattern
Abbreviations: US terms: ch chain · sl st slip stitch · sc single crochet · hdc half double crochet · BLO back loop only · rep repeat.
- With navy, ch 19 and hdc in the third chain and across (17 hdc). Ch 2, turn; work hdc in BLO across to create a stretchy ribbed strip. Continue until it measures 21 in, or about 1-2 in shorter than the wearer’s head circumference.
- Fold the strip lengthwise with wrong sides facing, aligning the long edges. Join teal at one short end; sc through both long edges together, working evenly and keeping the seam flat. Continue to the opposite short end, leaving both ends open for now. This creates a double-layer tube with teal edging.
- Turn the tube right-side out so the navy ribbing faces outward and the teal seam is tucked inside. Bring the short ends together, making sure the band is not twisted. Join the ends with a mattress stitch through both layers, then cover the join with a short teal slip-stitch bar if desired.
- Try the band on and check that both ears are covered. Weave in the navy and teal tails between the layers, distributing the bulk away from the forehead.
Assembly: Keep the tube untwisted before joining the short ends; lay it flat and align the seam line first. Hide the final join at the back and spread the two layers evenly so the teal accent remains a narrow, consistent edge.
Mulberry Cable Twist Ear Warmer
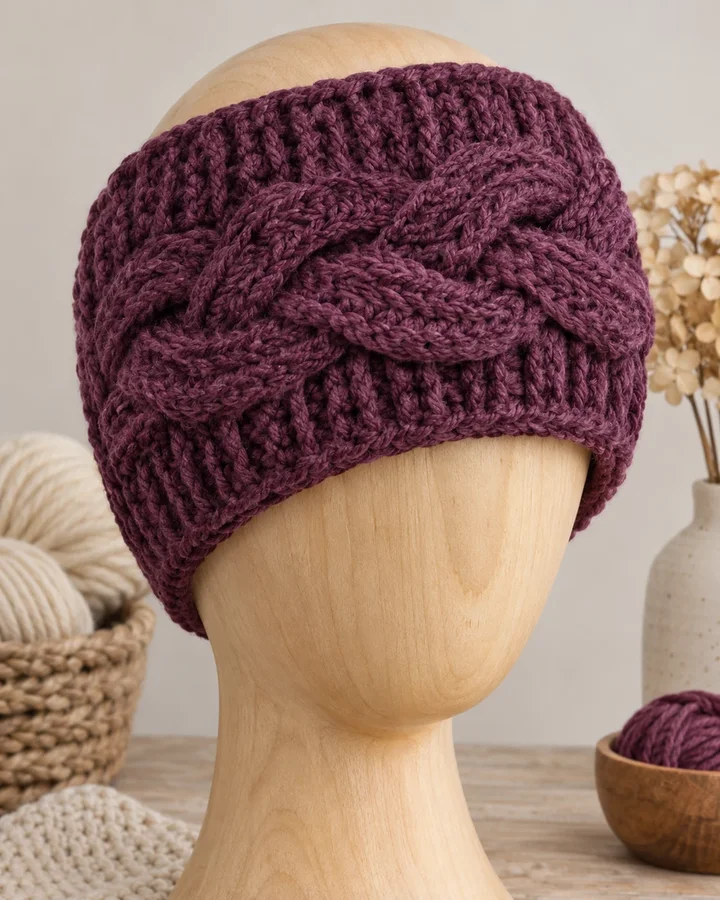
A plum-colored cable crosses the front of this warm ear warmer, framed by closely worked ribbing that stretches comfortably around the head. The deep color and substantial texture make it an easy cold-weather piece with a clean, polished finish.
- LEVEL
- Intermediate
- TRY IT WITH
- Bulky #5 wool blend, about 140 yd; 6 mm hook; stitch marker; tapestry needle.
- FINISHING NOTE
- Adult medium starting size: 4.5 in / 11.5 cm wide and 20-21 in / 51-53 cm long before joining.
Short Pattern
Abbreviations: US terms: ch chain · sl st slip stitch · hdc half double crochet · FPdc front-post double crochet · FPtr front-post treble crochet · rep repeat.
- Ch 16; hdc in the third chain and across (14 hdc). Ch 2, turn. Work hdc in BLO for 3 rows to establish a ribbed band, then mark the center 8 stitches for the cable panel.
- Work the panel in front-post stitches: hdc to the marker, FPtr around the fourth marked stitch, skip the next 3 stitches, then FPtr around each of those skipped stitches in order. Hdc to the end. On the return row, work hdc across, placing stitches into the tops of the post stitches.
- Work 3 plain hdc rows, then repeat the cable cross. Keep the outer edges in BLO hdc for stretch and texture. Continue until the band measures 20-21 in, ending with a plain row so the join is tidy.
- Bring the ends together, rotate one end by half a turn, and overlap the four layers. Use the long tail to stitch firmly through every layer at the twist. Weave in the tail on the inside of the band.
Assembly: Pin the twist in place before sewing so the cable stays centered at the front. Stitch through all four layers at the overlap and reinforce the edges of the seam, where repeated stretching places the most tension.
Plum Plaid Winter Headband
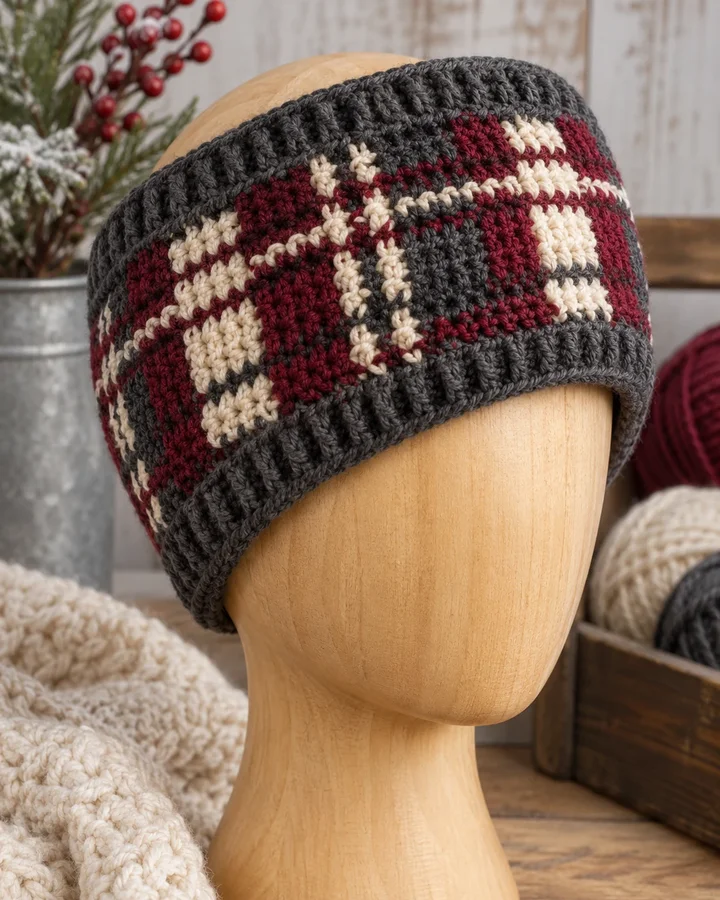
Charcoal, cranberry and cream make a bold plaid pattern across this thick ear warmer. The tidy color blocks are balanced by plain charcoal ribbing at the edges, creating a warm, substantial headband that pairs naturally with a winter scarf or coat.
- LEVEL
- Intermediate
- TRY IT WITH
- Worsted #4 wool: charcoal 100 yd, cranberry 35 yd, cream 25 yd; 4.5 mm hook; tapestry needle.
- FINISHING NOTE
- Adult medium: about 4 in / 10 cm wide and 20-21 in / 51-53 cm long before joining.
Short Pattern
Abbreviations: US terms: ch chain · sl st slip stitch · sc single crochet · hdc half double crochet · BLO back loop only · rep repeat.
- With charcoal, ch 19 and hdc in the third chain and across (17 hdc). Work 2 rows in BLO hdc. Keep 2 stitches at each edge in charcoal for the border throughout the plaid section.
- Work the color blocks in hdc: 4 rows charcoal, 3 rows cranberry, 2 rows cream, 3 rows cranberry, then 4 rows charcoal. For the crosswise plaid lines, work one surface slip-stitch stripe in cream and one in cranberry across the charcoal blocks, spacing them evenly along the strip.
- Repeat the color-block sequence until the strip measures 20-21 in, keeping the stripe positions consistent. Fasten off each color at the edge and weave tails into the same-color rows; avoid carrying yarn across the back, where it could rub against the skin.
- Finish with 2 rows of BLO hdc in charcoal. Join the short ends with mattress stitch at the back and secure every color tail before trying on.
Assembly: Keep the crosswise surface stripes low-profile and anchor them at both edges so they do not snag. Align the charcoal rib edges at the seam and place the join at the nape for comfortable wear.
Honeycomb Oat Ear Warmer
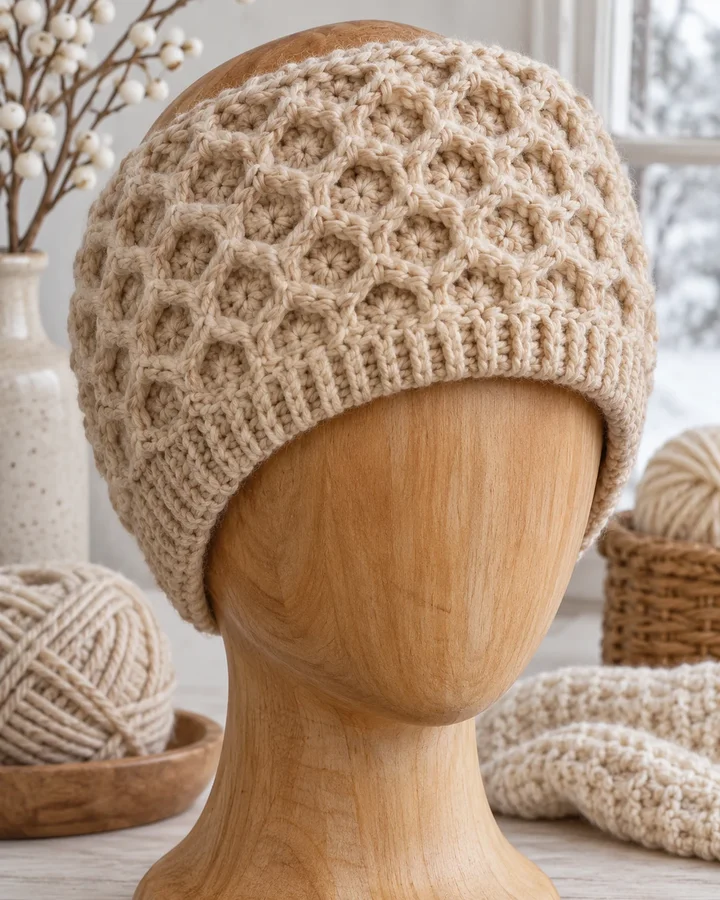
Oatmeal yarn forms a softly raised honeycomb across this generous ear warmer, with a deep ribbed edge that sits securely over the ears. The neutral shade and tactile stitch make it a versatile everyday accessory for cold mornings.
- LEVEL
- Intermediate
- TRY IT WITH
- Bulky #5 wool blend, about 130 yd; 6 mm hook; stitch marker; tapestry needle.
- FINISHING NOTE
- Adult medium starting size: 4.5 in / 11.5 cm wide and 20-21 in / 51-53 cm long before joining.
Short Pattern
Abbreviations: US terms: ch chain · sl st slip stitch · hdc half double crochet · FPdc front-post double crochet · BPdc back-post double crochet · rep repeat.
- Ch 17; hdc in the third chain and across (15 hdc). Ch 2, turn. Work 2 rows of hdc in BLO to make a flexible lower edge.
- For the honeycomb row, work *FPdc around the next stitch, BPdc around the next stitch* across, keeping the first and last stitch in hdc. On the return row, work hdc into each stitch, including the tops of the post stitches. On the next textured row, reverse the post placement: BPdc around the previous FPdc and FPdc around the previous BPdc.
- Repeat the two alternating post-stitch rows with one plain hdc row between each pair. Continue until the strip measures 20-21 in. Work 2 final rows of BLO hdc to match the beginning and fasten off with a long tail.
- Join the short ends with a flat mattress seam, matching the rib rows. Weave in the end on the wrong side and lightly shape the honeycomb cells with fingers rather than pressing the raised texture flat.
Assembly: Match the alternating post-stitch columns at the seam so the honeycomb texture continues around the loop. Keep the seam flat and avoid pulling the joining yarn tight enough to narrow the band.
Rusted Braid Ear Warmer
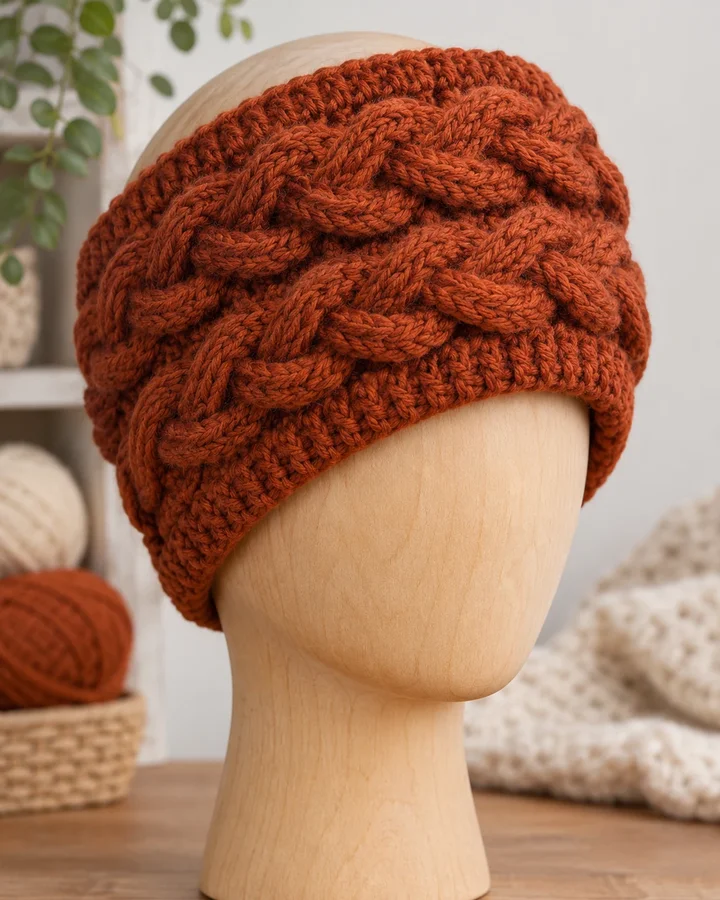
Burnt-rust yarn and two raised cable braids give this wide ear warmer a striking, dimensional look. Dense stitches fill the spaces around the cables for dependable warmth, while the warm earthy color stands out against neutral winter layers.
- LEVEL
- Intermediate
- TRY IT WITH
- Bulky #5 wool, about 150 yd; 6 mm hook; cable needle optional; stitch markers; tapestry needle.
- FINISHING NOTE
- Adult medium starting size: about 4.5 in / 11.5 cm wide and 20-21 in / 51-53 cm long.
Short Pattern
Abbreviations: US terms: ch chain · sl st slip stitch · hdc half double crochet · FPtr front-post treble crochet · FPdc front-post double crochet · rep repeat.
- Ch 18; hdc in the third chain and across (16 hdc). Ch 2, turn and work 2 setup rows in BLO hdc. Mark two 4-stitch cable panels, leaving 2 hdc between them and 2 hdc at each outer edge.
- For each cable panel, work FPtr around the third marked stitch, skip the next two stitches, then FPtr around the first skipped stitch and the second skipped stitch. Work the panel’s remaining stitch in hdc. Repeat the same crossing on the second panel, keeping both cables aligned across the row.
- Work 3 rows of hdc between crossings. Continue the double-cable repeat until the band measures 20-21 in, ending after a plain row. Keep the outer edge stitches in BLO hdc to add stretch and frame the raised braids.
- Seam the short ends at the back with a flat mattress stitch. Weave in the yarn tail beneath the cable panel and gently reshape the crossings with fingers.
Assembly: Mark both cable panels before beginning each crossing so they remain symmetrical. At the seam, match the cable valleys rather than the raised strands, then secure the join through the dense background stitches.
Cedar Button-Cuff Ear Warmer
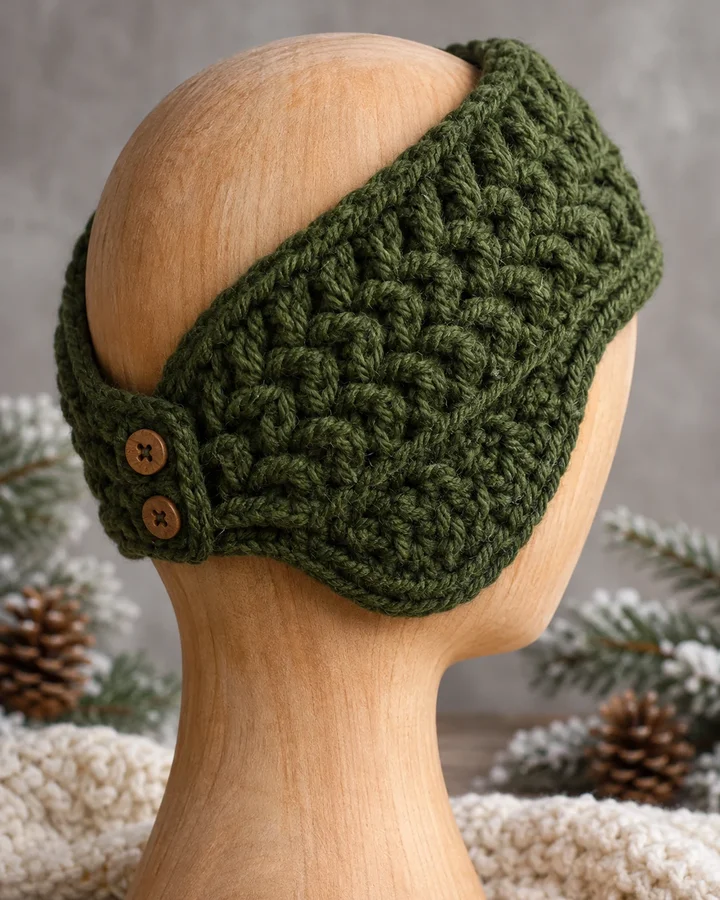
Moss-green texture and small wooden buttons create a practical adjustable closure on this double-thick ear warmer. The wide folded band covers the ears, while the buttoned overlap makes it easy to fine-tune the fit without a bulky front knot.
- LEVEL
- Confident beginner
- TRY IT WITH
- Bulky #5 wool blend, about 150 yd; 6 mm hook; 2 small 3/4 in / 2 cm buttons; tapestry needle.
- FINISHING NOTE
- Adult medium: 4.5 in / 11.5 cm wide; make the strip about 22 in / 56 cm long and use the button overlap to adjust the loop.
Short Pattern
Abbreviations: US terms: ch chain · sl st slip stitch · sc single crochet · hdc half double crochet · BLO back loop only · rep repeat.
- Ch 18; hdc in the third chain and across (16 hdc). Ch 2, turn. Work hdc in BLO across for a dense ribbed strip until it measures about 22 in. Add 2 rows of sc at both short ends to strengthen the button tabs.
- At one short end, make two button loops: ch 6, skip 2 stitches, sl st in the next stitch; repeat once, then sc across the remaining edge. Adjust chain length to fit the chosen buttons. At the opposite short end, work a firm sc row to create a stable button band.
- Fold the strip lengthwise so it is double thickness and align the long edges. Join them with sc through both layers, easing evenly without puckering. Turn right-side out and lightly press the seam with fingers; the ribbed side should remain the visible outer surface.
- Sew the buttons to the reinforced end, spacing them to match the loops. Fasten the band at the desired overlap and check that the covered ear area remains broad and comfortable.
Assembly: Place the buttons on the outside of the nape-side overlap, not at the forehead. Stitch each button through both layers with several passes and secure the thread ends between the layers so no knot rubs against the skin.
Berry Frost Striped Ear Warmer
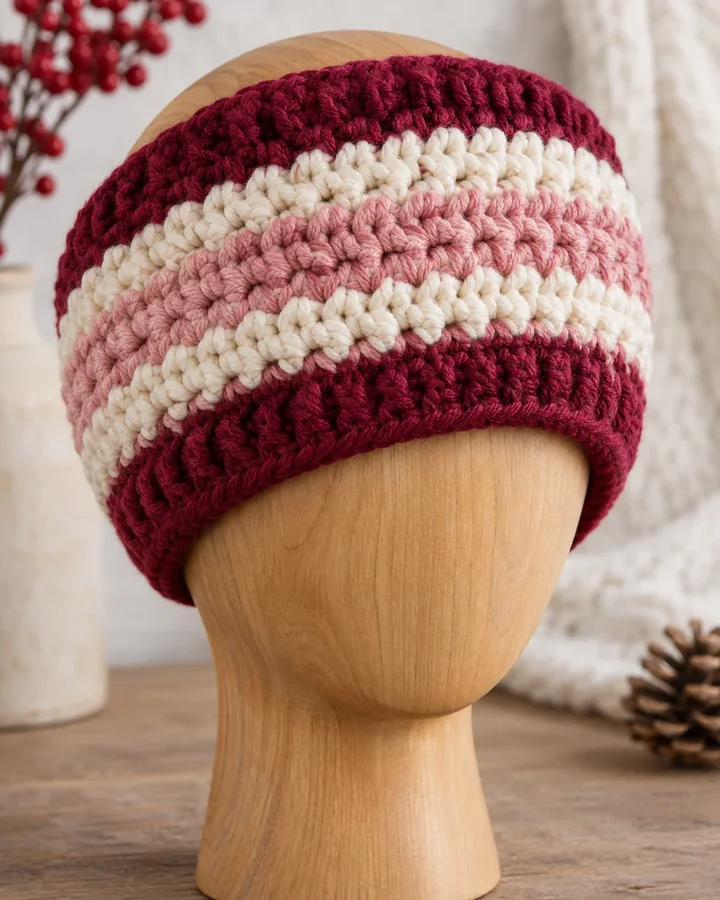
Cranberry, cream and dusty-rose stripes brighten this broad, warm ear warmer without sacrificing practical coverage. The dense crochet fabric and ribbed edges help it stay put over the ears, while the balanced color bands create a cheerful winter finish.
- LEVEL
- Confident beginner
- TRY IT WITH
- Worsted #4 wool: cranberry 70 yd, cream 50 yd, dusty rose 35 yd; 4.5 mm hook; tapestry needle.
- FINISHING NOTE
- Adult medium: about 4 in / 10 cm wide and 20-21 in / 51-53 cm circumference before joining.
Short Pattern
Abbreviations: US terms: ch chain · sl st slip stitch · sc single crochet · hdc half double crochet · BLO back loop only · rep repeat.
- With cranberry, ch 19 and hdc in the third chain and across (17 hdc). Ch 2, turn. Work 2 rows in BLO hdc for a stretchy lower edge.
- Work stripe bands in hdc: 4 rows cranberry, 3 rows cream, 3 rows dusty rose, 3 rows cream, then 4 rows cranberry. Change color in the final yarn-over of the last stitch of each band. Carry the inactive yarn loosely up one edge only if it does not pull; otherwise fasten off each band.
- Continue repeating the stripe sequence until the strip measures 20-21 in, ending with a cranberry band. Work 2 final rows in BLO hdc. Weave all ends along their matching color rows and keep the band’s edges flat.
- Bring the ends together and seam with mattress stitch, matching the stripe sequence exactly. Turn the seam to the inside and gently stretch the loop to check that the stripes remain level around the head.
Assembly: Match the cranberry bands before closing the loop, then weave each tail inside the corresponding stripe. Keep the seam low-profile so it sits comfortably at the nape and does not create a hard ridge.
Midnight Chevron Ear Warmer
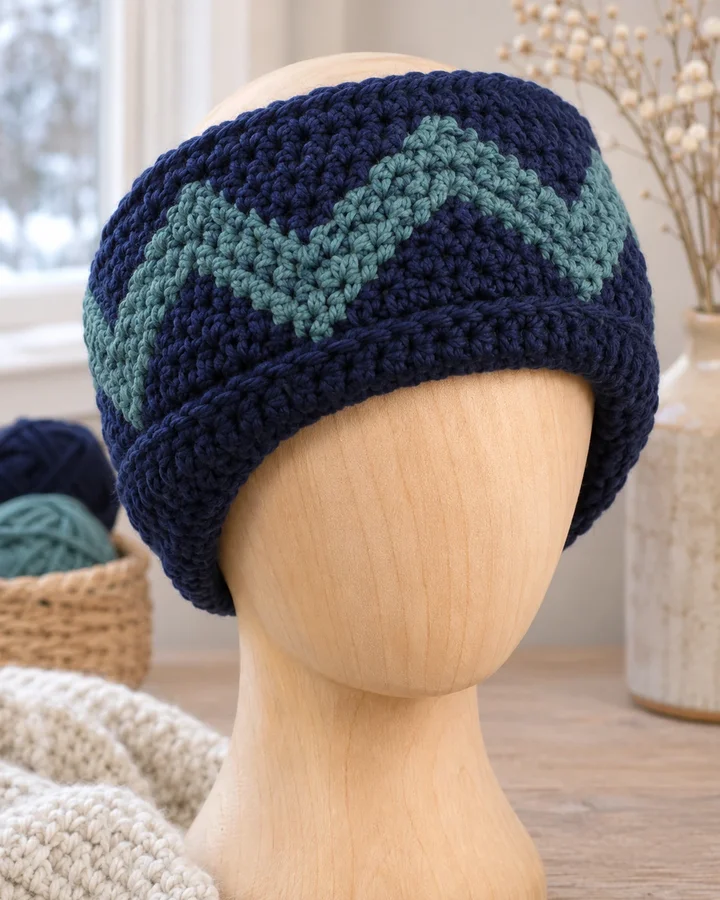
Navy and sea-glass teal form a bold chevron across this double-layer winter ear warmer. The dense stitches and folded cuff add extra warmth, while the clean geometric color-block gives the practical wide band a modern, sporty look.
- LEVEL
- Intermediate
- TRY IT WITH
- Worsted #4 wool: navy 110 yd, teal 45 yd; 4.5 mm hook; tapestry needle; stitch markers.
- FINISHING NOTE
- Adult medium: about 4 in / 10 cm wide and 20-21 in / 51-53 cm long before joining.
Short Pattern
Abbreviations: US terms: ch chain · sl st slip stitch · sc single crochet · hdc half double crochet · BLO back loop only · rep repeat.
- With navy, ch 19 and hdc in the third chain and across (17 hdc). Ch 2, turn. Work 2 rows of BLO hdc. Mark the center stitch and two points 4 stitches to either side for the color-change guides.
- Work hdc rows in navy, changing to teal for a stepped chevron: on the first motif row, work 5 navy, 3 teal, 5 navy; on the next, work 4 navy, 5 teal, 4 navy; then 3 navy, 7 teal, 3 navy. Reverse the sequence to complete the V. Keep 2 navy stitches at each edge as a border.
- Repeat the chevron chart along the strip, carrying the unused yarn loosely inside the stitches and catching it every 3 stitches. Continue until the band measures 20-21 in. Fold the strip lengthwise and join the long edges with sc through both layers to create a warm double-thick cuff.
- Turn the tube right-side out and join the short ends without twisting. Weave in all color tails between the layers and gently shape the folded cuff so it covers both ears evenly.
Assembly: Lay the strip flat before joining the ends to ensure the chevrons are upright and the tube is not twisted. Distribute the inner seam toward the back and keep the folded edge smooth across the forehead.
Saffron Pleat Ear Warmer
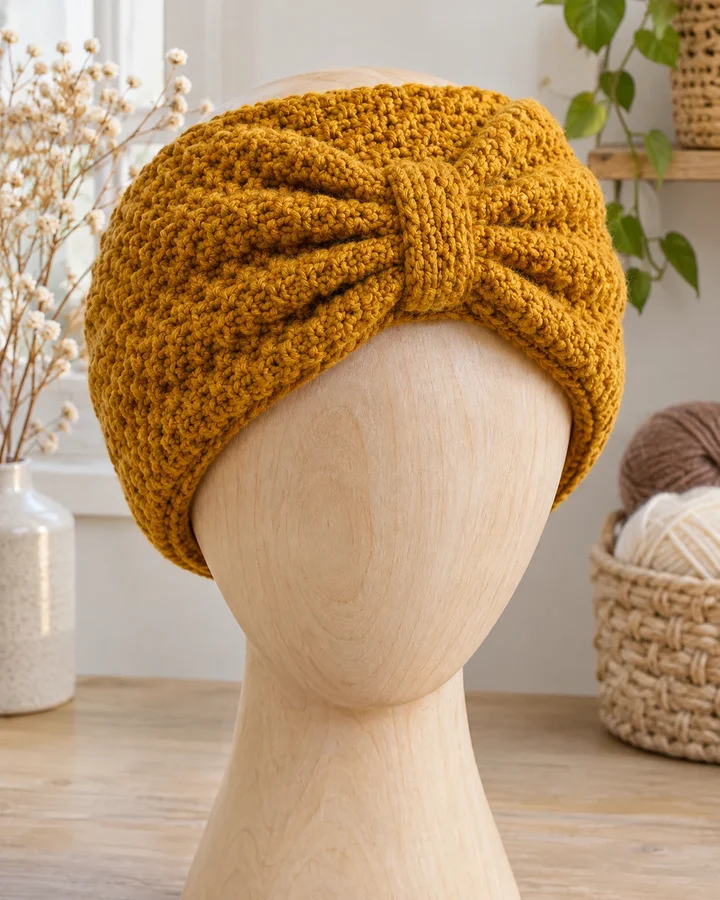
A sculptural gathered pleat gives this mustard-gold ear warmer a distinctive front detail, while its broad moss-stitch body stays soft and warm around the ears. The rich saffron shade adds a bright accent to a practical winter layer.
- LEVEL
- Confident beginner
- TRY IT WITH
- Bulky #5 wool blend, about 130 yd; 6 mm hook; tapestry needle; stitch marker.
- FINISHING NOTE
- Adult medium starting size: 4.5 in / 11.5 cm wide and 20-21 in / 51-53 cm long before joining.
Short Pattern
Abbreviations: US terms: ch chain · sl st slip stitch · sc single crochet · ch-sp chain space · rep repeat.
- Ch 18; sc in the second chain from the hook and across (17 sc). Ch 1, turn. Work moss stitch across: *sc in next stitch, ch 1, skip 1*; end with sc in the final stitch. On each following row, place sc in the prior ch-1 spaces and ch 1 over each sc. Continue until the strip measures 20-21 in.
- Work one final sc row without chain spaces to firm the long edge. Bring the short ends together and seam to form a loop, keeping the seam at the back. Weave in the tail and flatten the loop with the seam centered.
- At the front center, pinch the band into three even folds about 1 in deep. Wrap a 10-stitch-wide strip of matching yarn around the pinched section 8-10 times, keeping the wrap snug but not tight. Secure the wrap on the inside with several small stitches.
- Spread the fabric evenly on either side of the pleat, then try the band on a head form or measure around the head. Adjust the back seam if needed and weave in the center-wrap tail between the folds.
Assembly: Keep the three front folds equal before wrapping the center; uneven folds can pull the band sideways. Sew the wrap securely through the inner layers so it stays fixed while the band stretches during wear.
Make thoughtfully and check as you go.
Yarn, hook size and personal tension can change the finished scale. Count every round, stuff gradually and use embroidered features instead of safety eyes when making toys for children under three.