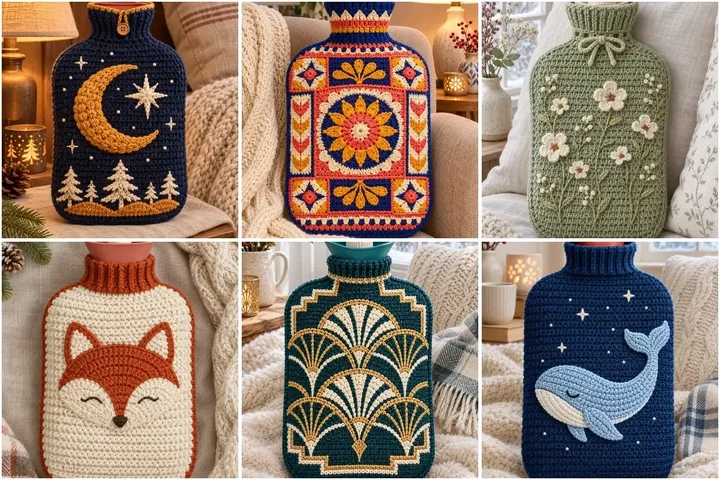
Add a removable handmade layer to a standard hot-water bottle with fourteen original crochet cover designs. Measure your own bottle before stitching because shapes and dimensions vary. Instructions use US terms; adjust panel widths, shoulder shaping and neck openings to your bottle. A crochet sleeve is only a textile cover—it is not a container and does not replace the bottle's supplied cover or manufacturer directions. Before each use, inspect the bottle for wear, follow its instructions, never fill with boiling water, and avoid direct skin contact. These precautions reduce burn and leak risks; see the official [Australian Competition and Consumer Commission hot-water bottle guide](https://www.productsafety.gov.au/consumers/be-safe-around-the-home/use-products-inside-the-home-safely/hot-water-bottles-guide).
Moonlit Forest Cover
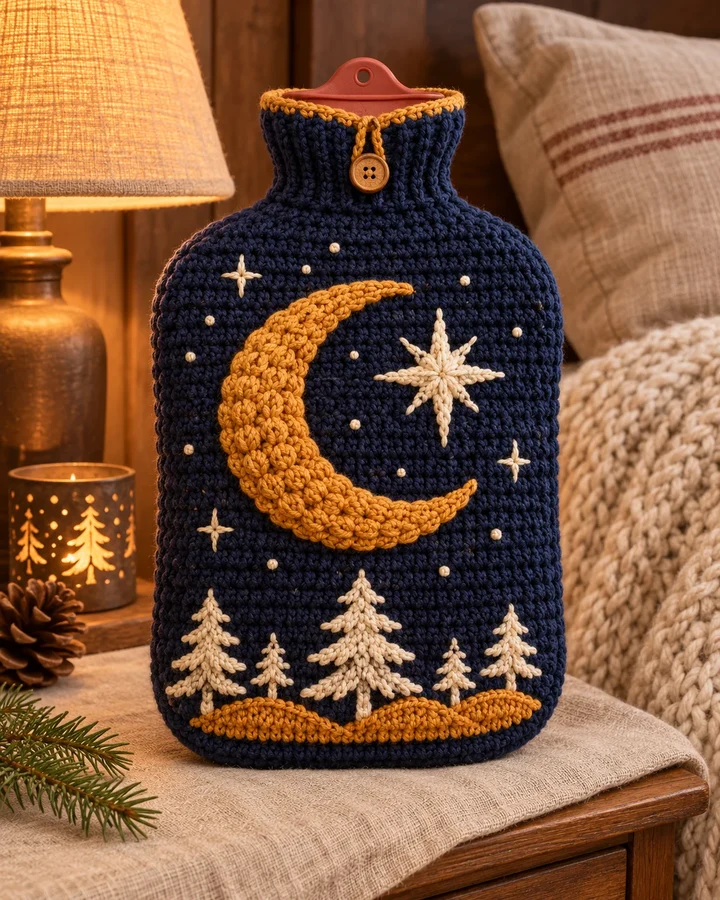
Deep midnight crochet frames an ochre crescent, cream stars and tiny evergreen silhouettes on this cozy cover. A ribbed neck opening keeps the stopper accessible, while the high-contrast night-sky motif makes a striking handmade gift for winter evenings.
- LEVEL
- Confident beginner
- TRY IT WITH
- DK cotton-wool blend: navy 180 yd, ochre 30 yd, cream 35 yd; 4 mm hook; stitch markers; tapestry needle.
- FINISHING NOTE
- Fits many standard 1.5-2 L bottles; measure the individual bottle and customize panel width, length and neck opening.
Short Pattern
Abbreviations: US terms: ch chain · sl st slip stitch · sc single crochet · hdc half double crochet · dc double crochet · BLO back loop only · MR magic ring · dec decrease.
- Measure the actual hot-water bottle laid flat, including body width, body length and the width below the neck. Make a small sc gauge swatch and adjust the stitch count so the cover fits snugly without stretching the stopper area.
- Front panel: ch 31 and work 30 hdc across. Continue in rows until the panel reaches the measured body length, then decrease one stitch at each edge every other row over the final 6 rows to shape the shoulders.
- Back panel: make a matching panel, adding a 2 cm overlap at the top if you want an envelope opening. For a two-panel closed sleeve, keep front and back equal and leave the neck shaping open.
- Neck: join the shoulder edges, leaving a centered opening sized to the bottle neck. Work 4-6 rounds of BLO sc around the opening; stop below the cap and verify it can be removed without stretching the crochet.
- Surface embroider the crescent in ochre using short chain stitches, filling the moon shape with close rows. Add cream starbursts with straight stitches and tiny evergreen silhouettes along the lower front.
- Join the front and back around both sides and the bottom with mattress stitch. Keep the seam flat, reinforce the shoulder corners, and try the cover on the empty bottle before final weaving in.
- Remove the cover before filling the bottle. Follow the bottle maker's instructions, do not use boiling water, inspect for damage, and use the cover between the bottle and skin. This crochet sleeve is only a removable textile cover, not a hot-water container.
Assembly: Keep the embroidered moon on the front panel and align its lower tree line above the bottle base. Close the side seams with navy yarn, then finish the neck ribbing without covering the stopper or its grip.
Folk Mosaic Hot Water Bottle Cozy
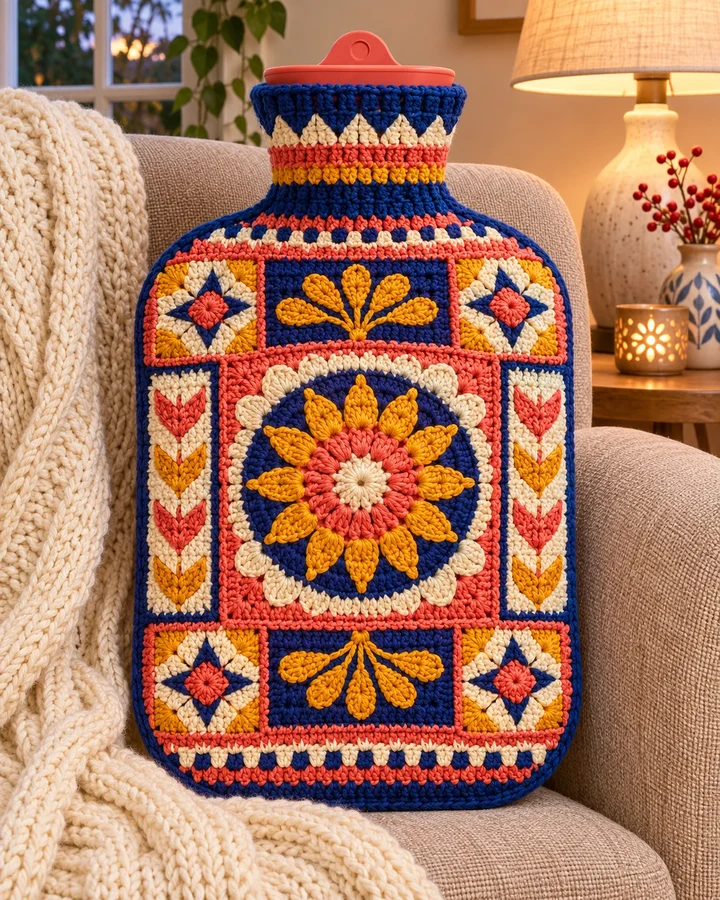
Jewel-tone crochet panels surround a bold sunburst medallion in cobalt, coral, mustard and cream. Shaped front pieces follow the bottle’s silhouette, and a practical open neck lets the rubber stopper remain easy to reach when filling or removing the cover.
- LEVEL
- Intermediate
- TRY IT WITH
- Worsted cotton: cobalt 130 yd, coral 70 yd, mustard 50 yd, cream 55 yd; 4.5 mm hook; yarn needle.
- FINISHING NOTE
- Fits many standard 1.5-2 L bottles; measure the individual bottle and customize panel width, length and neck opening.
Short Pattern
Abbreviations: US terms: ch chain · sl st slip stitch · sc single crochet · hdc half double crochet · dc double crochet · BLO back loop only · MR magic ring · dec decrease.
- Measure the actual hot-water bottle laid flat, including body width, body length and the width below the neck. Make a small sc gauge swatch and adjust the stitch count so the cover fits snugly without stretching the stopper area.
- Front panel: ch 31 and work 30 hdc across. Continue in rows until the panel reaches the measured body length, then decrease one stitch at each edge every other row over the final 6 rows to shape the shoulders.
- Back panel: make a matching panel, adding a 2 cm overlap at the top if you want an envelope opening. For a two-panel closed sleeve, keep front and back equal and leave the neck shaping open.
- Neck: join the shoulder edges, leaving a centered opening sized to the bottle neck. Work 4-6 rounds of BLO sc around the opening; stop below the cap and verify it can be removed without stretching the crochet.
- Make a large central sunburst square and two smaller geometric side panels, changing colors each round. Join the motifs with cream slip stitches, then add coral and mustard narrow borders.
- Join the front and back around both sides and the bottom with mattress stitch. Keep the seam flat, reinforce the shoulder corners, and try the cover on the empty bottle before final weaving in.
- Remove the cover before filling the bottle. Follow the bottle maker's instructions, do not use boiling water, inspect for damage, and use the cover between the bottle and skin. This crochet sleeve is only a removable textile cover, not a hot-water container.
Assembly: Join the sunburst and side panels with flat seams so their color blocks meet cleanly. Shape the shoulder evenly on both sides and work the neck edging in cobalt, leaving the stopper accessible.
Sage Wildflower Cover
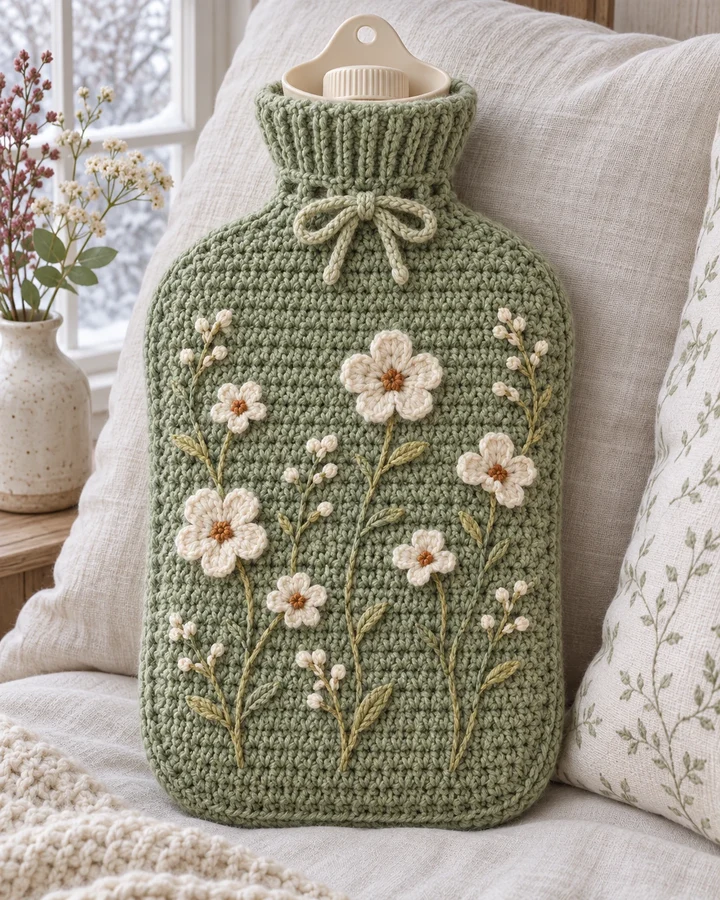
Soft sage yarn, cream wildflowers and slender stitched stems create a calm cottage-garden design. The fitted crochet sleeve leaves the bottle neck open and adds a removable textile layer without pretending the cover itself holds water or heat.
- LEVEL
- Confident beginner
- TRY IT WITH
- DK cotton: sage 190 yd, cream 35 yd, olive 12 yd, rust 8 yd; 4 mm hook; yarn needle; marker.
- FINISHING NOTE
- Fits many standard 1.5-2 L bottles; measure the individual bottle and customize panel width, length and neck opening.
Short Pattern
Abbreviations: US terms: ch chain · sl st slip stitch · sc single crochet · hdc half double crochet · dc double crochet · BLO back loop only · MR magic ring · dec decrease.
- Measure the actual hot-water bottle laid flat, including body width, body length and the width below the neck. Make a small sc gauge swatch and adjust the stitch count so the cover fits snugly without stretching the stopper area.
- Front panel: ch 31 and work 30 hdc across. Continue in rows until the panel reaches the measured body length, then decrease one stitch at each edge every other row over the final 6 rows to shape the shoulders.
- Back panel: make a matching panel, adding a 2 cm overlap at the top if you want an envelope opening. For a two-panel closed sleeve, keep front and back equal and leave the neck shaping open.
- Neck: join the shoulder edges, leaving a centered opening sized to the bottle neck. Work 4-6 rounds of BLO sc around the opening; stop below the cap and verify it can be removed without stretching the crochet.
- Make six cream flowers: MR, 5 petals each formed with (sl st, ch 3, 2 dc, ch 3, sl st). Surface crochet three stems in olive and sew two flowers along each stem, keeping petals flat.
- Join the front and back around both sides and the bottom with mattress stitch. Keep the seam flat, reinforce the shoulder corners, and try the cover on the empty bottle before final weaving in.
- Remove the cover before filling the bottle. Follow the bottle maker's instructions, do not use boiling water, inspect for damage, and use the cover between the bottle and skin. This crochet sleeve is only a removable textile cover, not a hot-water container.
Assembly: Sew the six flowers and stems onto the front before joining the panels. Place the side seam at the back and finish the neck opening with sage ribbing so the floral surface remains centered.
Rose Cable Comfort Cover
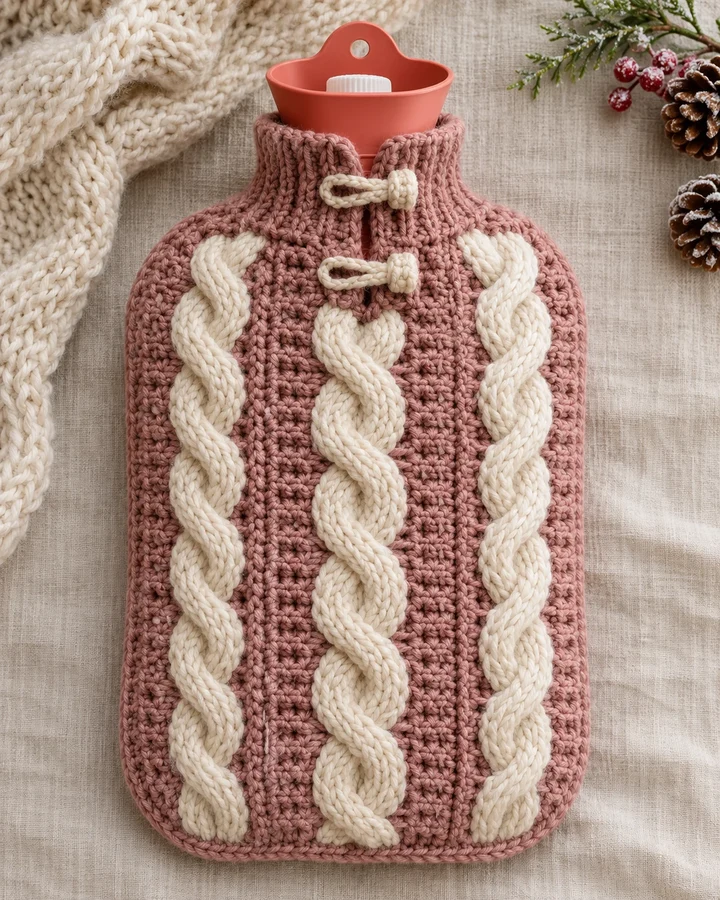
Dusty rose crochet and three raised cream cable bands give this design a boutique, sweater-inspired look. A softly shaped shoulder and tall ribbed neck frame the bottle neatly, while flexible toggle loops keep the front secure and easy to open.
- LEVEL
- Confident beginner
- TRY IT WITH
- Worsted wool blend: dusty rose 190 yd, cream 70 yd; 4.5 mm hook; 4 mm hook for neck; yarn needle.
- FINISHING NOTE
- Fits many standard 1.5-2 L bottles; measure the individual bottle and customize panel width, length and neck opening.
Short Pattern
Abbreviations: US terms: ch chain · sl st slip stitch · sc single crochet · hdc half double crochet · dc double crochet · BLO back loop only · MR magic ring · dec decrease.
- Measure the actual hot-water bottle laid flat, including body width, body length and the width below the neck. Make a small sc gauge swatch and adjust the stitch count so the cover fits snugly without stretching the stopper area.
- Front panel: ch 31 and work 30 hdc across. Continue in rows until the panel reaches the measured body length, then decrease one stitch at each edge every other row over the final 6 rows to shape the shoulders.
- Back panel: make a matching panel, adding a 2 cm overlap at the top if you want an envelope opening. For a two-panel closed sleeve, keep front and back equal and leave the neck shaping open.
- Neck: join the shoulder edges, leaving a centered opening sized to the bottle neck. Work 4-6 rounds of BLO sc around the opening; stop below the cap and verify it can be removed without stretching the crochet.
- Work three vertical front-post cable columns on the front panel, each separated by 5 hdc. Cross paired post-stitch groups every fourth texture round to create the raised braid effect.
- Join the front and back around both sides and the bottom with mattress stitch. Keep the seam flat, reinforce the shoulder corners, and try the cover on the empty bottle before final weaving in.
- Remove the cover before filling the bottle. Follow the bottle maker's instructions, do not use boiling water, inspect for damage, and use the cover between the bottle and skin. This crochet sleeve is only a removable textile cover, not a hot-water container.
Assembly: Match the cable columns across the center front and keep the crossed stitches loose enough for stretch. Join the back seam, fold the neck ribbing outward and secure each crocheted toggle loop through several stitches.
Honeycomb Sunburst Cozy
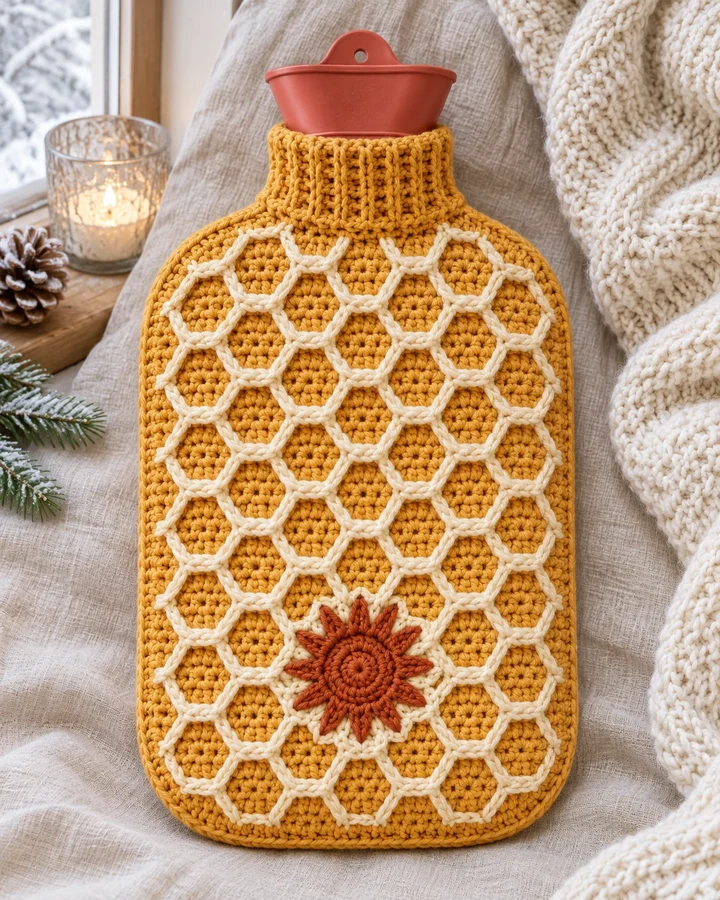
A warm honey-gold base and cream honeycomb overlay give this cover a dimensional geometric surface. A rust sunburst medallion anchors the center, balancing the busy texture with a clear focal point and a practical fitted opening at the bottle neck.
- LEVEL
- Confident beginner
- TRY IT WITH
- Worsted cotton: honey 190 yd, cream 60 yd, rust 15 yd; 4.5 mm hook; yarn needle.
- FINISHING NOTE
- Fits many standard 1.5-2 L bottles; measure the individual bottle and customize panel width, length and neck opening.
Short Pattern
Abbreviations: US terms: ch chain · sl st slip stitch · sc single crochet · hdc half double crochet · dc double crochet · BLO back loop only · MR magic ring · dec decrease.
- Measure the actual hot-water bottle laid flat, including body width, body length and the width below the neck. Make a small sc gauge swatch and adjust the stitch count so the cover fits snugly without stretching the stopper area.
- Front panel: ch 31 and work 30 hdc across. Continue in rows until the panel reaches the measured body length, then decrease one stitch at each edge every other row over the final 6 rows to shape the shoulders.
- Back panel: make a matching panel, adding a 2 cm overlap at the top if you want an envelope opening. For a two-panel closed sleeve, keep front and back equal and leave the neck shaping open.
- Neck: join the shoulder edges, leaving a centered opening sized to the bottle neck. Work 4-6 rounds of BLO sc around the opening; stop below the cap and verify it can be removed without stretching the crochet.
- Overlay cream chain loops in linked hexagon outlines across the gold base, joining each loop at shared corners. Add the rust sunburst as a flat crocheted circle with eight short rays.
- Join the front and back around both sides and the bottom with mattress stitch. Keep the seam flat, reinforce the shoulder corners, and try the cover on the empty bottle before final weaving in.
- Remove the cover before filling the bottle. Follow the bottle maker's instructions, do not use boiling water, inspect for damage, and use the cover between the bottle and skin. This crochet sleeve is only a removable textile cover, not a hot-water container.
Assembly: Attach the sunburst over the honeycomb overlay and secure every shared chain intersection. Align the honeycomb before seaming the sides, then finish with a plain gold neck band to calm the textured body.
Woodland Fox Bottle Cover
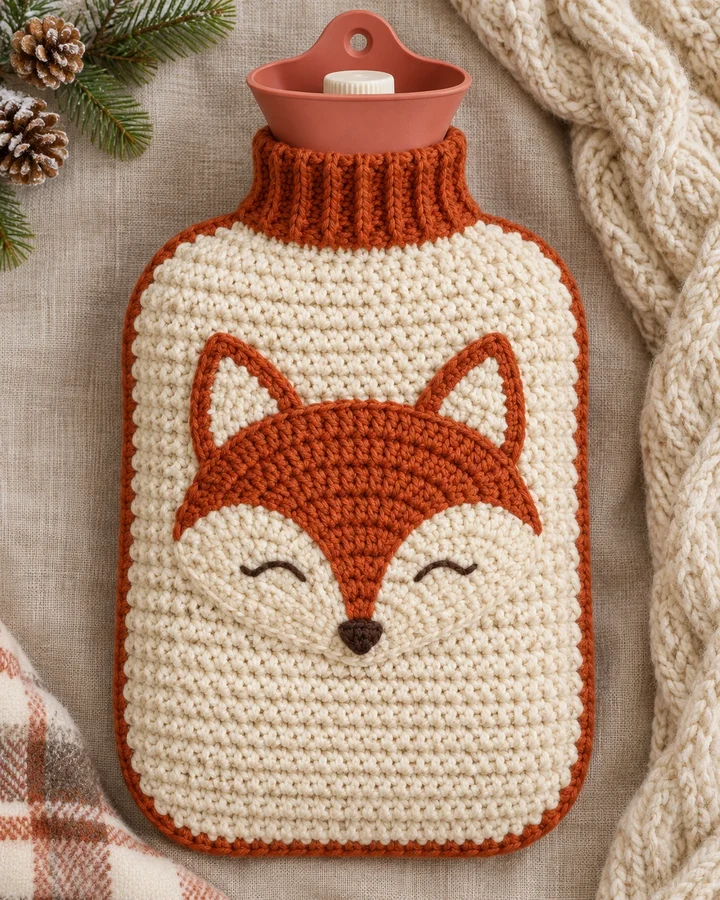
A stylized rust fox face sits against a cream crochet front with a neat rust border. Embroidered sleepy eyes and a dark nose keep the features soft and secure, while the shaped sleeve follows the bottle body and leaves its stopper clear.
- LEVEL
- Intermediate
- TRY IT WITH
- Worsted cotton: cream 155 yd, rust 70 yd, dark brown 10 yd; 4.5 mm hook; tapestry needle.
- FINISHING NOTE
- Fits many standard 1.5-2 L bottles; measure the individual bottle and customize panel width, length and neck opening.
Short Pattern
Abbreviations: US terms: ch chain · sl st slip stitch · sc single crochet · hdc half double crochet · dc double crochet · BLO back loop only · MR magic ring · dec decrease.
- Measure the actual hot-water bottle laid flat, including body width, body length and the width below the neck. Make a small sc gauge swatch and adjust the stitch count so the cover fits snugly without stretching the stopper area.
- Front panel: ch 31 and work 30 hdc across. Continue in rows until the panel reaches the measured body length, then decrease one stitch at each edge every other row over the final 6 rows to shape the shoulders.
- Back panel: make a matching panel, adding a 2 cm overlap at the top if you want an envelope opening. For a two-panel closed sleeve, keep front and back equal and leave the neck shaping open.
- Neck: join the shoulder edges, leaving a centered opening sized to the bottle neck. Work 4-6 rounds of BLO sc around the opening; stop below the cap and verify it can be removed without stretching the crochet.
- Crochet a rust fox mask as a flat rounded triangle panel, then add cream cheek ovals and two small rust ears with cream inner triangles. Embroider closed eyes and a dark nose.
- Join the front and back around both sides and the bottom with mattress stitch. Keep the seam flat, reinforce the shoulder corners, and try the cover on the empty bottle before final weaving in.
- Remove the cover before filling the bottle. Follow the bottle maker's instructions, do not use boiling water, inspect for damage, and use the cover between the bottle and skin. This crochet sleeve is only a removable textile cover, not a hot-water container.
Assembly: Center the fox mask and embroider facial features before sewing the front and back together. Reinforce both ear bases, align the rust border around the body and keep the neck opening clear of applique.
Nordic Snowfall Hot Water Bottle Cover
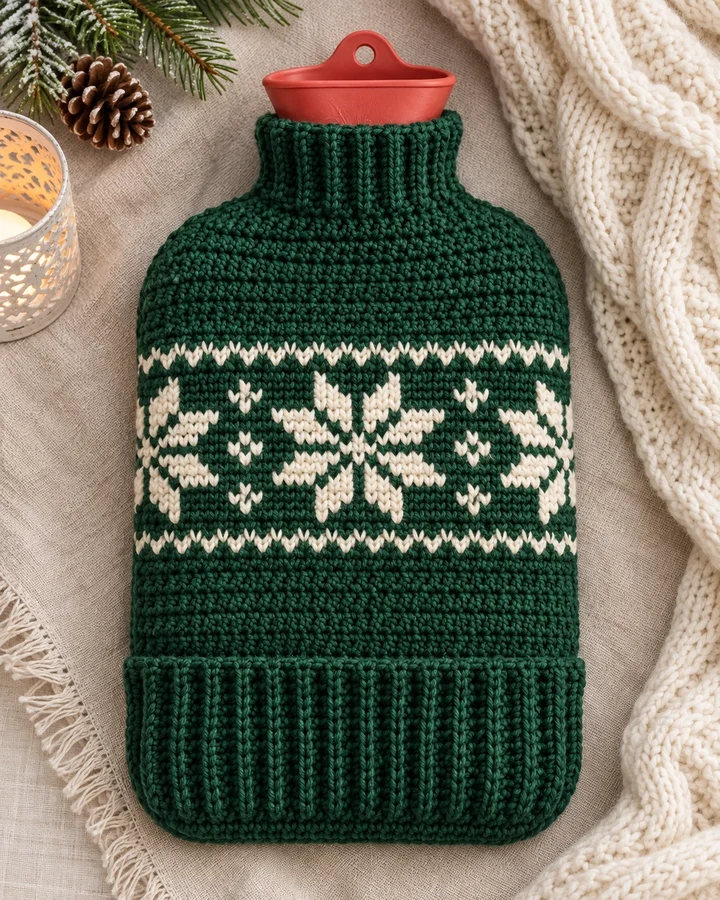
Forest-green crochet surrounds a crisp cream snowflake band on this classic winter cover. The tidy ribbed lower panel adds contrast, while a fitted shoulder and open neck make it practical to slip over a standard hot-water bottle.
- LEVEL
- Confident beginner
- TRY IT WITH
- Worsted wool blend: forest 190 yd, cream 45 yd; 4.5 mm hook; marker; yarn needle.
- FINISHING NOTE
- Fits many standard 1.5-2 L bottles; measure the individual bottle and customize panel width, length and neck opening.
Short Pattern
Abbreviations: US terms: ch chain · sl st slip stitch · sc single crochet · hdc half double crochet · dc double crochet · BLO back loop only · MR magic ring · dec decrease.
- Measure the actual hot-water bottle laid flat, including body width, body length and the width below the neck. Make a small sc gauge swatch and adjust the stitch count so the cover fits snugly without stretching the stopper area.
- Front panel: ch 31 and work 30 hdc across. Continue in rows until the panel reaches the measured body length, then decrease one stitch at each edge every other row over the final 6 rows to shape the shoulders.
- Back panel: make a matching panel, adding a 2 cm overlap at the top if you want an envelope opening. For a two-panel closed sleeve, keep front and back equal and leave the neck shaping open.
- Neck: join the shoulder edges, leaving a centered opening sized to the bottle neck. Work 4-6 rounds of BLO sc around the opening; stop below the cap and verify it can be removed without stretching the crochet.
- Work a 24-stitch cream motif repeat across 4 middle rounds: form a stepped snowflake from short tapestry-crochet blocks and small surface-embroidered arms. Keep carried strands short and relaxed.
- Join the front and back around both sides and the bottom with mattress stitch. Keep the seam flat, reinforce the shoulder corners, and try the cover on the empty bottle before final weaving in.
- Remove the cover before filling the bottle. Follow the bottle maker's instructions, do not use boiling water, inspect for damage, and use the cover between the bottle and skin. This crochet sleeve is only a removable textile cover, not a hot-water container.
Assembly: Block the snowflake panel lightly before seaming so its band sits level around the bottle. Place the back join between motif repeats and finish the neck with forest ribbing that does not cover the stopper.
Heart Envelope Cover
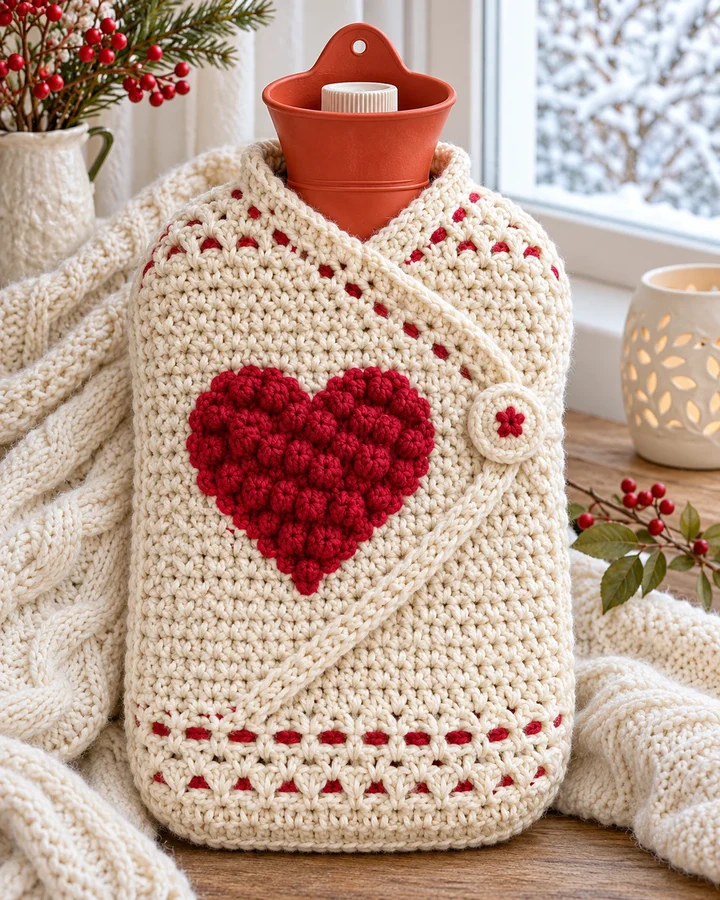
A raised cranberry heart decorates a cream envelope-front cover with tiny berry-red details. The wrap construction opens along the front for bottle insertion, and its soft tie-and-loop closure creates a gift-ready finish without hard fasteners.
- LEVEL
- Confident beginner
- TRY IT WITH
- Worsted cotton: cream 190 yd, cranberry 55 yd; 4.5 mm hook; 4 mm hook for edging; yarn needle.
- FINISHING NOTE
- Fits many standard 1.5-2 L bottles; measure the individual bottle and customize panel width, length and neck opening.
Short Pattern
Abbreviations: US terms: ch chain · sl st slip stitch · sc single crochet · hdc half double crochet · dc double crochet · BLO back loop only · MR magic ring · dec decrease.
- Measure the actual hot-water bottle laid flat, including body width, body length and the width below the neck. Make a small sc gauge swatch and adjust the stitch count so the cover fits snugly without stretching the stopper area.
- Front panel: ch 31 and work 30 hdc across. Continue in rows until the panel reaches the measured body length, then decrease one stitch at each edge every other row over the final 6 rows to shape the shoulders.
- Back panel: make a matching panel, adding a 2 cm overlap at the top if you want an envelope opening. For a two-panel closed sleeve, keep front and back equal and leave the neck shaping open.
- Neck: join the shoulder edges, leaving a centered opening sized to the bottle neck. Work 4-6 rounds of BLO sc around the opening; stop below the cap and verify it can be removed without stretching the crochet.
- Make a cranberry heart from two small rounded top lobes joined into a point, then sew it firmly to the center of the front panel. Add small berry stitches along the lower border.
- Join the front and back around both sides and the bottom with mattress stitch. Keep the seam flat, reinforce the shoulder corners, and try the cover on the empty bottle before final weaving in.
- Remove the cover before filling the bottle. Follow the bottle maker's instructions, do not use boiling water, inspect for damage, and use the cover between the bottle and skin. This crochet sleeve is only a removable textile cover, not a hot-water container.
Assembly: Overlap the front edges evenly, forming a removable envelope opening. Sew the heart to the top layer only; add short yarn loops and soft crocheted ties at the side points, avoiding loose long cords.
Mint Frog Hot Water Bottle Cozy
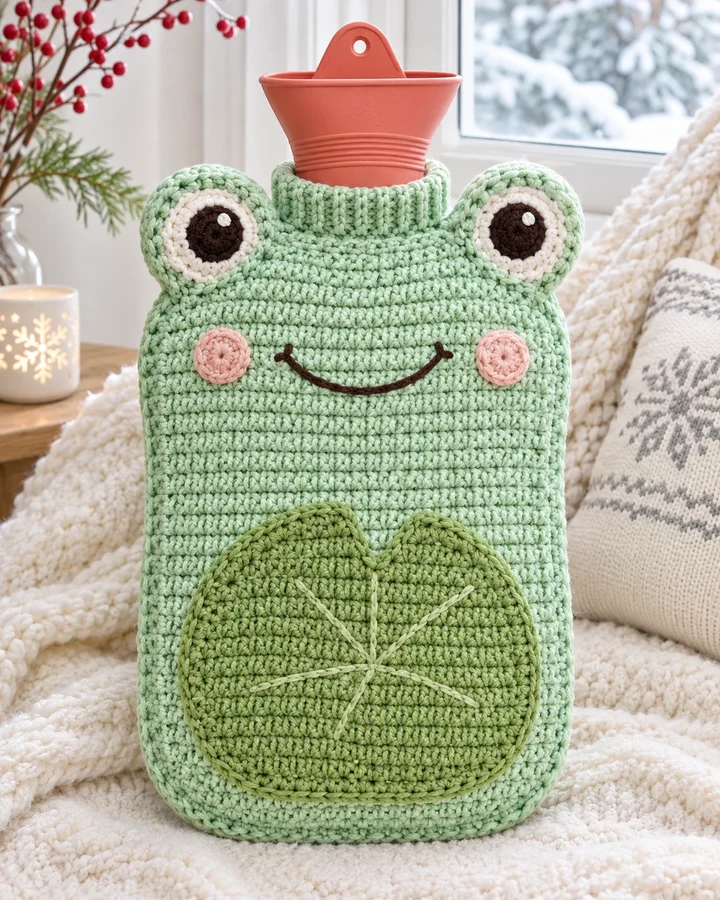
Mint crochet forms a cheerful frog face with rounded eye bumps, embroidered smile and a darker lily-pad belly panel. The playful cover is shaped around a real rubber bottle, with the top neck left visible and functional.
- LEVEL
- Confident beginner
- TRY IT WITH
- Worsted cotton: mint 185 yd, olive 45 yd, cream 20 yd, dark brown 8 yd, blush 8 yd; 4.5 mm hook; yarn needle.
- FINISHING NOTE
- Fits many standard 1.5-2 L bottles; measure the individual bottle and customize panel width, length and neck opening.
Short Pattern
Abbreviations: US terms: ch chain · sl st slip stitch · sc single crochet · hdc half double crochet · dc double crochet · BLO back loop only · MR magic ring · dec decrease.
- Measure the actual hot-water bottle laid flat, including body width, body length and the width below the neck. Make a small sc gauge swatch and adjust the stitch count so the cover fits snugly without stretching the stopper area.
- Front panel: ch 31 and work 30 hdc across. Continue in rows until the panel reaches the measured body length, then decrease one stitch at each edge every other row over the final 6 rows to shape the shoulders.
- Back panel: make a matching panel, adding a 2 cm overlap at the top if you want an envelope opening. For a two-panel closed sleeve, keep front and back equal and leave the neck shaping open.
- Neck: join the shoulder edges, leaving a centered opening sized to the bottle neck. Work 4-6 rounds of BLO sc around the opening; stop below the cap and verify it can be removed without stretching the crochet.
- Make two raised eye discs: MR 6, increase to 18, then add a cream ring and dark embroidered pupils. Sew the discs to the shoulder corners; surface stitch a smile and attach an olive belly panel.
- Join the front and back around both sides and the bottom with mattress stitch. Keep the seam flat, reinforce the shoulder corners, and try the cover on the empty bottle before final weaving in.
- Remove the cover before filling the bottle. Follow the bottle maker's instructions, do not use boiling water, inspect for damage, and use the cover between the bottle and skin. This crochet sleeve is only a removable textile cover, not a hot-water container.
Assembly: Attach the eye discs securely at equal heights and embroider the pupils, smile and blush before joining the panels. Reinforce the eye bases and keep the frog’s neck opening unobstructed.
Art Deco Fan Cover
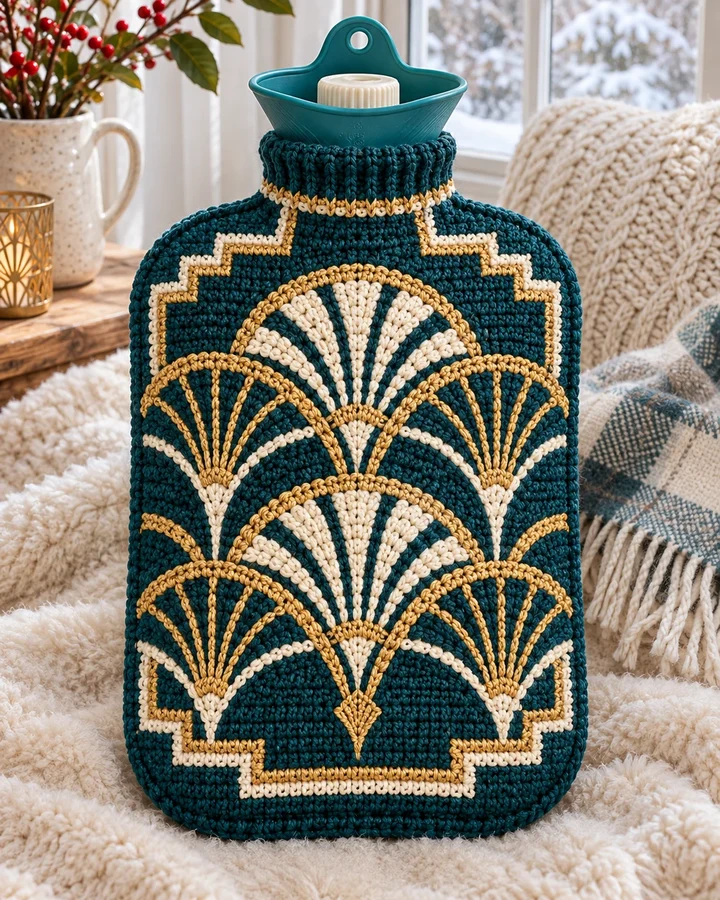
Symmetrical fan arches in antique gold and cream stand out against deep teal crochet. Stepped geometric borders create an Art Deco silhouette, and the close-fitting panels keep the bold surface pattern aligned around the bottle body.
- LEVEL
- Intermediate
- TRY IT WITH
- Worsted cotton: deep teal 190 yd, antique gold 45 yd, cream 35 yd; 4.5 mm hook; chart paper; yarn needle.
- FINISHING NOTE
- Fits many standard 1.5-2 L bottles; measure the individual bottle and customize panel width, length and neck opening.
Short Pattern
Abbreviations: US terms: ch chain · sl st slip stitch · sc single crochet · hdc half double crochet · dc double crochet · BLO back loop only · MR magic ring · dec decrease.
- Measure the actual hot-water bottle laid flat, including body width, body length and the width below the neck. Make a small sc gauge swatch and adjust the stitch count so the cover fits snugly without stretching the stopper area.
- Front panel: ch 31 and work 30 hdc across. Continue in rows until the panel reaches the measured body length, then decrease one stitch at each edge every other row over the final 6 rows to shape the shoulders.
- Back panel: make a matching panel, adding a 2 cm overlap at the top if you want an envelope opening. For a two-panel closed sleeve, keep front and back equal and leave the neck shaping open.
- Neck: join the shoulder edges, leaving a centered opening sized to the bottle neck. Work 4-6 rounds of BLO sc around the opening; stop below the cap and verify it can be removed without stretching the crochet.
- Use a repeating 16-stitch fan chart: cream and gold dc groups step outward from a shared base, framed with gold surface slip stitches. Repeat symmetrically from the center line.
- Join the front and back around both sides and the bottom with mattress stitch. Keep the seam flat, reinforce the shoulder corners, and try the cover on the empty bottle before final weaving in.
- Remove the cover before filling the bottle. Follow the bottle maker's instructions, do not use boiling water, inspect for damage, and use the cover between the bottle and skin. This crochet sleeve is only a removable textile cover, not a hot-water container.
Assembly: Align the center fan motif on the front and mirror the stepped borders on each side. Use gold for the back seam, then add a deep-teal neck band with a tidy edge around the stopper.
Indigo Patchwork Bottle Cozy
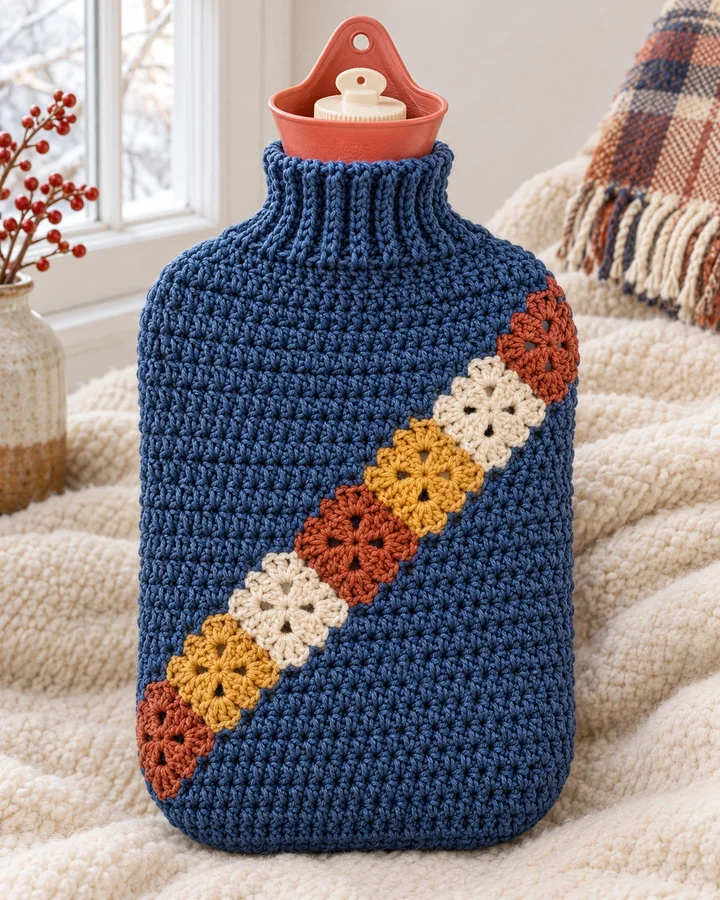
Indigo crochet provides a denim-like ground for a diagonal band of small rust, mustard and cream squares. A ribbed neck and carefully shaped sides give this patchwork design a tailored finish with a practical, accessible bottle opening.
- LEVEL
- Confident beginner
- TRY IT WITH
- Worsted cotton: indigo 165 yd, rust 20 yd, mustard 20 yd, cream 20 yd; 4.5 mm hook; yarn needle.
- FINISHING NOTE
- Fits many standard 1.5-2 L bottles; measure the individual bottle and customize panel width, length and neck opening.
Short Pattern
Abbreviations: US terms: ch chain · sl st slip stitch · sc single crochet · hdc half double crochet · dc double crochet · BLO back loop only · MR magic ring · dec decrease.
- Measure the actual hot-water bottle laid flat, including body width, body length and the width below the neck. Make a small sc gauge swatch and adjust the stitch count so the cover fits snugly without stretching the stopper area.
- Front panel: ch 31 and work 30 hdc across. Continue in rows until the panel reaches the measured body length, then decrease one stitch at each edge every other row over the final 6 rows to shape the shoulders.
- Back panel: make a matching panel, adding a 2 cm overlap at the top if you want an envelope opening. For a two-panel closed sleeve, keep front and back equal and leave the neck shaping open.
- Neck: join the shoulder edges, leaving a centered opening sized to the bottle neck. Work 4-6 rounds of BLO sc around the opening; stop below the cap and verify it can be removed without stretching the crochet.
- Make 8 small 4-round granny squares in indigo, rust, mustard and cream. Join into a diagonal strip with flat slip stitches and sew across the center of the indigo front.
- Join the front and back around both sides and the bottom with mattress stitch. Keep the seam flat, reinforce the shoulder corners, and try the cover on the empty bottle before final weaving in.
- Remove the cover before filling the bottle. Follow the bottle maker's instructions, do not use boiling water, inspect for damage, and use the cover between the bottle and skin. This crochet sleeve is only a removable textile cover, not a hot-water container.
Assembly: Join the granny-square strip at the back of the cover so the diagonal line remains uninterrupted across the front. Stabilize both edges with indigo stitches and finish the neck in matching ribbing.
Midnight Whale Cover
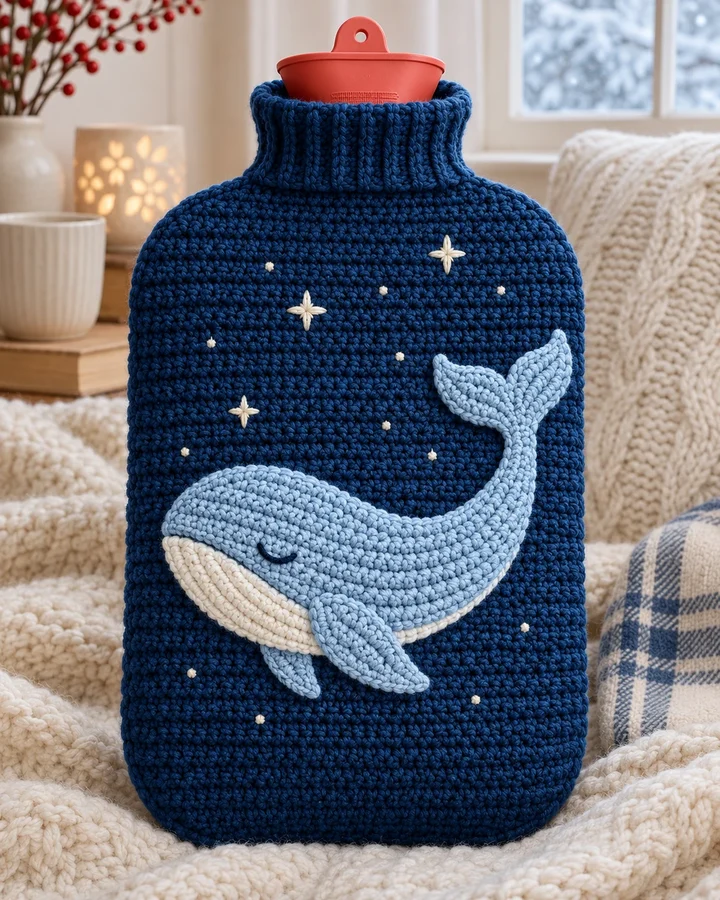
A pale-blue whale swims across a deep ocean-blue crochet cover beneath scattered cream stars. The large flat applique becomes a clear focal point, while the shaped shoulder and open bottle neck keep this playful bedtime design functional.
- LEVEL
- Confident beginner
- TRY IT WITH
- Worsted cotton: navy 175 yd, pale blue 45 yd, cream 20 yd; 4.5 mm hook; yarn needle.
- FINISHING NOTE
- Fits many standard 1.5-2 L bottles; measure the individual bottle and customize panel width, length and neck opening.
Short Pattern
Abbreviations: US terms: ch chain · sl st slip stitch · sc single crochet · hdc half double crochet · dc double crochet · BLO back loop only · MR magic ring · dec decrease.
- Measure the actual hot-water bottle laid flat, including body width, body length and the width below the neck. Make a small sc gauge swatch and adjust the stitch count so the cover fits snugly without stretching the stopper area.
- Front panel: ch 31 and work 30 hdc across. Continue in rows until the panel reaches the measured body length, then decrease one stitch at each edge every other row over the final 6 rows to shape the shoulders.
- Back panel: make a matching panel, adding a 2 cm overlap at the top if you want an envelope opening. For a two-panel closed sleeve, keep front and back equal and leave the neck shaping open.
- Neck: join the shoulder edges, leaving a centered opening sized to the bottle neck. Work 4-6 rounds of BLO sc around the opening; stop below the cap and verify it can be removed without stretching the crochet.
- Crochet a pale-blue whale silhouette from a flat oval body with a pointed tail and two small fins. Add a cream belly and embroidered closed eye; scatter small cream star stitches around it.
- Join the front and back around both sides and the bottom with mattress stitch. Keep the seam flat, reinforce the shoulder corners, and try the cover on the empty bottle before final weaving in.
- Remove the cover before filling the bottle. Follow the bottle maker's instructions, do not use boiling water, inspect for damage, and use the cover between the bottle and skin. This crochet sleeve is only a removable textile cover, not a hot-water container.
Assembly: Position the whale slightly below the center and sew along its full outline, including the tail and fins. Embroider the eye, add star stitches, then seam the cover with the navy join at the back.
Sunset Ombre Cover
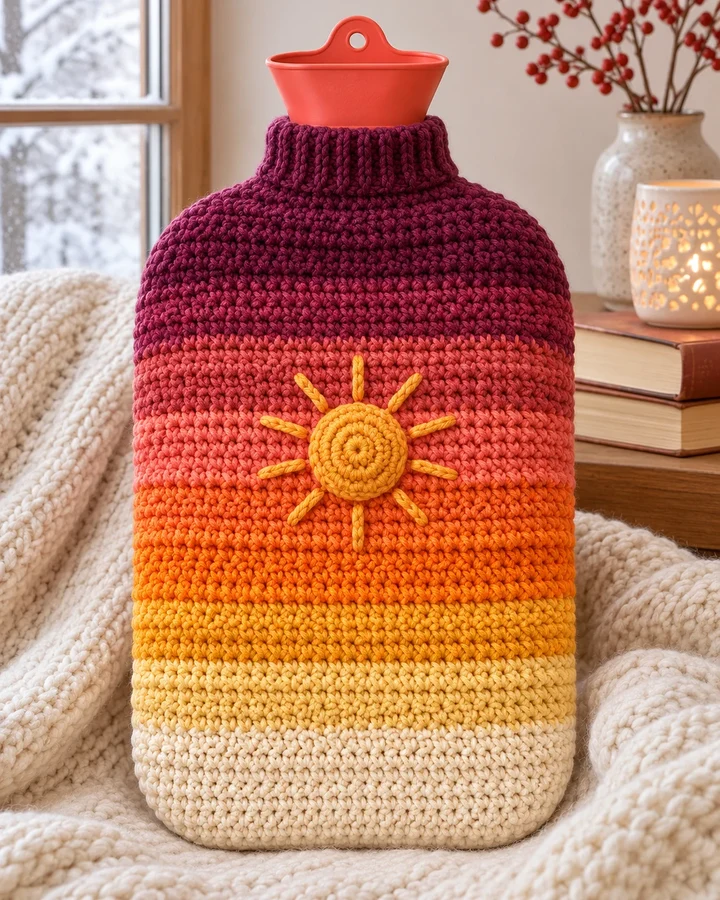
Plum, coral, amber and cream bands create a sunset gradient across this smooth crochet cover. A small raised sun sits at the center of the color story, while the fitted shape and ribbed neck give it a clean, modern finish.
- LEVEL
- Confident beginner
- TRY IT WITH
- Worsted cotton in plum, coral, amber and cream, about 50 yd each; 4.5 mm hook; yarn needle.
- FINISHING NOTE
- Fits many standard 1.5-2 L bottles; measure the individual bottle and customize panel width, length and neck opening.
Short Pattern
Abbreviations: US terms: ch chain · sl st slip stitch · sc single crochet · hdc half double crochet · dc double crochet · BLO back loop only · MR magic ring · dec decrease.
- Measure the actual hot-water bottle laid flat, including body width, body length and the width below the neck. Make a small sc gauge swatch and adjust the stitch count so the cover fits snugly without stretching the stopper area.
- Front panel: ch 31 and work 30 hdc across. Continue in rows until the panel reaches the measured body length, then decrease one stitch at each edge every other row over the final 6 rows to shape the shoulders.
- Back panel: make a matching panel, adding a 2 cm overlap at the top if you want an envelope opening. For a two-panel closed sleeve, keep front and back equal and leave the neck shaping open.
- Neck: join the shoulder edges, leaving a centered opening sized to the bottle neck. Work 4-6 rounds of BLO sc around the opening; stop below the cap and verify it can be removed without stretching the crochet.
- Change color every 5 rounds from plum to coral to amber to cream, carrying yarn only at the back seam. Make a small amber circle and add eight short chain-ray stitches for the sun.
- Join the front and back around both sides and the bottom with mattress stitch. Keep the seam flat, reinforce the shoulder corners, and try the cover on the empty bottle before final weaving in.
- Remove the cover before filling the bottle. Follow the bottle maker's instructions, do not use boiling water, inspect for damage, and use the cover between the bottle and skin. This crochet sleeve is only a removable textile cover, not a hot-water container.
Assembly: Place color changes at the back seam and center the sun on the coral band. Weave each tail into its matching stripe, shape the shoulders evenly and add a cream neck edge for a clean finish.
Camellia Heirloom Cover
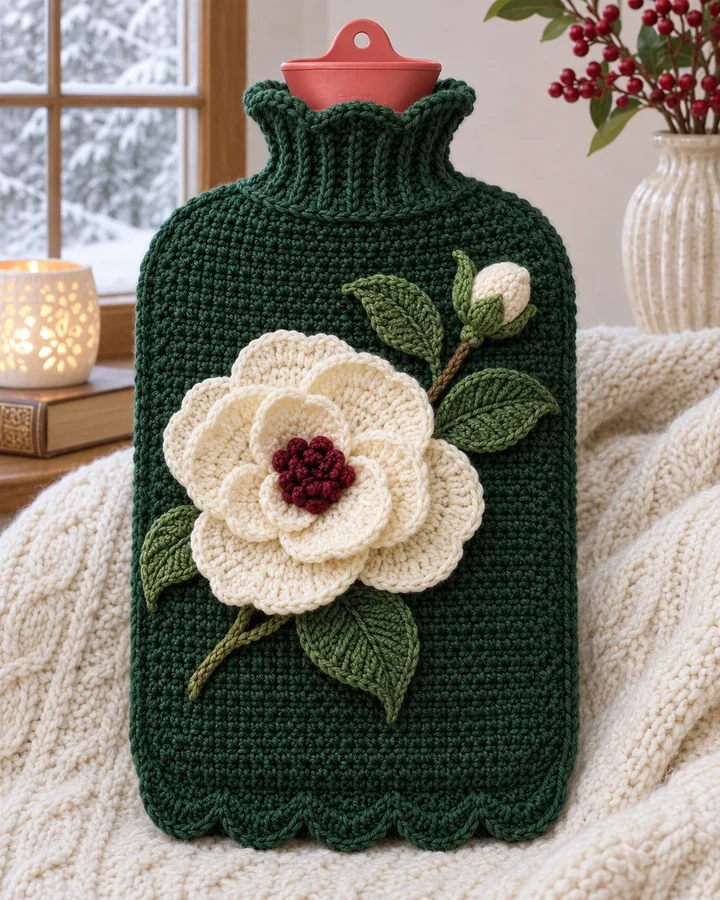
A dramatic cream camellia with a burgundy center blooms against forest-green crochet. Layered petals, sage leaves and a gently scalloped edge create an heirloom-inspired look, balanced by a close-fitting body and an accessible shaped neck.
- LEVEL
- Intermediate
- TRY IT WITH
- Worsted cotton: forest 175 yd, cream 40 yd, burgundy 12 yd, sage 20 yd; 4.5 mm hook; yarn needle.
- FINISHING NOTE
- Fits many standard 1.5-2 L bottles; measure the individual bottle and customize panel width, length and neck opening.
Short Pattern
Abbreviations: US terms: ch chain · sl st slip stitch · sc single crochet · hdc half double crochet · dc double crochet · BLO back loop only · MR magic ring · dec decrease.
- Measure the actual hot-water bottle laid flat, including body width, body length and the width below the neck. Make a small sc gauge swatch and adjust the stitch count so the cover fits snugly without stretching the stopper area.
- Front panel: ch 31 and work 30 hdc across. Continue in rows until the panel reaches the measured body length, then decrease one stitch at each edge every other row over the final 6 rows to shape the shoulders.
- Back panel: make a matching panel, adding a 2 cm overlap at the top if you want an envelope opening. For a two-panel closed sleeve, keep front and back equal and leave the neck shaping open.
- Neck: join the shoulder edges, leaving a centered opening sized to the bottle neck. Work 4-6 rounds of BLO sc around the opening; stop below the cap and verify it can be removed without stretching the crochet.
- Make a layered camellia: crochet 3 petal rings, each with 5-7 broad petals, increasing the outer layer slightly. Stack and sew the rings over a burgundy center, then add 4 flat sage leaves.
- Join the front and back around both sides and the bottom with mattress stitch. Keep the seam flat, reinforce the shoulder corners, and try the cover on the empty bottle before final weaving in.
- Remove the cover before filling the bottle. Follow the bottle maker's instructions, do not use boiling water, inspect for damage, and use the cover between the bottle and skin. This crochet sleeve is only a removable textile cover, not a hot-water container.
Assembly: Layer and secure each camellia petal ring through its center, then sew every leaf base flat. Center the flower on the front, align the scallops along the bottom edge and seam the back in forest green.
Make thoughtfully and check as you go.
Yarn, hook size and personal tension can change the finished scale. Count every round, stuff gradually and use embroidered features instead of safety eyes when making toys for children under three.