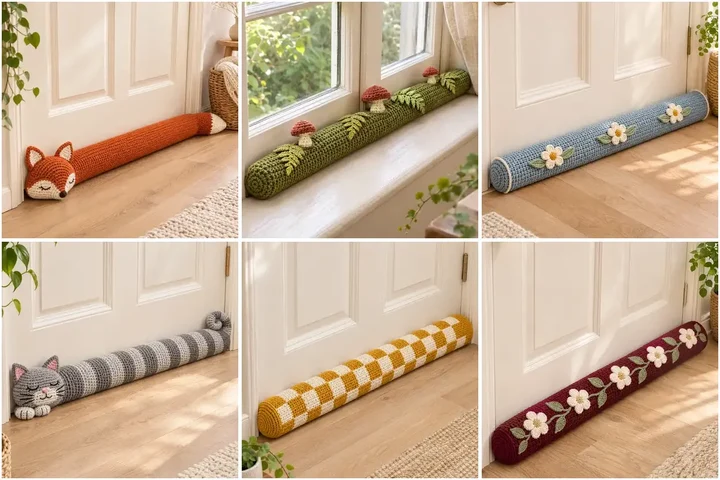
Turn a simple door or windowsill bolster into a cozy handmade accent with fourteen original crochet designs. Each uses a continuous cushion body, with optional flat motifs or small animal details. Measure your opening first: these accessories may help reduce a small draft but are not a substitute for proper repairs or weatherstripping. Instructions use US crochet terms. Swatch, adjust dimensions and test placement. Use a separately sewn, fully closed fabric liner; never leave loose filling exposed. These are household accessories, not toys. Keep them dry and away from heaters, flames, children and pets, and do not block required ventilation, fire doors or emergency exits.
Sleepy Fox Draft Stopper
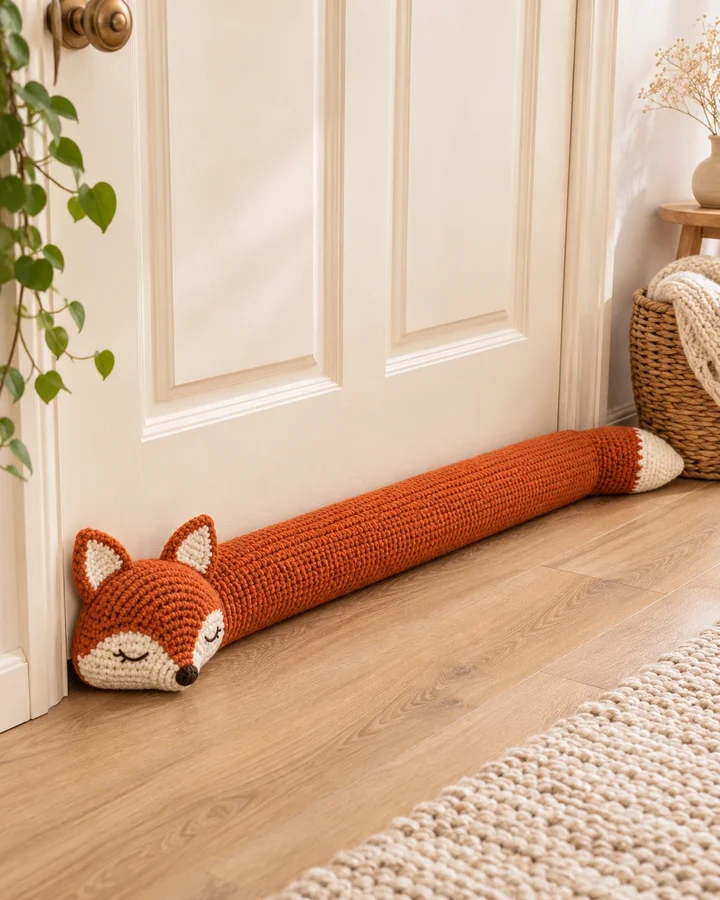
A sleepy fox turns a practical door bolster into a warm woodland accent. Its long rust-colored body reaches across the door gap, while a cream muzzle, small ears and pale tail tip add character without interrupting the continuous cushion.
- LEVEL
- Confident beginner
- TRY IT WITH
- Worsted cotton or washable cotton blend in rust, cream and dark brown, approx. 450-650 yd total; 4 mm hook; stitch marker; tapestry needle; closely woven fabric for a separate liner; polyester fiberfill.
- FINISHING NOTE
- Approx. 80-90 cm long and 9-10 cm diameter; measure the opening and adjust the body length.
Short Pattern
Abbreviations: US terms: ch chain · sc single crochet · hdc half double crochet · dc double crochet · sl st slip stitch · MR magic ring · inc 2 stitches in one stitch.
- Measure: check the usable width of the closed door or window and the height of its gap. Aim for a bolster that covers the seam without wedging into the hinges. Swatch 10 cm in sc; use a hook that gives dense but flexible fabric.
- Base cap: MR 6 sc. Rounds 2-8: add 6 evenly spaced increases per round, reaching 48 sc. This gives roughly 9-10 cm diameter at about 15-16 sc per 10 cm; adjust the final round to match your gauge. Mark the beginning of each round.
- Body: work 48 sc in continuous rounds without increases until the tube is the measured length, allowing space for the end details. For a flat-panel variation, follow the design notes below instead. Check the tube against the actual opening before finishing.
- Crochet a head cap: MR 6 sc, increase by 6 per round to 48, then work 6 rounds even. Sew two small cream oval cheek patches to the face and embroider closed eyes and a brown nose.
- Make two flat triangular ears: ch 7, sc 6, then decrease at the start of each row to one stitch. Sew both bases firmly above the head. Change the last 12 cm of the body to cream for the tail tip.
- Inner cushion: sew a closely woven fabric tube slightly smaller than the crochet shell, with double-stitched seams. Fill evenly with polyester fiberfill and sew the liner completely closed. Keep all filling inside this liner; never pour loose filling directly into the crochet. Do not overstuff into a rigid log.
- Finish: insert the liner and make a second matching end cap, or attach the decorated animal head. Sew around the full edge with small mattress stitches, weave ends back through several stitches, and test the cushion along the closed door. Leave the underside smooth and keep the bolster out of the walking route.
Assembly: Attach the fox head with the cream muzzle facing forward and the ears above the seam. Reinforce the head-to-body join, secure the cream tail tip at the opposite end and roll the liner gently so the underside sits flat.
Woodland Mushroom Window Bolster
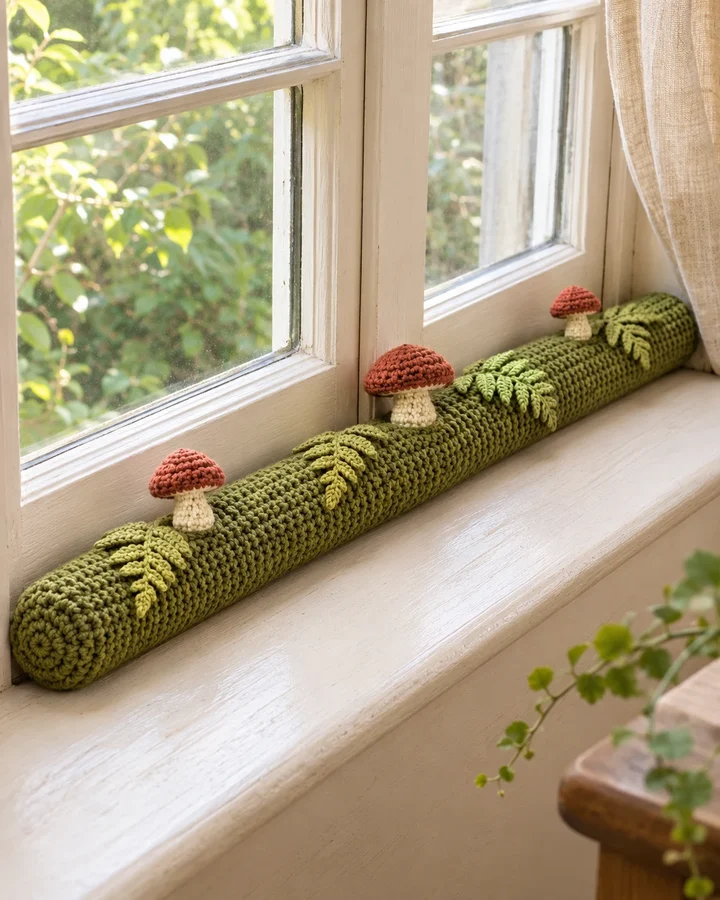
A moss-green bolster brings a quiet woodland scene to the windowsill. Three small mushrooms and stitched fern leaves decorate the upper surface, leaving the underside smooth so the long cushion can sit closely against the window seam.
- LEVEL
- Confident beginner
- TRY IT WITH
- Worsted cotton or washable cotton blend in moss green, rust and cream, approx. 450-650 yd total; 4 mm hook; stitch marker; tapestry needle; closely woven fabric for a separate liner; polyester fiberfill.
- FINISHING NOTE
- Approx. 80-90 cm long and 9-10 cm diameter; measure the opening and adjust the body length.
Short Pattern
Abbreviations: US terms: ch chain · sc single crochet · hdc half double crochet · dc double crochet · sl st slip stitch · MR magic ring · inc 2 stitches in one stitch.
- Measure: check the usable width of the closed door or window and the height of its gap. Aim for a bolster that covers the seam without wedging into the hinges. Swatch 10 cm in sc; use a hook that gives dense but flexible fabric.
- Base cap: MR 6 sc. Rounds 2-8: add 6 evenly spaced increases per round, reaching 48 sc. This gives roughly 9-10 cm diameter at about 15-16 sc per 10 cm; adjust the final round to match your gauge. Mark the beginning of each round.
- Body: work 48 sc in continuous rounds without increases until the tube is the measured length, allowing space for the end details. For a flat-panel variation, follow the design notes below instead. Check the tube against the actual opening before finishing.
- Mushroom stems: MR 6, increase to 12, then work 4 rounds even. Caps: MR 6, increase to 24 over 4 rounds, then work one even round. Sew each cap to a lightly stuffed stem.
- Make fern fronds on ch 17: work small ch-4 leaf loops along both sides of the chain. Sew every loop flat. Attach the mushrooms to the upper third of the bolster with several circular rows of stitching.
- Inner cushion: sew a closely woven fabric tube slightly smaller than the crochet shell, with double-stitched seams. Fill evenly with polyester fiberfill and sew the liner completely closed. Keep all filling inside this liner; never pour loose filling directly into the crochet. Do not overstuff into a rigid log.
- Finish: insert the liner and make a second matching end cap, or attach the decorated animal head. Sew around the full edge with small mattress stitches, weave ends back through several stitches, and test the cushion along the closed door. Leave the underside smooth and keep the bolster out of the walking route.
Assembly: Position the mushrooms along the upper third of the green bolster, clear of the surface touching the window. Sew each stem through a broad base and stitch every fern frond flat before inserting the closed liner.
Blue Daisy Door Cushion
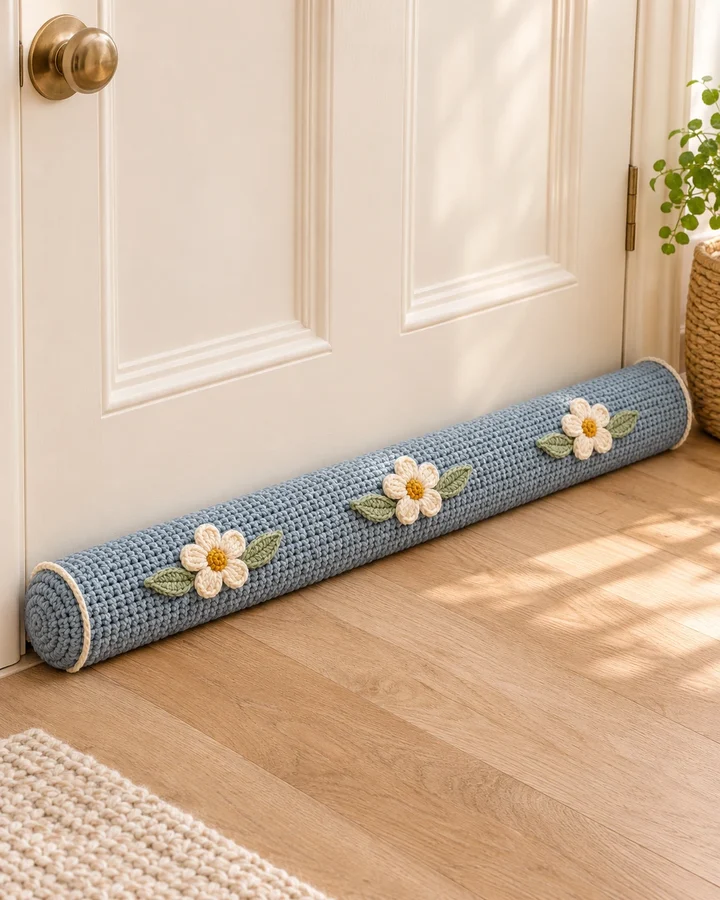
Dusty blue yarn and three cream daisies give this door cushion a fresh, gentle look. Flat floral appliqués add handmade detail without bulky projections, while cream end caps neatly frame the dense crochet body and its soft cylindrical shape.
- LEVEL
- Confident beginner
- TRY IT WITH
- Worsted cotton or washable cotton blend in dusty blue, cream, mustard and sage, approx. 450-650 yd total; 4 mm hook; stitch marker; tapestry needle; closely woven fabric for a separate liner; polyester fiberfill.
- FINISHING NOTE
- Approx. 80-90 cm long and 9-10 cm diameter; measure the opening and adjust the body length.
Short Pattern
Abbreviations: US terms: ch chain · sc single crochet · hdc half double crochet · dc double crochet · sl st slip stitch · MR magic ring · inc 2 stitches in one stitch.
- Measure: check the usable width of the closed door or window and the height of its gap. Aim for a bolster that covers the seam without wedging into the hinges. Swatch 10 cm in sc; use a hook that gives dense but flexible fabric.
- Base cap: MR 6 sc. Rounds 2-8: add 6 evenly spaced increases per round, reaching 48 sc. This gives roughly 9-10 cm diameter at about 15-16 sc per 10 cm; adjust the final round to match your gauge. Mark the beginning of each round.
- Body: work 48 sc in continuous rounds without increases until the tube is the measured length, allowing space for the end details. For a flat-panel variation, follow the design notes below instead. Check the tube against the actual opening before finishing.
- Daisies: make a mustard MR with 10 sc. In cream, repeat (sl st, ch 3, 2 dc, ch 3, sl st) across paired center stitches to form five petals. Make three flowers.
- Leaves: ch 9; work sl st, sc, hdc, 3 dc, hdc, sc down the chain and mirror along its other side. Sew two leaves and a daisy in each of three evenly spaced groups.
- Inner cushion: sew a closely woven fabric tube slightly smaller than the crochet shell, with double-stitched seams. Fill evenly with polyester fiberfill and sew the liner completely closed. Keep all filling inside this liner; never pour loose filling directly into the crochet. Do not overstuff into a rigid log.
- Finish: insert the liner and make a second matching end cap, or attach the decorated animal head. Sew around the full edge with small mattress stitches, weave ends back through several stitches, and test the cushion along the closed door. Leave the underside smooth and keep the bolster out of the walking route.
Assembly: Space the three daisies evenly across the blue front panel. Sew every petal and leaf edge down, align the cream end caps and place the body seam underneath so the cushion rests smoothly against the door.
Sleepy Dachshund Draft Stopper
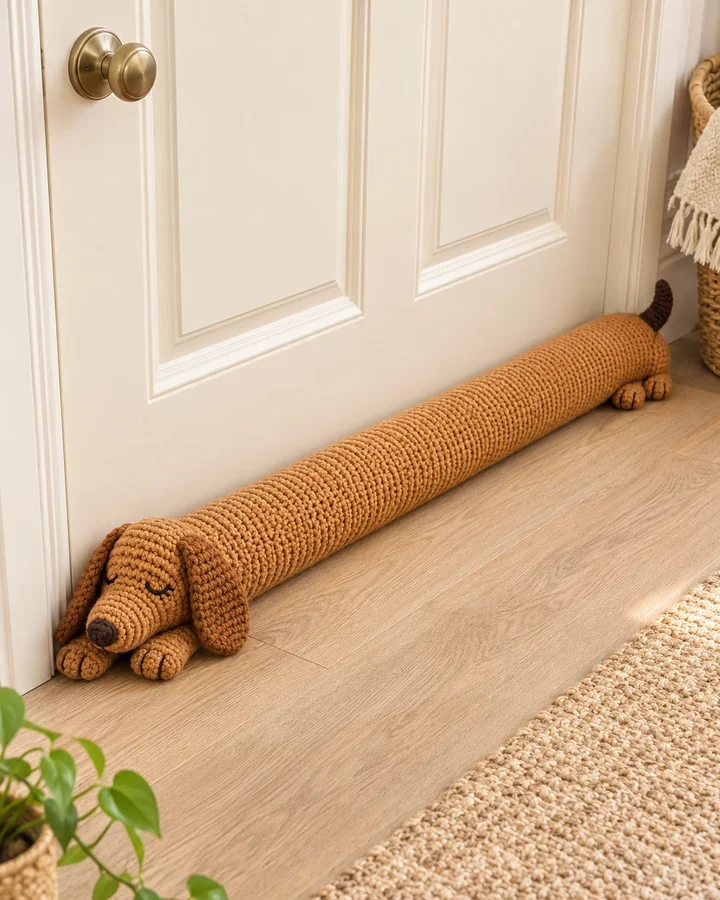
This extra-long dachshund makes the door gap part of its playful silhouette. Floppy ears, small paws and a dark tail distinguish the caramel-colored cushion, while the central body remains one uninterrupted bolster rather than a chain of separate toys.
- LEVEL
- Confident beginner
- TRY IT WITH
- Worsted cotton or washable cotton blend in caramel and dark brown, approx. 450-650 yd total; 4 mm hook; stitch marker; tapestry needle; closely woven fabric for a separate liner; polyester fiberfill.
- FINISHING NOTE
- Approx. 80-90 cm long and 9-10 cm diameter; measure the opening and adjust the body length.
Short Pattern
Abbreviations: US terms: ch chain · sc single crochet · hdc half double crochet · dc double crochet · sl st slip stitch · MR magic ring · inc 2 stitches in one stitch.
- Measure: check the usable width of the closed door or window and the height of its gap. Aim for a bolster that covers the seam without wedging into the hinges. Swatch 10 cm in sc; use a hook that gives dense but flexible fabric.
- Base cap: MR 6 sc. Rounds 2-8: add 6 evenly spaced increases per round, reaching 48 sc. This gives roughly 9-10 cm diameter at about 15-16 sc per 10 cm; adjust the final round to match your gauge. Mark the beginning of each round.
- Body: work 48 sc in continuous rounds without increases until the tube is the measured length, allowing space for the end details. For a flat-panel variation, follow the design notes below instead. Check the tube against the actual opening before finishing.
- Head: MR 6, increase to 48 over 8 rounds and work 5 rounds even. Shape a muzzle from MR 6 increased to 18 with 4 even rounds; lightly stuff and sew to the head cap. Embroider the nose and closed eyes.
- Ears: ch 9, sc 8 for 8 rows, then decrease at both ends for two rows. Make two and sew the top edges securely. Make four small flattened paw ovals and a short stuffed tail; sew all joins with repeated passes.
- Inner cushion: sew a closely woven fabric tube slightly smaller than the crochet shell, with double-stitched seams. Fill evenly with polyester fiberfill and sew the liner completely closed. Keep all filling inside this liner; never pour loose filling directly into the crochet. Do not overstuff into a rigid log.
- Finish: insert the liner and make a second matching end cap, or attach the decorated animal head. Sew around the full edge with small mattress stitches, weave ends back through several stitches, and test the cushion along the closed door. Leave the underside smooth and keep the bolster out of the walking route.
Assembly: Center the dachshund muzzle on the head and attach both floppy ears at matching heights. Sew the flattened paws close to the body, reinforce the short tail and keep the long underside free of raised seams.
Oatmeal Cable Door Bolster
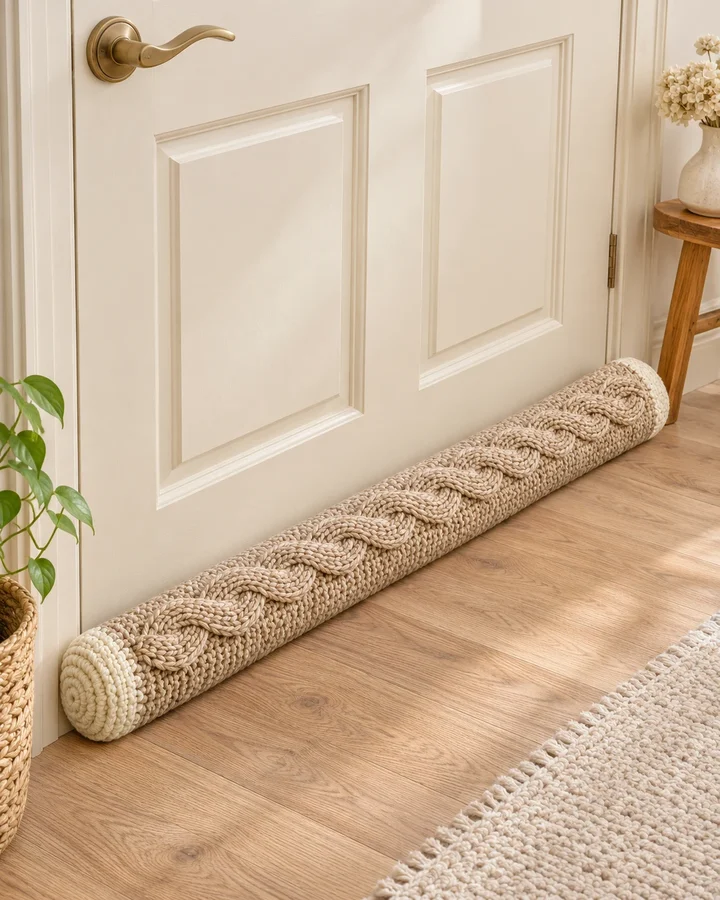
Raised oatmeal cables create a restrained alternative to animal-shaped draft stoppers. Cream end caps soften the textured body, making this a versatile piece for neutral interiors where warmth and stitch detail matter more than colorful decorative motifs.
- LEVEL
- Intermediate
- TRY IT WITH
- Worsted cotton or washable cotton blend in oatmeal and cream, approx. 450-650 yd total; 4 mm hook; stitch marker; tapestry needle; closely woven fabric for a separate liner; polyester fiberfill.
- FINISHING NOTE
- Approx. 80-90 cm long and 9-10 cm diameter; measure the opening and adjust the body length.
Short Pattern
Abbreviations: US terms: ch chain · sc single crochet · hdc half double crochet · dc double crochet · sl st slip stitch · MR magic ring · inc 2 stitches in one stitch.
- Measure: check the usable width of the closed door or window and the height of its gap. Aim for a bolster that covers the seam without wedging into the hinges. Swatch 10 cm in sc; use a hook that gives dense but flexible fabric.
- Base cap: MR 6 sc. Rounds 2-8: add 6 evenly spaced increases per round, reaching 48 sc. This gives roughly 9-10 cm diameter at about 15-16 sc per 10 cm; adjust the final round to match your gauge. Mark the beginning of each round.
- Body: work 48 sc in continuous rounds without increases until the tube is the measured length, allowing space for the end details. For a flat-panel variation, follow the design notes below instead. Check the tube against the actual opening before finishing.
- For the body, replace the plain tube with a flat rectangle approximately 80 by 31 cm. Work hdc rows and add two lengthwise raised cable bands using front-post stitches or separately crocheted cords.
- For an accessible cable effect, crochet six long sc cords and braid them into two bands. Sew all cord edges onto the rectangle before joining its long edges. Keep the braided section on top and the seam underneath.
- Inner cushion: sew a closely woven fabric tube slightly smaller than the crochet shell, with double-stitched seams. Fill evenly with polyester fiberfill and sew the liner completely closed. Keep all filling inside this liner; never pour loose filling directly into the crochet. Do not overstuff into a rigid log.
- Finish: insert the liner and make a second matching end cap, or attach the decorated animal head. Sew around the full edge with small mattress stitches, weave ends back through several stitches, and test the cushion along the closed door. Leave the underside smooth and keep the bolster out of the walking route.
Assembly: Join the oatmeal rectangle along its long edges with the cable bands facing upward. Secure every braided cord edge, align the cream caps and smooth the underside seam before inserting the fabric cushion.
Sage Leaf Draft Stopper
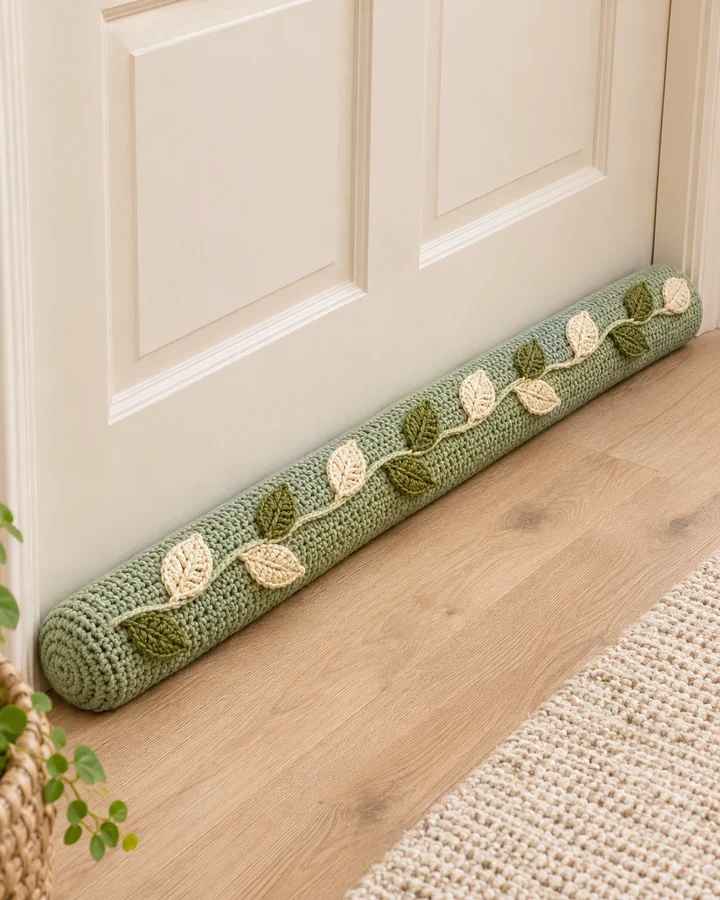
Sage crochet provides a calm backdrop for a cream-and-olive leafy vine. The flat appliqués follow the length of the cushion, creating a botanical accent that remains low enough to sit neatly beside an interior door or on a deep sill.
- LEVEL
- Confident beginner
- TRY IT WITH
- Worsted cotton or washable cotton blend in sage, olive and cream, approx. 450-650 yd total; 4 mm hook; stitch marker; tapestry needle; closely woven fabric for a separate liner; polyester fiberfill.
- FINISHING NOTE
- Approx. 80-90 cm long and 9-10 cm diameter; measure the opening and adjust the body length.
Short Pattern
Abbreviations: US terms: ch chain · sc single crochet · hdc half double crochet · dc double crochet · sl st slip stitch · MR magic ring · inc 2 stitches in one stitch.
- Measure: check the usable width of the closed door or window and the height of its gap. Aim for a bolster that covers the seam without wedging into the hinges. Swatch 10 cm in sc; use a hook that gives dense but flexible fabric.
- Base cap: MR 6 sc. Rounds 2-8: add 6 evenly spaced increases per round, reaching 48 sc. This gives roughly 9-10 cm diameter at about 15-16 sc per 10 cm; adjust the final round to match your gauge. Mark the beginning of each round.
- Body: work 48 sc in continuous rounds without increases until the tube is the measured length, allowing space for the end details. For a flat-panel variation, follow the design notes below instead. Check the tube against the actual opening before finishing.
- Make 12 leaves: ch 9 and work sl st, sc, hdc, 3 dc, hdc, sc along one side, then mirror the stitches on the other side. Use cream for half and olive for half.
- Surface-slip-stitch a meandering cream stem along the upper front of the empty tube. Arrange leaves alternately along it and sew each perimeter down, leaving no loose tips or hanging loops.
- Inner cushion: sew a closely woven fabric tube slightly smaller than the crochet shell, with double-stitched seams. Fill evenly with polyester fiberfill and sew the liner completely closed. Keep all filling inside this liner; never pour loose filling directly into the crochet. Do not overstuff into a rigid log.
- Finish: insert the liner and make a second matching end cap, or attach the decorated animal head. Sew around the full edge with small mattress stitches, weave ends back through several stitches, and test the cushion along the closed door. Leave the underside smooth and keep the bolster out of the walking route.
Assembly: Arrange the olive and cream leaves alternately along the surface-stitched vine. Sew leaf tips and edges down, conceal their tails inside the empty shell and attach the caps with the vine centered on the upper front.
Striped Sleepy Cat Bolster
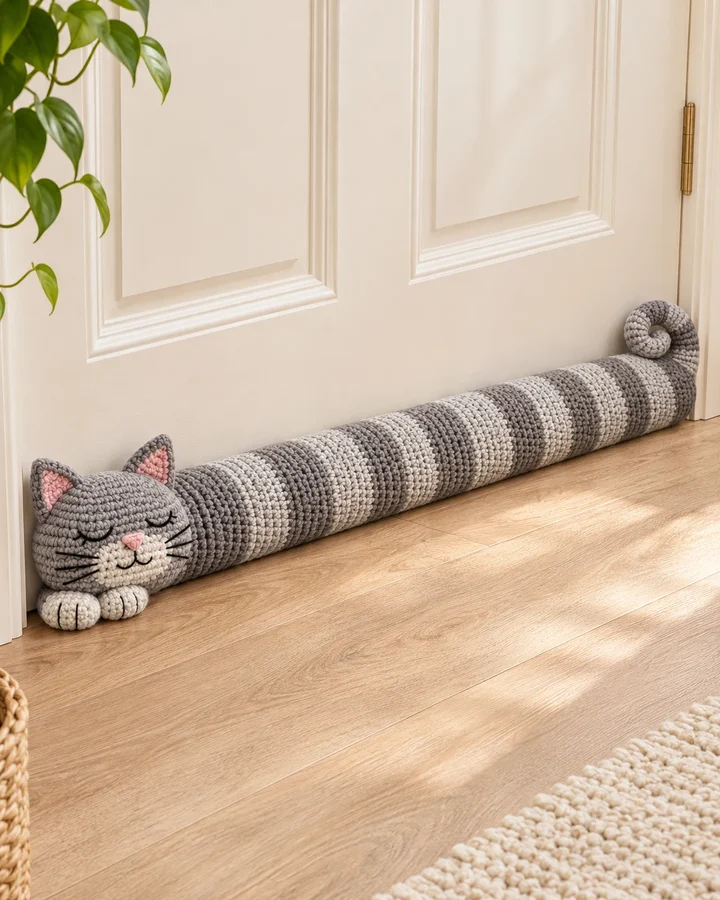
A sleepy striped cat stretches across the door in this cozy practical design. Alternating gray bands, a cream muzzle and pink ear centers provide recognizable feline details, while the elongated body stays smooth enough to cover the gap continuously.
- LEVEL
- Confident beginner
- TRY IT WITH
- Worsted cotton or washable cotton blend in light gray, charcoal, cream and dusty pink, approx. 450-650 yd total; 4 mm hook; stitch marker; tapestry needle; closely woven fabric for a separate liner; polyester fiberfill.
- FINISHING NOTE
- Approx. 80-90 cm long and 9-10 cm diameter; measure the opening and adjust the body length.
Short Pattern
Abbreviations: US terms: ch chain · sc single crochet · hdc half double crochet · dc double crochet · sl st slip stitch · MR magic ring · inc 2 stitches in one stitch.
- Measure: check the usable width of the closed door or window and the height of its gap. Aim for a bolster that covers the seam without wedging into the hinges. Swatch 10 cm in sc; use a hook that gives dense but flexible fabric.
- Base cap: MR 6 sc. Rounds 2-8: add 6 evenly spaced increases per round, reaching 48 sc. This gives roughly 9-10 cm diameter at about 15-16 sc per 10 cm; adjust the final round to match your gauge. Mark the beginning of each round.
- Body: work 48 sc in continuous rounds without increases until the tube is the measured length, allowing space for the end details. For a flat-panel variation, follow the design notes below instead. Check the tube against the actual opening before finishing.
- Change body color every 8 rounds, alternating light gray and charcoal. Carry neither yarn through long sections; fasten or weave ends at each change to keep the interior tidy.
- Make a round head cap as for the basic cap, adding 5 even rounds. Sew flat triangular ears and cream muzzle ovals onto it. Embroider all facial details. Make a short narrow tail, curl it and sew the curl closed against the body.
- Inner cushion: sew a closely woven fabric tube slightly smaller than the crochet shell, with double-stitched seams. Fill evenly with polyester fiberfill and sew the liner completely closed. Keep all filling inside this liner; never pour loose filling directly into the crochet. Do not overstuff into a rigid log.
- Finish: insert the liner and make a second matching end cap, or attach the decorated animal head. Sew around the full edge with small mattress stitches, weave ends back through several stitches, and test the cushion along the closed door. Leave the underside smooth and keep the bolster out of the walking route.
Assembly: Match the gray stripe boundaries at the body seam and align the cat face above the smooth underside. Reinforce both ear bases, stitch the curled tail against the body and keep all embroidered facial ends hidden.
Terracotta Cottage-Row Stopper
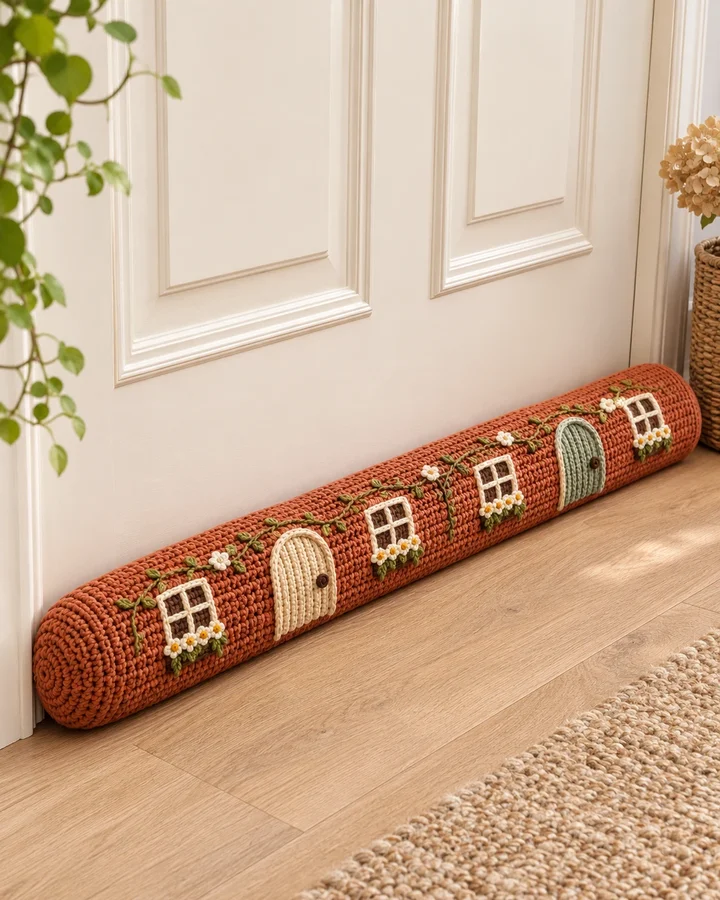
Tiny cottage doors and windows transform a terracotta bolster into a charming row of homes. The architectural details are sewn onto a single continuous cushion, offering cottagecore character without separate structures, open gaps or a complicated three-dimensional construction.
- LEVEL
- Confident beginner
- TRY IT WITH
- Worsted cotton or washable cotton blend in terracotta, cream, sage and brown, approx. 450-650 yd total; 4 mm hook; stitch marker; tapestry needle; closely woven fabric for a separate liner; polyester fiberfill.
- FINISHING NOTE
- Approx. 80-90 cm long and 9-10 cm diameter; measure the opening and adjust the body length.
Short Pattern
Abbreviations: US terms: ch chain · sc single crochet · hdc half double crochet · dc double crochet · sl st slip stitch · MR magic ring · inc 2 stitches in one stitch.
- Measure: check the usable width of the closed door or window and the height of its gap. Aim for a bolster that covers the seam without wedging into the hinges. Swatch 10 cm in sc; use a hook that gives dense but flexible fabric.
- Base cap: MR 6 sc. Rounds 2-8: add 6 evenly spaced increases per round, reaching 48 sc. This gives roughly 9-10 cm diameter at about 15-16 sc per 10 cm; adjust the final round to match your gauge. Mark the beginning of each round.
- Body: work 48 sc in continuous rounds without increases until the tube is the measured length, allowing space for the end details. For a flat-panel variation, follow the design notes below instead. Check the tube against the actual opening before finishing.
- Door appliqués: ch 7, sc 6 for 10 rows; round the top with one edging round, using extra sc around the top corners. Make one cream and one sage door and stitch them flat.
- Windows: crochet small 5-by-5 sc squares in brown. Sew cream chain cords around their borders and across each center. Add short green embroidered vines and tiny firmly sewn cream flowers above the windows.
- Inner cushion: sew a closely woven fabric tube slightly smaller than the crochet shell, with double-stitched seams. Fill evenly with polyester fiberfill and sew the liner completely closed. Keep all filling inside this liner; never pour loose filling directly into the crochet. Do not overstuff into a rigid log.
- Finish: insert the liner and make a second matching end cap, or attach the decorated animal head. Sew around the full edge with small mattress stitches, weave ends back through several stitches, and test the cushion along the closed door. Leave the underside smooth and keep the bolster out of the walking route.
Assembly: Sew the cottage doors and windows onto the empty terracotta shell, keeping their lower edges in one line. Anchor the cream window bars and floral details, then position the long body seam beneath the finished cushion.
Lavender Sprig Door Cushion
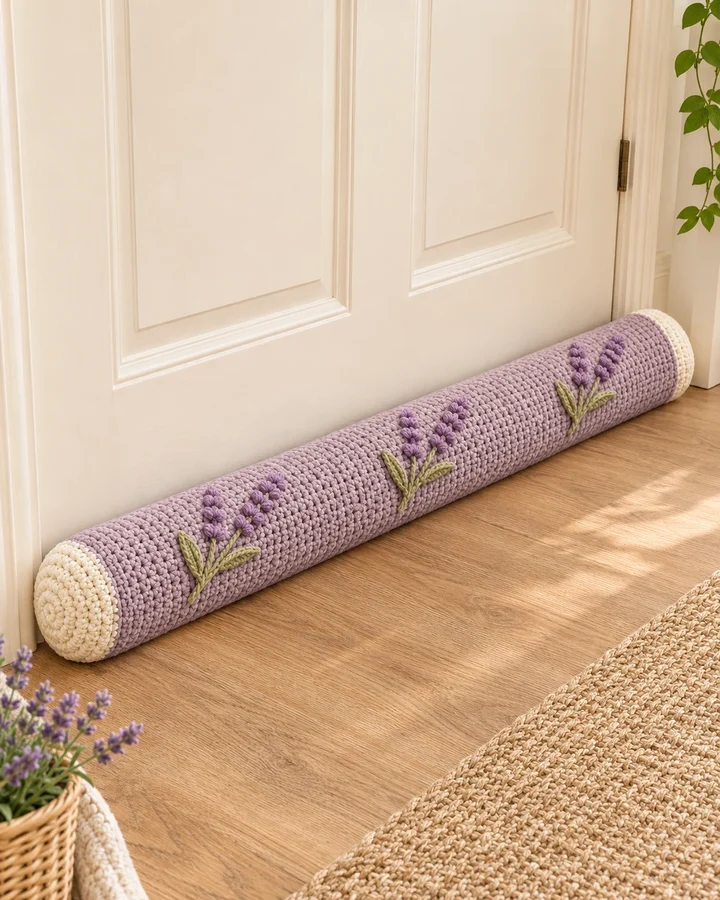
Muted lavender and ivory create a soft botanical door cushion with three sprig motifs. Small stitched buds and slender green leaves bring texture to the simple cylinder, keeping the design elegant, compact and easy to pair with pale interiors.
- LEVEL
- Confident beginner
- TRY IT WITH
- Worsted cotton or washable cotton blend in lavender, ivory and olive, approx. 450-650 yd total; 4 mm hook; stitch marker; tapestry needle; closely woven fabric for a separate liner; polyester fiberfill.
- FINISHING NOTE
- Approx. 80-90 cm long and 9-10 cm diameter; measure the opening and adjust the body length.
Short Pattern
Abbreviations: US terms: ch chain · sc single crochet · hdc half double crochet · dc double crochet · sl st slip stitch · MR magic ring · inc 2 stitches in one stitch.
- Measure: check the usable width of the closed door or window and the height of its gap. Aim for a bolster that covers the seam without wedging into the hinges. Swatch 10 cm in sc; use a hook that gives dense but flexible fabric.
- Base cap: MR 6 sc. Rounds 2-8: add 6 evenly spaced increases per round, reaching 48 sc. This gives roughly 9-10 cm diameter at about 15-16 sc per 10 cm; adjust the final round to match your gauge. Mark the beginning of each round.
- Body: work 48 sc in continuous rounds without increases until the tube is the measured length, allowing space for the end details. For a flat-panel variation, follow the design notes below instead. Check the tube against the actual opening before finishing.
- Embroider three groups of short olive stems using split stitch on the empty body. Keep all stitches on the upper front of the cylinder so the underside remains plain.
- For lavender buds, make small ch-3 loops and stitch every loop down along the stems, or use compact French knots in purple yarn. Add flat ch-7 crochet leaves and cream end caps.
- Inner cushion: sew a closely woven fabric tube slightly smaller than the crochet shell, with double-stitched seams. Fill evenly with polyester fiberfill and sew the liner completely closed. Keep all filling inside this liner; never pour loose filling directly into the crochet. Do not overstuff into a rigid log.
- Finish: insert the liner and make a second matching end cap, or attach the decorated animal head. Sew around the full edge with small mattress stitches, weave ends back through several stitches, and test the cushion along the closed door. Leave the underside smooth and keep the bolster out of the walking route.
Assembly: Keep the three lavender sprig groups equally spaced on the visible front. Secure every bud loop and leaf tip, weave the green stems through the reverse and align the ivory end caps before closing the shell.
Forest Owl Draft Stopper
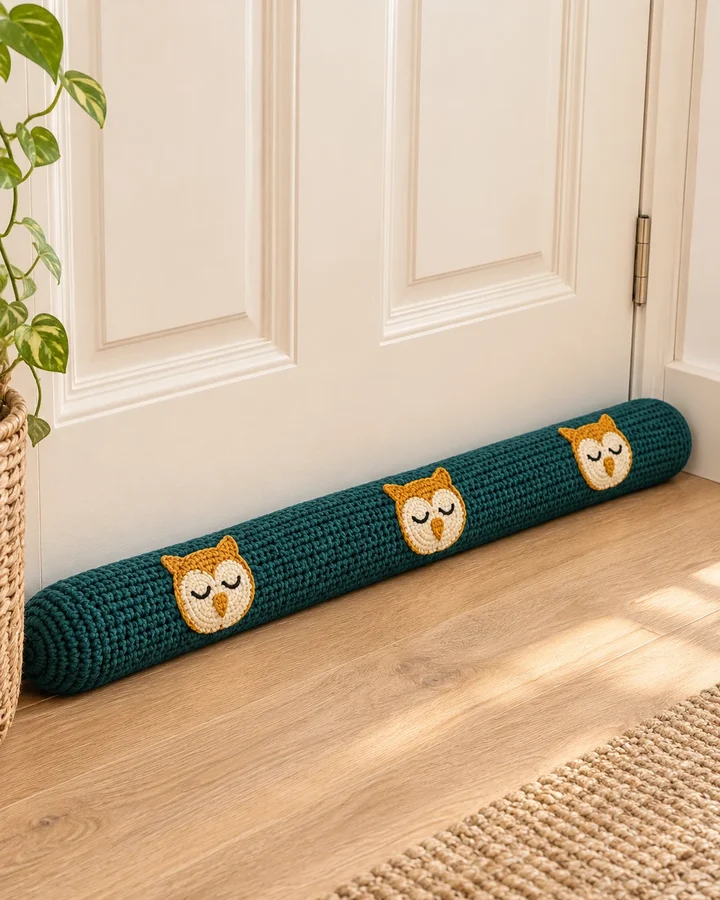
Three sleepy owl faces stand out against a deep teal bolster in this woodland-inspired design. Flat cream face panels and ochre outlines deliver plenty of character, while the uninterrupted cylindrical body keeps the accessory useful along a door seam.
- LEVEL
- Confident beginner
- TRY IT WITH
- Worsted cotton or washable cotton blend in deep teal, ochre, cream and dark brown, approx. 450-650 yd total; 4 mm hook; stitch marker; tapestry needle; closely woven fabric for a separate liner; polyester fiberfill.
- FINISHING NOTE
- Approx. 80-90 cm long and 9-10 cm diameter; measure the opening and adjust the body length.
Short Pattern
Abbreviations: US terms: ch chain · sc single crochet · hdc half double crochet · dc double crochet · sl st slip stitch · MR magic ring · inc 2 stitches in one stitch.
- Measure: check the usable width of the closed door or window and the height of its gap. Aim for a bolster that covers the seam without wedging into the hinges. Swatch 10 cm in sc; use a hook that gives dense but flexible fabric.
- Base cap: MR 6 sc. Rounds 2-8: add 6 evenly spaced increases per round, reaching 48 sc. This gives roughly 9-10 cm diameter at about 15-16 sc per 10 cm; adjust the final round to match your gauge. Mark the beginning of each round.
- Body: work 48 sc in continuous rounds without increases until the tube is the measured length, allowing space for the end details. For a flat-panel variation, follow the design notes below instead. Check the tube against the actual opening before finishing.
- Make three owl bases: MR 6 sc, increase to 24, then add one ochre edging round. At two points on the top edge, work (sc, hdc, dc, hdc, sc) to suggest ear tufts.
- Sew two small cream circles to each base and embroider closed eyes. Add an ochre triangular beak with short stitches. Stitch the completed owl appliqués fully around their edges to the empty tube.
- Inner cushion: sew a closely woven fabric tube slightly smaller than the crochet shell, with double-stitched seams. Fill evenly with polyester fiberfill and sew the liner completely closed. Keep all filling inside this liner; never pour loose filling directly into the crochet. Do not overstuff into a rigid log.
- Finish: insert the liner and make a second matching end cap, or attach the decorated animal head. Sew around the full edge with small mattress stitches, weave ends back through several stitches, and test the cushion along the closed door. Leave the underside smooth and keep the bolster out of the walking route.
Assembly: Center each cream face panel inside its ochre owl base and finish the embroidered eyes before attaching the motifs. Sew around every owl edge, including the ear tips, with the three faces evenly spaced across the teal body.
Mustard Checkerboard Bolster
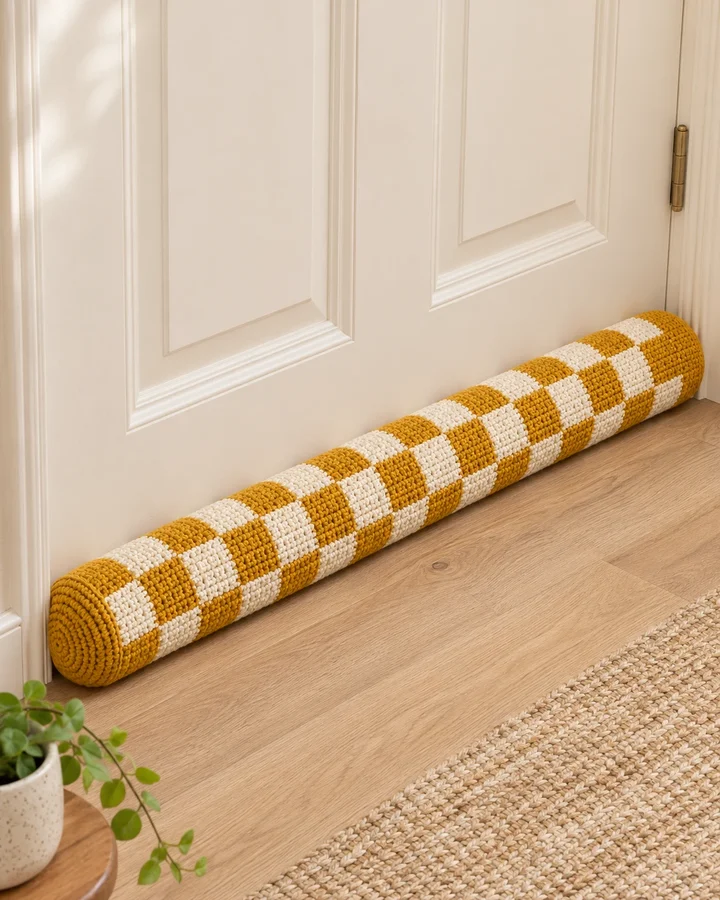
A mustard-and-cream checkerboard gives this simple bolster a bold graphic finish. The rounded solid-color ends keep the pattern tidy, creating a cheerful accent for an otherwise neutral doorway without relying on flowers, animals or additional decorative pieces.
- LEVEL
- Intermediate
- TRY IT WITH
- Worsted cotton or washable cotton blend in mustard and cream, approx. 450-650 yd total; 4 mm hook; stitch marker; tapestry needle; closely woven fabric for a separate liner; polyester fiberfill.
- FINISHING NOTE
- Approx. 80-90 cm long and 9-10 cm diameter; measure the opening and adjust the body length.
Short Pattern
Abbreviations: US terms: ch chain · sc single crochet · hdc half double crochet · dc double crochet · sl st slip stitch · MR magic ring · inc 2 stitches in one stitch.
- Measure: check the usable width of the closed door or window and the height of its gap. Aim for a bolster that covers the seam without wedging into the hinges. Swatch 10 cm in sc; use a hook that gives dense but flexible fabric.
- Base cap: MR 6 sc. Rounds 2-8: add 6 evenly spaced increases per round, reaching 48 sc. This gives roughly 9-10 cm diameter at about 15-16 sc per 10 cm; adjust the final round to match your gauge. Mark the beginning of each round.
- Body: work 48 sc in continuous rounds without increases until the tube is the measured length, allowing space for the end details. For a flat-panel variation, follow the design notes below instead. Check the tube against the actual opening before finishing.
- Use 48 stitches around the body. Alternate 6 sc mustard and 6 sc cream around each round, forming eight blocks. Work 6 rounds with the same placement, then swap colors for the next group of 6 rounds.
- Carry the inactive color loosely within the sc stitches, checking that it does not shorten the circumference. Finish the final body section and both end caps in solid mustard for a neat frame.
- Inner cushion: sew a closely woven fabric tube slightly smaller than the crochet shell, with double-stitched seams. Fill evenly with polyester fiberfill and sew the liner completely closed. Keep all filling inside this liner; never pour loose filling directly into the crochet. Do not overstuff into a rigid log.
- Finish: insert the liner and make a second matching end cap, or attach the decorated animal head. Sew around the full edge with small mattress stitches, weave ends back through several stitches, and test the cushion along the closed door. Leave the underside smooth and keep the bolster out of the walking route.
Assembly: Align mustard and cream block rows at the joining seam so the checker pattern continues neatly. Secure carried-color ends inside matching blocks, attach the solid mustard caps and smooth the closed liner through the tube.
Oatmeal Bunny Draft Stopper
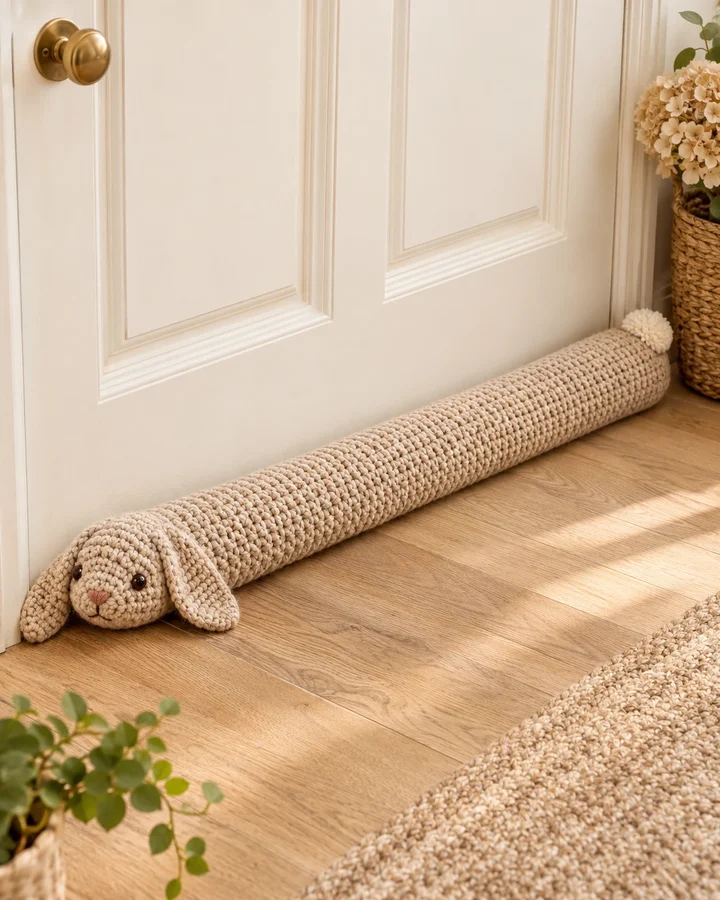
An oatmeal bunny brings a soft animal-inspired touch to the doorway. Its long rounded body ends in a small rabbit face with floppy ears, while a compact cream tail completes the silhouette without changing the cushion's practical continuous shape.
- LEVEL
- Confident beginner
- TRY IT WITH
- Worsted cotton or washable cotton blend in oatmeal, cream and dusty pink, approx. 450-650 yd total; 4 mm hook; stitch marker; tapestry needle; closely woven fabric for a separate liner; polyester fiberfill.
- FINISHING NOTE
- Approx. 80-90 cm long and 9-10 cm diameter; measure the opening and adjust the body length.
Short Pattern
Abbreviations: US terms: ch chain · sc single crochet · hdc half double crochet · dc double crochet · sl st slip stitch · MR magic ring · inc 2 stitches in one stitch.
- Measure: check the usable width of the closed door or window and the height of its gap. Aim for a bolster that covers the seam without wedging into the hinges. Swatch 10 cm in sc; use a hook that gives dense but flexible fabric.
- Base cap: MR 6 sc. Rounds 2-8: add 6 evenly spaced increases per round, reaching 48 sc. This gives roughly 9-10 cm diameter at about 15-16 sc per 10 cm; adjust the final round to match your gauge. Mark the beginning of each round.
- Body: work 48 sc in continuous rounds without increases until the tube is the measured length, allowing space for the end details. For a flat-panel variation, follow the design notes below instead. Check the tube against the actual opening before finishing.
- Make a rounded head from a basic 48-stitch cap plus 5 even rounds. Embroider dark eyes, a pink nose and a small mouth before attaching the head to the tube.
- Ears: ch 9, work 8 sc for 10 rows, then decrease at each edge until 2 remain. Make two flat ears and sew them with several passes. Add a small crocheted cream ball at the opposite end rather than a loose yarn pom-pom.
- Inner cushion: sew a closely woven fabric tube slightly smaller than the crochet shell, with double-stitched seams. Fill evenly with polyester fiberfill and sew the liner completely closed. Keep all filling inside this liner; never pour loose filling directly into the crochet. Do not overstuff into a rigid log.
- Finish: insert the liner and make a second matching end cap, or attach the decorated animal head. Sew around the full edge with small mattress stitches, weave ends back through several stitches, and test the cushion along the closed door. Leave the underside smooth and keep the bolster out of the walking route.
Assembly: Attach the bunny head centrally and sew both floppy ears with broad, reinforced bases. Embroider the facial details, stitch the compact cream tail firmly at the far end and keep the ears away from the floor-contact seam.
Berry Blossom Door Cushion
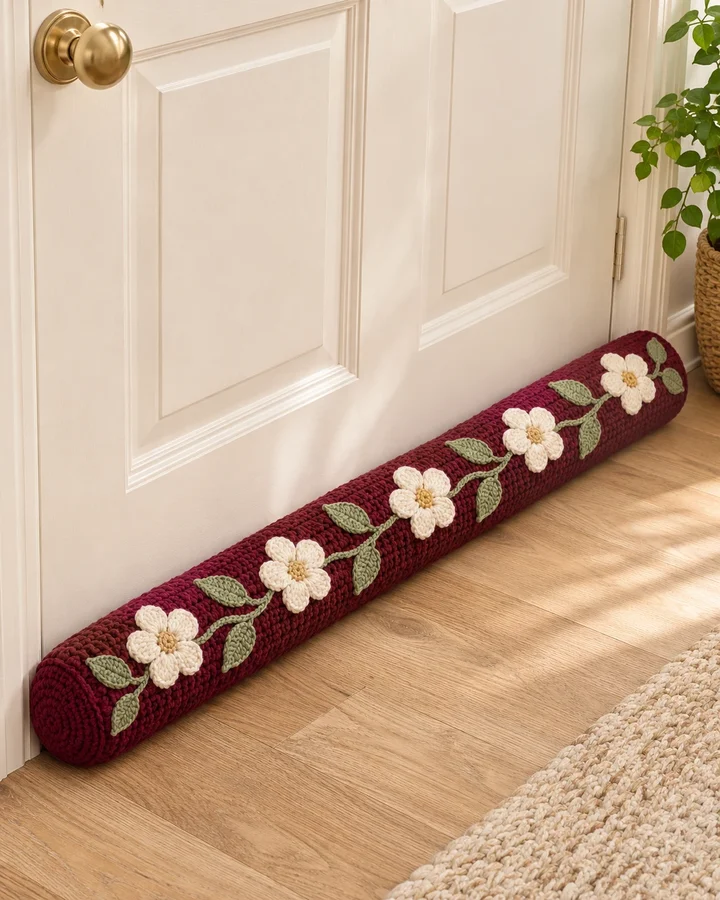
Cream blossoms and a trailing sage vine contrast beautifully with the deep berry body of this cushion. The flowers are kept flat and firmly attached, giving the door bolster a romantic handmade finish without compromising its simple elongated construction.
- LEVEL
- Confident beginner
- TRY IT WITH
- Worsted cotton or washable cotton blend in burgundy, cream, mustard and sage, approx. 450-650 yd total; 4 mm hook; stitch marker; tapestry needle; closely woven fabric for a separate liner; polyester fiberfill.
- FINISHING NOTE
- Approx. 80-90 cm long and 9-10 cm diameter; measure the opening and adjust the body length.
Short Pattern
Abbreviations: US terms: ch chain · sc single crochet · hdc half double crochet · dc double crochet · sl st slip stitch · MR magic ring · inc 2 stitches in one stitch.
- Measure: check the usable width of the closed door or window and the height of its gap. Aim for a bolster that covers the seam without wedging into the hinges. Swatch 10 cm in sc; use a hook that gives dense but flexible fabric.
- Base cap: MR 6 sc. Rounds 2-8: add 6 evenly spaced increases per round, reaching 48 sc. This gives roughly 9-10 cm diameter at about 15-16 sc per 10 cm; adjust the final round to match your gauge. Mark the beginning of each round.
- Body: work 48 sc in continuous rounds without increases until the tube is the measured length, allowing space for the end details. For a flat-panel variation, follow the design notes below instead. Check the tube against the actual opening before finishing.
- Make five cream flowers with mustard centers: MR 10 sc, then form five petals as (sl st, ch 3, 2 dc, ch 3, sl st) over pairs of center stitches.
- Surface-slip-stitch a sage vine along the body. Make ten small ch-7 leaves and sew them along the stem. Attach each flower through its center and around every petal edge, leaving the underside undecorated.
- Inner cushion: sew a closely woven fabric tube slightly smaller than the crochet shell, with double-stitched seams. Fill evenly with polyester fiberfill and sew the liner completely closed. Keep all filling inside this liner; never pour loose filling directly into the crochet. Do not overstuff into a rigid log.
- Finish: insert the liner and make a second matching end cap, or attach the decorated animal head. Sew around the full edge with small mattress stitches, weave ends back through several stitches, and test the cushion along the closed door. Leave the underside smooth and keep the bolster out of the walking route.
Assembly: Follow the sage vine with the cream blossoms, spacing their centers evenly. Sew around every petal and leaf, hide the yarn tails inside the burgundy shell and turn the long seam underneath before closing the end cap.
Coastal Wave Draft Stopper
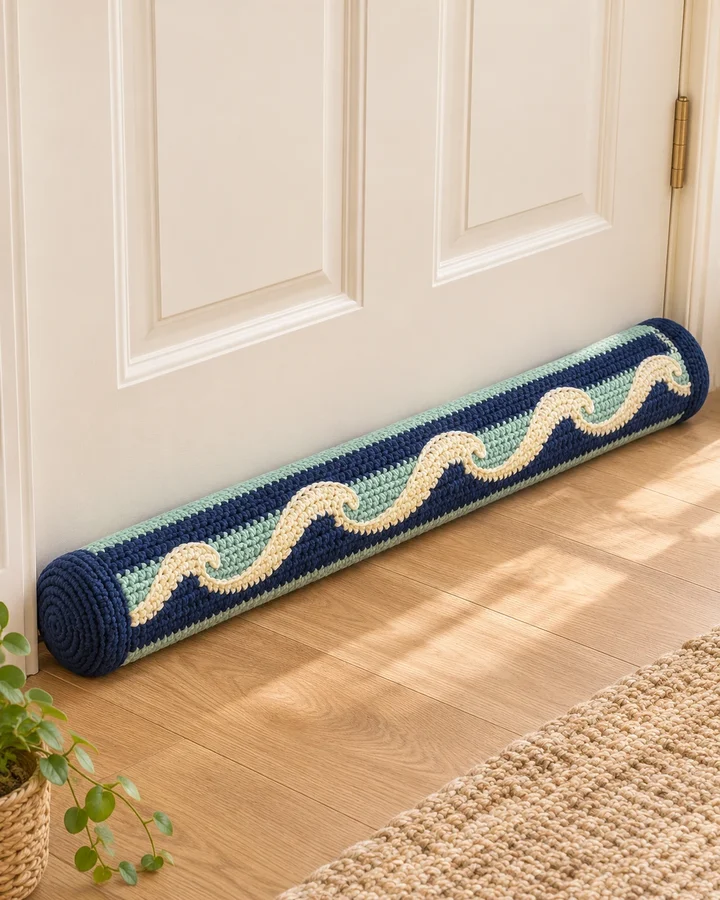
Navy and seafoam stripes bring a coastal look to this practical draft cushion. A cream wave band adds movement along the front, while solid navy ends and dense crochet fabric keep the overall construction clean, durable and straightforward to customize.
- LEVEL
- Confident beginner
- TRY IT WITH
- Worsted cotton or washable cotton blend in navy, seafoam and cream, approx. 450-650 yd total; 4 mm hook; stitch marker; tapestry needle; closely woven fabric for a separate liner; polyester fiberfill.
- FINISHING NOTE
- Approx. 80-90 cm long and 9-10 cm diameter; measure the opening and adjust the body length.
Short Pattern
Abbreviations: US terms: ch chain · sc single crochet · hdc half double crochet · dc double crochet · sl st slip stitch · MR magic ring · inc 2 stitches in one stitch.
- Measure: check the usable width of the closed door or window and the height of its gap. Aim for a bolster that covers the seam without wedging into the hinges. Swatch 10 cm in sc; use a hook that gives dense but flexible fabric.
- Base cap: MR 6 sc. Rounds 2-8: add 6 evenly spaced increases per round, reaching 48 sc. This gives roughly 9-10 cm diameter at about 15-16 sc per 10 cm; adjust the final round to match your gauge. Mark the beginning of each round.
- Body: work 48 sc in continuous rounds without increases until the tube is the measured length, allowing space for the end details. For a flat-panel variation, follow the design notes below instead. Check the tube against the actual opening before finishing.
- For lengthwise stripes, make a flat sc rectangle about 80 by 31 cm, changing between navy and seafoam every 4 rows. Keep the long starting chain loose and measure after several rows.
- Make a cream wave cord with a long chain and sc edging. Arrange it in repeating curves over the rectangle and stitch both cord edges down frequently. Join the long edges underneath, then add navy caps.
- Inner cushion: sew a closely woven fabric tube slightly smaller than the crochet shell, with double-stitched seams. Fill evenly with polyester fiberfill and sew the liner completely closed. Keep all filling inside this liner; never pour loose filling directly into the crochet. Do not overstuff into a rigid log.
- Finish: insert the liner and make a second matching end cap, or attach the decorated animal head. Sew around the full edge with small mattress stitches, weave ends back through several stitches, and test the cushion along the closed door. Leave the underside smooth and keep the bolster out of the walking route.
Assembly: Match the navy and seafoam stripes along the underside seam. Stitch both edges of the cream wave cord down at short intervals, secure each curve and attach the navy caps with the wave centered on the front.
Make thoughtfully and check as you go.
Yarn, hook size and personal tension can change the finished scale. Count every round, stuff gradually and use embroidered features instead of safety eyes when making toys for children under three.